Invoicing
In Membri 365, during the various operations, invoices are automatically generated by the system.
However, several processes still require your intervention.
- Read an invoice
- Create an invoice
- Find an invoice
- Pay an invoice
- Resend an invoice
- Cancel an invoice
- Create a credit note
- Issue a refund
- View an account's invoice credit balance
Read an invoice
An invoice can have several statuses. It is possible to consult the status of an invoice in its header
| Statutes | Definitions |
|---|---|
| New | The invoice is newly created in the system, but it is not yet invoiced. |
| Waiting for payment | An invoice that has been created and sent, but the account has not yet paid. These invoices are also called open invoices. |
| Paid | A payment has been applied to the invoice and the balance is $0. |
| Done | The invoice is paid and transferred to the accounting system. |
The box Invoice information contains all the general information related to the invoice itself.
| Fields | Description |
|---|---|
| Ref. invoice | The default reference number is 001000, with each new invoice, this number increases by 1. Therefore, the higher the number, the more recent the invoice. The reverse is also true. |
| Sync Reference | Invoice number in accounting system |
| Name | This is the name of the invoice. |
| Invoice Type | Invoices can be of several types: renewal, membership, manual, registration, etc. |
| Currency | The system default is Canadian dollars |
| Taxless | This option allows you to not apply tax on an invoice. It is not possible, for the moment, to activate this option only for certain lines of your invoice. You cannot therefore combine non-taxable products and taxable products. |
| Block Invoice Email | Enable this field to prevent Membri 365 from emailing the invoice. |
| Last Email Sent On | This is the date of the last invoice email sent. |
| Description | It is possible to add a personalized message on the invoice that you send by email. |
The box Billing information contains all the information related to the billing of an account
| Fields | Description |
|---|---|
| Account | This search field allows you to select an account that is part of your database. Use the partial search using the asterisk to be effective. Most of the fields in this box are pre-filled when you select the account since the account file contains all the information that allows us to bill it. |
| Override Billing Email | This field allows you to indicate an e-mail address different from the one displayed in the account file. |
| Email Address | This field is pre-filled in several cases. If it is not, the invoice will be sent to the email that is registered in the account card. |
The fields in this box are pre-filled in connection with the billed account sheet. The changes you make directly on the invoice will not have any impact on the information found in the account file.
The Invoice Products box contains all the products that have been invoiced. It is possible to select them to know the general information.
Consult the Products page for more information on this subject.
Create an invoice
To create a manual invoice, follow these steps:
- Navigate to the
Invoicespage in the main menu (1) - Select
+Newin the toolbar to create a new invoice (2) - Enter the general information of the invoice which are also mandatory fields (if in doubt, the fields of an invoice are all described in the previous section) ( 3)
- Select
Savefrom the toolbar to create the invoice in the system (4) - Select
+ New invoice productin the box Invoice products (5) - Fill out the Quick creation: Invoice product form by selecting an existing product or by creating a new product. (6)
- Select an existing product
- Use the magnifying glass of the search field to have access to all the products in your product list
- Select the product
- Determine the quantity purchased and the unit price (if the latter is not already configured)
- Select
Save and closeto return to the invoice
- Create a new product
- Name your product and indicate the price
- Determine the quantity purchased
- Enter the G/L number or the product number (it depends on your accounting system) in which the amount of this line of your invoice will be entered
- Select
Save and closeto return to the invoice
- Select an existing product
- Add other products to the invoice by repeating steps 5 and 6 as needed
Remember that it is not yet possible to create an invoice that combines taxable and non-taxable products.
- Select the
Invoiceoption in the toolbar to send the invoice by email (7)
Find an invoice
There are several ways to quickly find an invoice that was created in Membri 365:
1. In an account file
To quickly view open invoices:
- Access the file of an account that you have billed
- Select the
Billingtab - Consult the open invoices of the account
To view all invoices related to this account:
- Select
Associationin the header - Select
Invoicesin the list of associated elements - Navigate in the different system views, use the quick search or impose filters on columns to find the invoice that interests you
2. In invoice lists
Navigate to the
Invoicespage in the main menu to have a list of all invoices that have been created in the systemNavigate in the different system views, use the quick search or impose filters on columns to find the invoice that interests you
From here you can search either by invoice name, invoice reference number (Membri 365 number or your accounting system number) or charged account.
You can do a partial search using the asterisk (*). For example, if you enter: *4900, all results with these numbers will appear.
Pay an invoice
Make a regular payment
- Select the invoice on which to apply a payment
- Select the
Paymenttab
If you have a customer's credit card information, you can pay directly on the online payment platform instead. Simply select Pay Online from the toolbar. Then complete the payment steps on the platform.
- Select
+ New Payment - Enter the information related to the payment in the form Quick creation: Payment
Depending on the payment method, the Details field may be mandatory. For example, a confirmation number is entered therein in the case of a payment by credit card or the check number when the payment is made by check.
- Select
Save and closeto return to the invoice Refreshto apply the payment to the invoice and to see the new balance displayed
Apply available invoice credits
To find out if the account has invoice credits available, you must consult the account file.
- Select the invoice on which to apply a credit
- Select the
Paymenttab - Indicate Yes in the field Apply available invoice credits
- If necessary, determine the maximum amount of invoice credits that can be used to pay the balance of this invoice
Apply available contribution credits
This module is not yet available. It will be in the next versions of Membri 365. You can activate it from the parameters of your environment.
Some bills can be paid by applying contribution credits. These credits can result from canceling an event attendance or be part of membership option package benefits.
- Select the invoice on which to apply a credit
- Select the
Paymenttab - Indicate Yes in the field Apply available contribution credits
- If necessary, determine the maximum amount of contribution credits that can be used to pay the balance of this invoice
Resend an invoice
1. Directly through Membri 365
- Find the invoice to re-send to the customer and select it
- Select the
Resend Emailoption from the toolbar
This action updates the Last email sent on field in the Invoice information box which is located in the Summary tab of the invoice.
2. By another means by downloading the invoice
- Find the invoice to be sent to the customer again and select it
- Select the
Download invoiceoption in the toolbar to download the file in PDF format - Use the messaging system of your choice to communicate with the customer and attach the invoice
You could also make a physical copy of the invoice and send it by mail.
This action does not update the Last email sent on field in the Invoice information box which is located in the Summary tab of the invoice.
Send account statements
It is possible to send account statements from your Membri 365 environment.
Manually
If an account has several invoices awaiting payment and you wish to send it an account statement, it is possible to do so manually.
- Navigate to the concerned account's file
- Select
Flowfrom the toolbar - Select the stream Send a Statement of Account
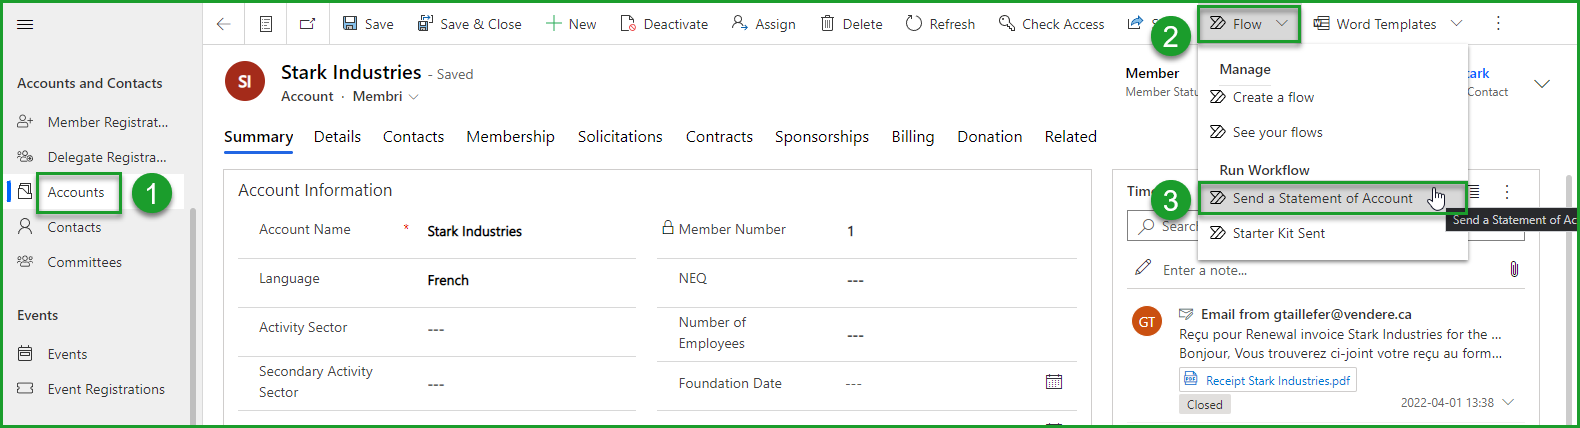
The account statement will be sent to the account and added to its timeline provided an account statement email template is selected in your environment settings.
Automatically
It is possible to activate the automatic sending of account statements for all accounts in your environment that have open invoices generated for more than 30 days.
Statements are sent every 30 days.
This option is not enabled by default in Membri 365. Contact our support team to activate it or activate it yourself from the Settings section of the Configuration menu.
Upon activation, account statements are automatically sent to each account that has an open invoice on its file (provided it has been created more than 30 days ago). It is therefore necessary to closely monitor invoices pending payment to avoid unpleasant surprises. You could, for example, have forgotten to apply a payment on an invoice and cause unnecessary confusion by sending an account statement for an already paid invoice.
Cancel an invoice
It is only possible to cancel an invoice that is not yet paid or partially paid.
- Find the invoice awaiting payment to be canceled
- Select the
Cancel Invoiceoption from the toolbar - Confirm invoice cancellation
It is possible to cancel an event registration at various percentages to make a partial refund.
Create a credit note
It is possible to create a credit note using the invoicing module.
- Select the
Invoicespage in the Billing section of the main menu - Select
+ Newto create a new invoice in your Membri 365 environment - Select the account for which you need to create a credit note and enter the various information required for invoicing in the boxes of the Summary tab (for more information on the various fields of this tab, refer to the section Read an invoice)
- Select
Savein the toolbar to create the note in the environment and have access to the Invoice Details module - Select the three superimposed dots in the upper right corner of the Invoice Details box and select
+ New Invoice Product - Complete the various mandatory and optional fields of the quick form for creating products
Positive amounts represent amounts that are owed to your organization. Negative amounts therefore correspond to cash outflows that you must repay to the account in question. The amount of the credit note must therefore be negative.
You should also know that negative amounts are always displayed in parentheses.
- Select
Save and Closeat the bottom of the Quick Form to create it.
You may want to set the Block Invoice Email field to Yes to avoid sending this note by email.
- Select
Billin the toolbar to create the note and add it to the account's file.
Invoices pending payment (status that your credit note will have until the full payment of the balance) are always displayed in the Billing tab of an account's file.
It is possible to note each of the transactions to the balance of the credit note by applying negative payments on the (negative) balance of the credit note to each transaction.
It is not enough to enter a refund in Membri 365 for it to be made. Indeed, the CRM allows you to track this information, but does not transfer funds.
Issue a refund
If the status of the invoice is Awaiting payment, all you have to do is cancel the invoice for it to be deleted from the environment.
When the invoice is paid, it is possible to make a refund.
This procedure does not work for membership invoices or for paid renewal invoices. However, it works for all other paid invoices in your environment.
- Select the invoice to be reimbursed
- Select
Cancel Invoicefrom the toolbar
The invoice will not be cancelled. When the invoice is paid, this button creates a reimbursement invoice in your environment which will be linked to the paid invoice that you wish to reimburse. This refund invoice has a negative balance. This tells you that you need to issue a refund.
You could also decide not to reimburse the account. In this case, the negative balance of this invoice is added to the account invoice credits. It is possible to use these credits to fully or partially pay the next invoices of this account.
- Reimburse the member in the way that suits you the most (cheque, bank transfer, etc.)
You will soon be able to refund invoices paid online directly. This feature will be available in a future version of our application.
You must then indicate that you have made the reimbursement on the reimbursement invoice by applying a negative payment to this invoice.
- Select the reimbursement invoice
- Select the Payment tab
- Select
+ New Payment
The Dynamics way of displaying negative numbers is to put them in parentheses. If you write a negative number in the Amount field, it will automatically be displayed that way.
- Select the method of payment by which you reimbursed this invoice and enter the details of the transaction if necessary.
The system does no funds transfer when the refund is entered. You will have to make this transfer by the means of your choice.
- Select
Save and closeto apply the payment. - Select
Savefrom the toolbar and return to the summary tab to see the new $0 balance and the new Paid status of the invoice.
View an account's invoice credit balance
It is possible to apply these credits to an invoice to pay it.
- Select an account file
- Select the
Billingtab - Consult the Total available credits field in the Billing information box.
To recalculate the total amount of available credits, simply select the calculator to the left of the field and select Recalculate.
Frequently Asked Questions
- Section under development
Still unsure? Contact us - support@vendere.ca