Events
The Events section of the menu allows you to create events, prepare for them and review past events. In this section we will cover these three moments separately. This way you will have a better understanding of the different functionalities offered by Membri.
- Create an event
- Export a list of participants or responses
- Indicate the presence of participants manually
Create an event
The process of creating an event allows you to craft many types of events that are tailor-made for you, but most importantly, for your members.
This process will guide you through the following steps:
Copy an event
Are you planning the next edition of an event you have created before?
If the answer to this question is no, continue to the first step of this process.
If the answer to this question is yes, be aware that it is possible to copy all the details of an existing event. You can of course make the necessary changes (dates, price increases, changes in description, etc.). The copied event will have all the configurations of the original event. Of course, the new event will not have the history and registrations of the old one.
1- To copy an event, start by selecting the existing event to copy by checking it (1).
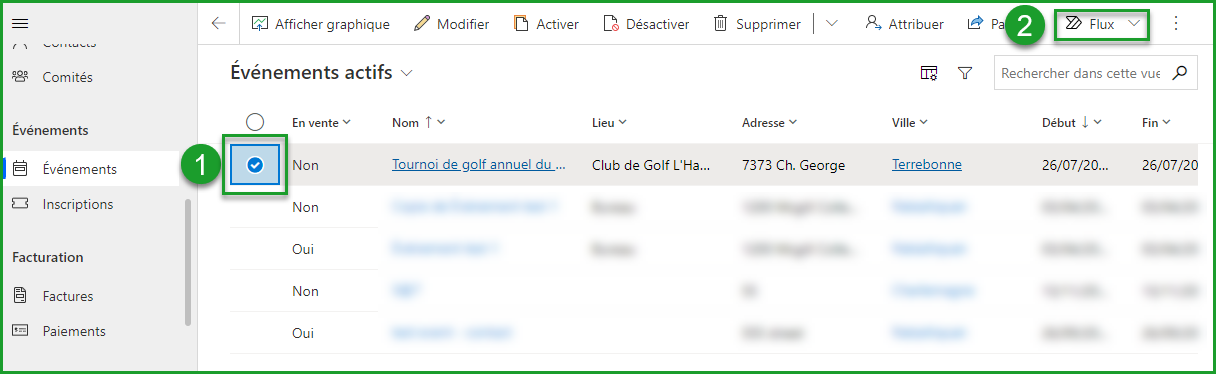
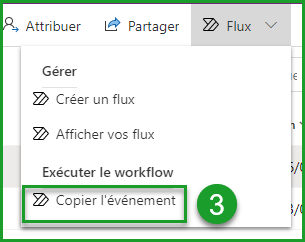
2- Then select Flow in the toolbar (2) and use the flow Copy event (3).
1. Describe the event
Opening of the form New Event
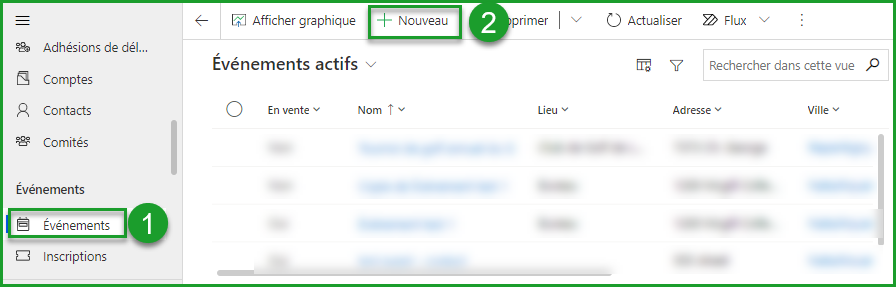
To open the event creation form, first go to the Events section of the menu (1) and click + New in your toolbar(2).
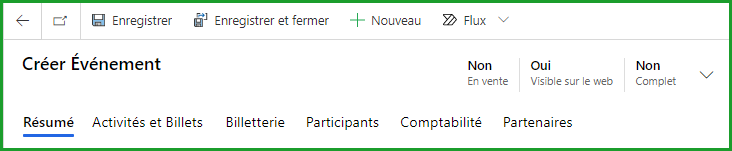
You should see a new section open with the title Create Event. Under this title, you will see six tabs: Summary, Activities and Tickets, Tickets, Participants, Accounting and Partners.
Our approach
Under each of the tabs, you will find boxes in which there are fields that allow you to personalize your event. In the next sections, we will try to define as precisely as possible the functioning of each of the fields and the impacts of each on the development of the event.
To make the experience more concrete, we have decided to show you these impacts throughout the process through the construction of a tournament / round of golf type event.
The Summary tab
This first tab allows you to enter the outline of your event.

Each of the boxes allows you to define a different aspect of your event. The fields found there will be described in the following lines. These descriptions are accompanied by examples.
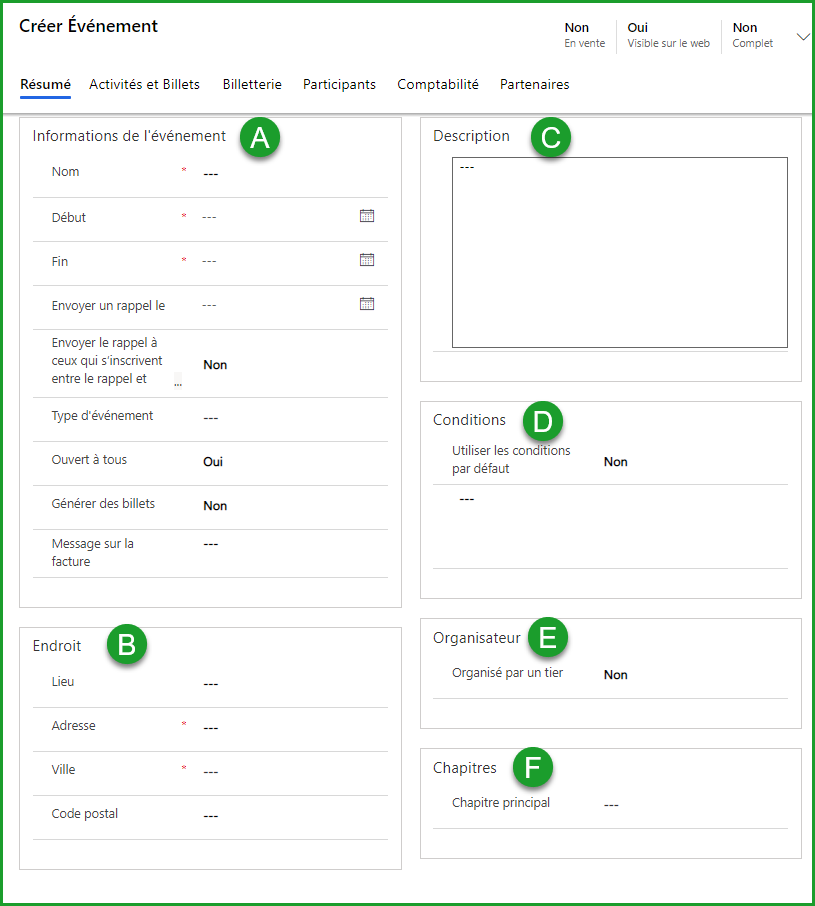
A. Event Informations
| Options | Description | Example |
|---|---|---|
| Name | The name of your event | Groupe Vendere 20XX Annual Golf Tournament |
| Start | When will the event start? | The tournament starts at 8 am on a Saturday July 26th |
| End | When will the event end? | The tournament ends after dinner the same day around 8 p.m. |
| Send a reminder on | The date the system will send an automatic reminder email to ticket holders. If you decide to send a reminder, the reminder text field will be displayed and you will be able to compose the reminder text. You should have configured a basic model with our team during the implementation phase. | The reminder will be sent to ticket holders 3 days prior to the event date (July 23). The time is not necessarily important, but we prefer that the reminder be sent near lunchtime (11am) to encourage discussion around the upcoming weekend event. |
| Send reminder to those who sign up between reminder and event | It is possible to send a reminder to people who register between the date of the reminder and the date of the event. For example, this email might contain essential information such as a link for your web conference. | As we have decided to send a reminder only 3 days before the date of the event, we have chosen to leave this field at No. |
| Reminder text | In this field you can indicate anything your event attendees need to know before your event. This is a great place to insert the link to your online event, for example. | |
| Type of event | Determine the type of event you are building. It is not mandatory, but it will be displayed on your site. For example you might want to offer a series of trainings. | For the tournament, we will not specify an event type as it is a single sporting event. |
| Open to all | Determines if the event is for members only or if it is open to the general population. | We want everyone to be able to register for the tournament, but we will impose certain limits as to buying tickets a little further in the process. |
| Generate tickets | Determines whether you will need the module to generate and send tickets (QR codes) from the box office or not. | For the tournament, we want to send tickets to participants. We will therefore activate this option. |
| Message on the invoice | The message you want to display on each of the invoices generated during the sale of your tickets | We would like to warmly thank the people who will purchase the tickets. We will therefore write a short message so that the invoice is more personalized. In addition, we will register that there is no refund possible. |
B. Place
| Options | Description | Example |
|---|---|---|
| The place, the address, the city and the postal code | Enter the address of the place where the event will be held | Club de Golf L'Hallucination, 7373 Ch. George, Terrebonne, ... |
C. Description
Enter a description to accompany the event. This will also be found on your website.
D. Conditions
| Options | Description | Exemple |
|---|---|---|
| Use default conditions | You might have configured a set of conditions that you want to apply to all of your events. You can choose to apply them for this event or not to apply them. (We are talking about cancellation policy, refund, etc.) | We want to apply our default terms for the golf tournament. We will therefore indicate Yes in this field. |
| The empty field | If you have any special conditions that you want to apply only to this event, you can enter them here and they will appear on your invoices. | NA |
E. Organizer
| Options | Description | Example |
|---|---|---|
| Organized by a third party | Is the event organized by you directly or are you dealing with a company or an individual for the organization? | We have chosen to organize our own golf tournament. So we will leave this field at No. |
| Organized by | If you answered Yes to the previous field, enter here the entity that organizes this event for you. | NA |
F. Chapters
This box indicates that the event being created is that of a sub-organization associated with yours.
Save progress
Proceed to the saving and creating your event, by selecting the Save icon in your toolbar.
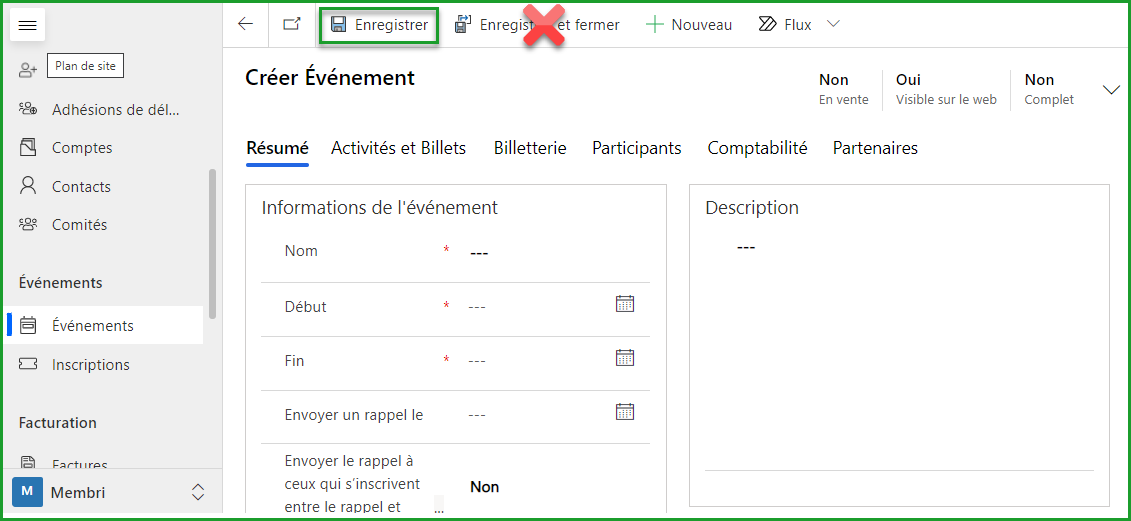
The Save and Close option is not optimal here as it will bring you back to the main menu in the Events section. Of course, if you ever select this option by mistake, you can still access the event you are working on by selecting it from the menu list.
Be at ease
You are not listing the event for sale by saving it. You only save your progress in the system and this will allow you to access certain fields under the next tabs.
2. Create activities and ticket types
As the general information is well defined and your event is registered in the system, you can now create the different activities that will take place during your event as well as the types of tickets that will be available on the online ticketing.
Select the Activities and Tickets tab

Here are the different boxes that you will find under this tab:
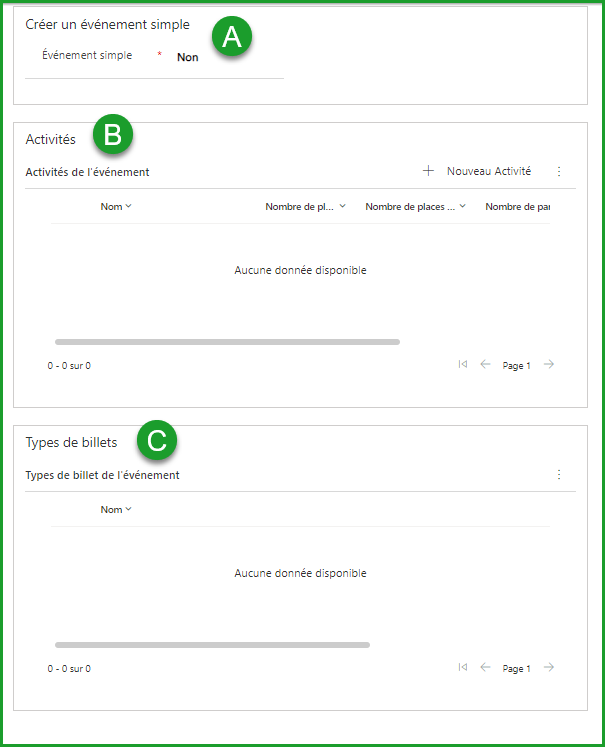
A. Create a simple event
To know if you want to create a simple event, you first need to understand what is considered simple. In this specific case, Membri considers that an event is simple when only one activity takes place and there is only one type of ticket giving access to it.
This feature is a shortcut available to you. In previous versions of Membri, users had to complete all the forms for each event they wanted to create, regardless of their complexity.
Quick reminder
Your event has only one activity: select Yes
Your event has more than one activity: select No
If you select No, go straight to section B. Activities
If you select Yes, several fields will appear and you will be able to create your whole simple event from this simplified form.
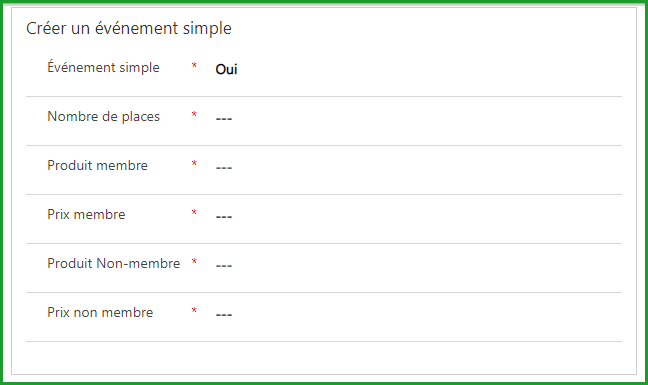
| Options | Description |
|---|---|
| Number of places | Determine how many seats are available at your single event. |
| Member product | Here you can select the member product that you have previously configured. A product is a term that refers to your accounting system. You could always create a new product by selecting the option at the bottom of the drop-down menu. |
| Member price | Determine the price of your member ticket. |
| Non-member product | Here you can select the non-member product that you configured beforehand. A product is a term that refers to your accounting system. You could always create a new product by selecting the option at the bottom of the drop-down menu. |
| Non-member price | Determine the price of your non-member ticket. Member and non-member ticket prices may be the same. However, this will allow you to have data on the participants at the end of the event. |
B. Create activities
Define the activities that will make up your tickets. To create a new activity, select + New Activity at the top of the Activities box.
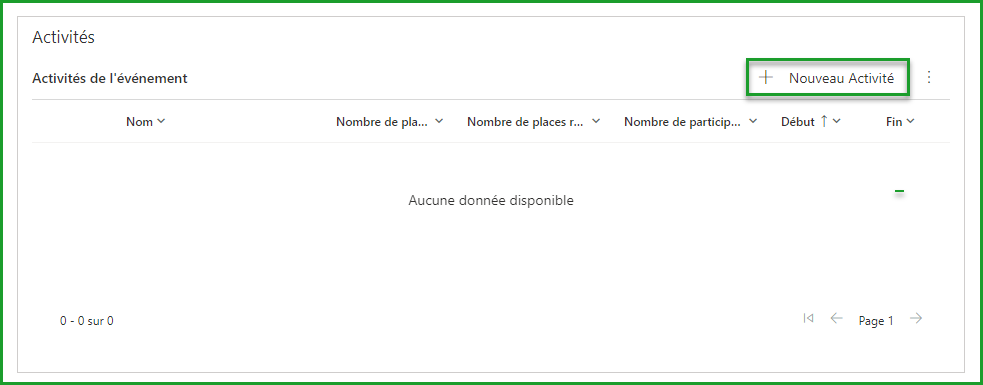
It is important to understand this process because it is the basis of ticket creation. A ticket gives access to one or more activities.
For example, a congress that takes place over two days will include several activities (conferences, training, workshops, courses, banquet, etc.). Having multiple activities for an event allows you to make tickets that combine some of your activities.
To take the context of a congress, you could have a first ticket that includes all the activities of the first day, a second that includes all the activities of the second day and a third that gives access to all the activities of the two days.
You should see the New Activity form displayed.
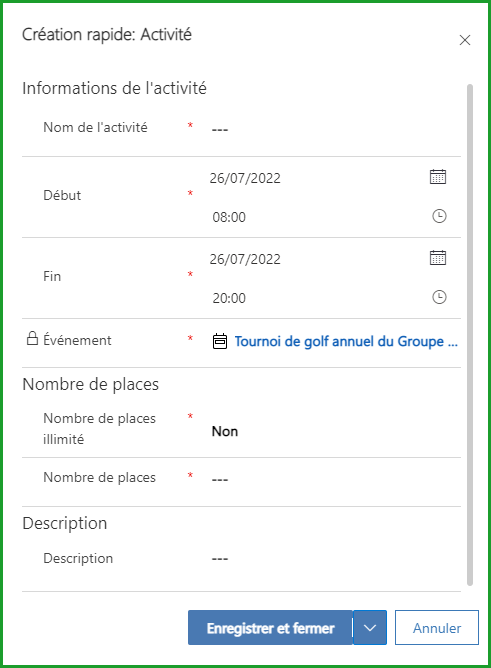
Complete the mandatory fields of the form (1)
- Give a name to your activity
- Establish a time slot for it
- Then determine if your activity has a limited number of places and indicate this number if it is the case.
- The Description field is there to give more information about the activity to people who would like to register. We can for example think of the content of a conference / training.
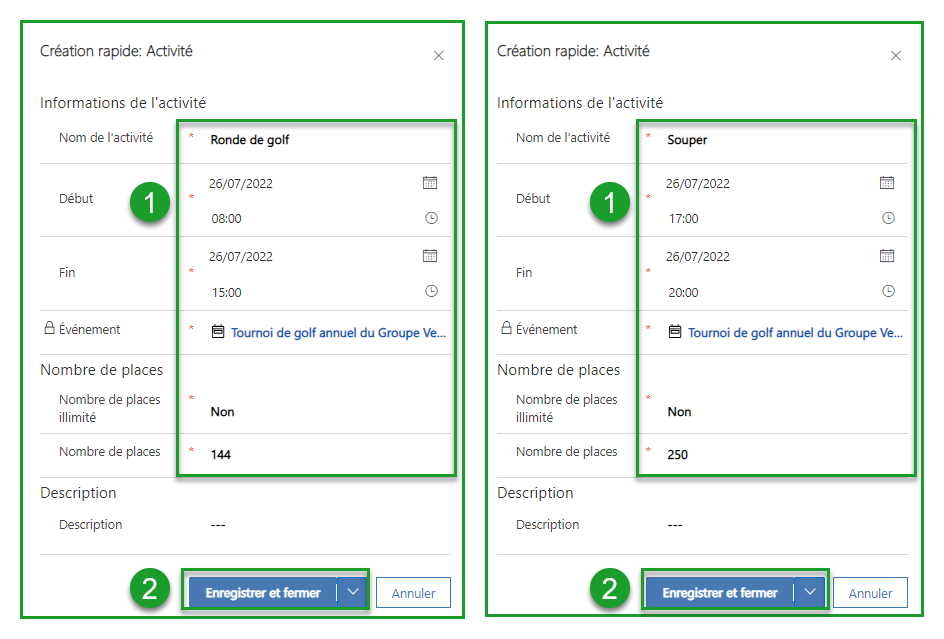
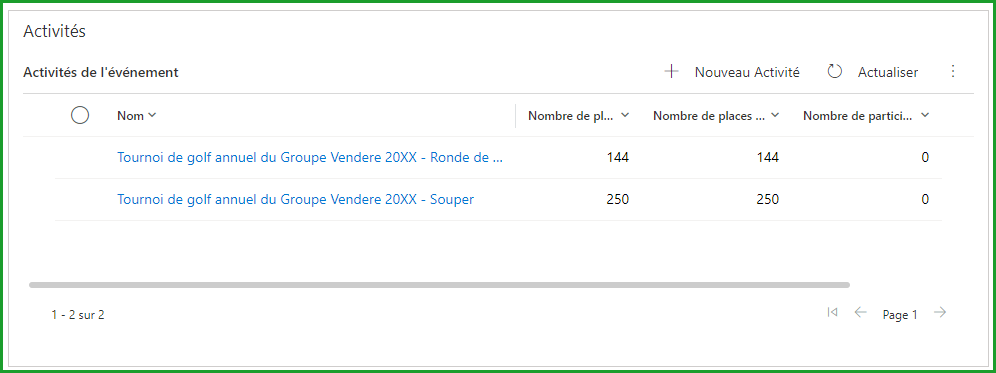
Now save (2) your activity and repeat the process until all the activities for your event are created.
For our golf day, we have defined two distinct activities: round of golf and dinner.
Creating questions associated with an activity
Once you have saved an activity, you can return to it to create questions that will appear on the registration form for that activity.
For example, we want to know what the participants in the Supper activity want to eat. So we're going to create a question and give them choices. Follow this procedure for each of the questions you want to create:
- Select the activity to be accompanied by a question
- Select the Questions tab
- Select + New Activity question at the top of the box Questions
- Select an existing question in your system or create the question you want to ask.
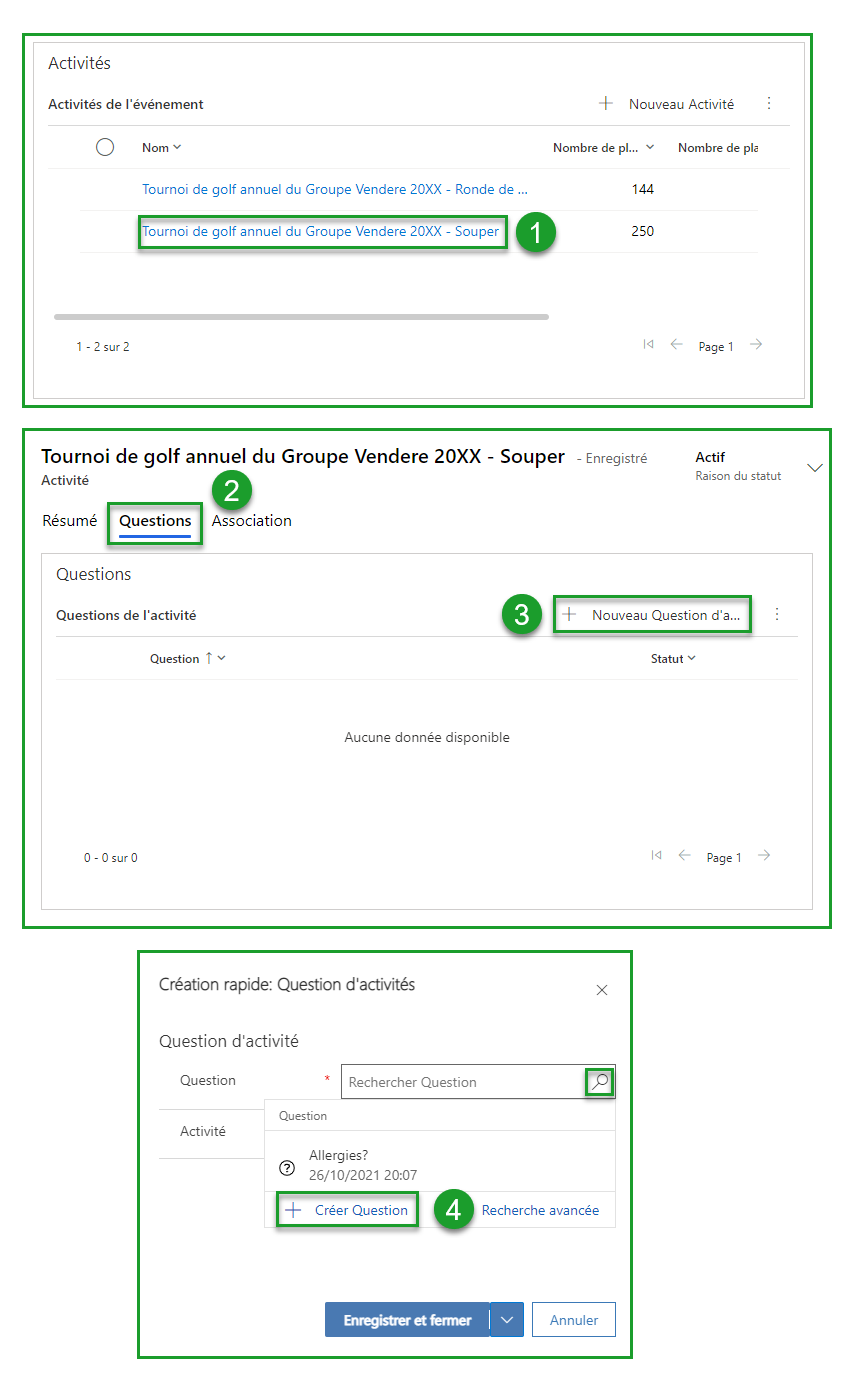
To create a new question, press the magnifying glass icon in the Question field and select the + Create Question option. A new form named New Question should appear with three required fields: Question, Type and Answer required
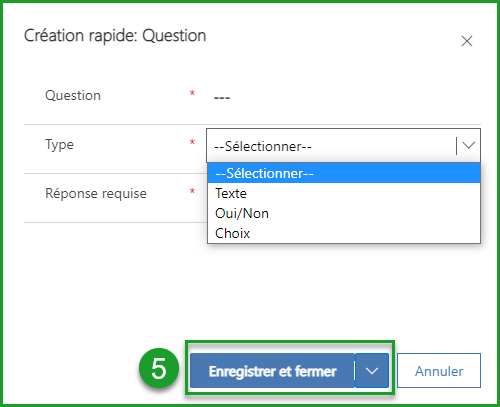
Compose the text of the question in the first field and choose the type of answer you want to receive in the second.
Here is a table showing you the different types of responses you may choose to receive:
| Types | Description |
|---|---|
| Text | It is the freest field. People who register will be able to answer whatever they want in this field. |
| Yes / No | This is the most restrictive choice. You must ask a closed question (answer by yes or no). |
| Choice | Indicates that you want to design a multiple choice question. This option is a compromise between the first two types. If you choose this type of question, you will need to create your answer choices after saving your question. |
You will need to determine whether the answer to this question is required or not. If the response is required, the person attempting to register for this activity will be required to provide a response before proceeding to payment.
- Save your progress
To save your progress simply select Save and Close at the bottom of the forms
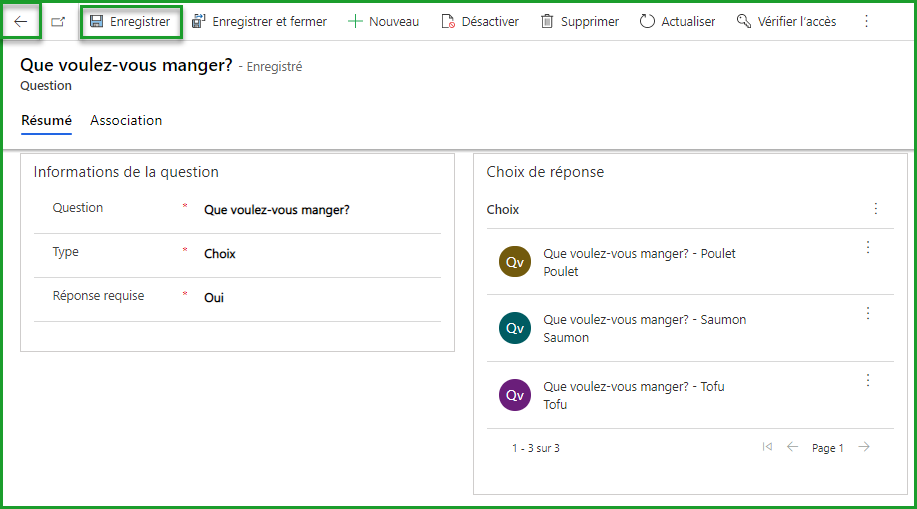
- Specify multiple choices
If you have indicated that one of your questions is a multiple choice question, you will want to define those choices.
To specify the possible answers to a multiple choice question, select the question in the box (A). Then select the option + New Choice (B) in the box Choice of answer. If you don't see this option, select the three overlapping dots and you will have access to it. Make one of the choices (C) and save (D).

Repeat this manipulation until all your choices are created. Save and return to the Activities and Tickets tab of your event creation using the Back arrow.
Likewise, create all the activities that make up your event.
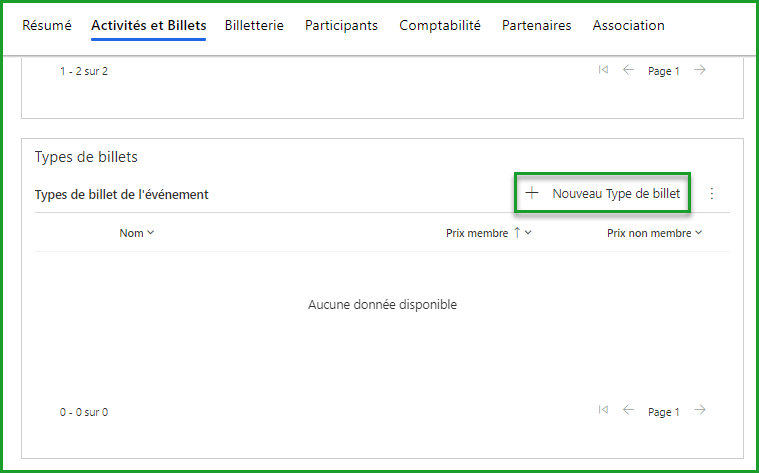
C. Creating ticket types
Now that you have defined the activities that make up your event, you can think about how you want to arrange them on your tickets.
For our golf day, we anticipate that some of our members will not want to take part in the game of golf, but instead will want to enjoy a good meal. This is why we are going to create two distinct types of tickets:
Full day (includes golf for four people and dinner for four people)
Dinner only (included only the activity Dinner for one person)
To get started with creating a ticket, select + New Ticket type in the box Ticket types
General tab
You will find yourself in a new form called Create Ticket Type . This form has tabs which have boxes. You must complete the mandatory fields under each tab for your ticket to be created.
Here is the general tab and the different boxes that you will find there.
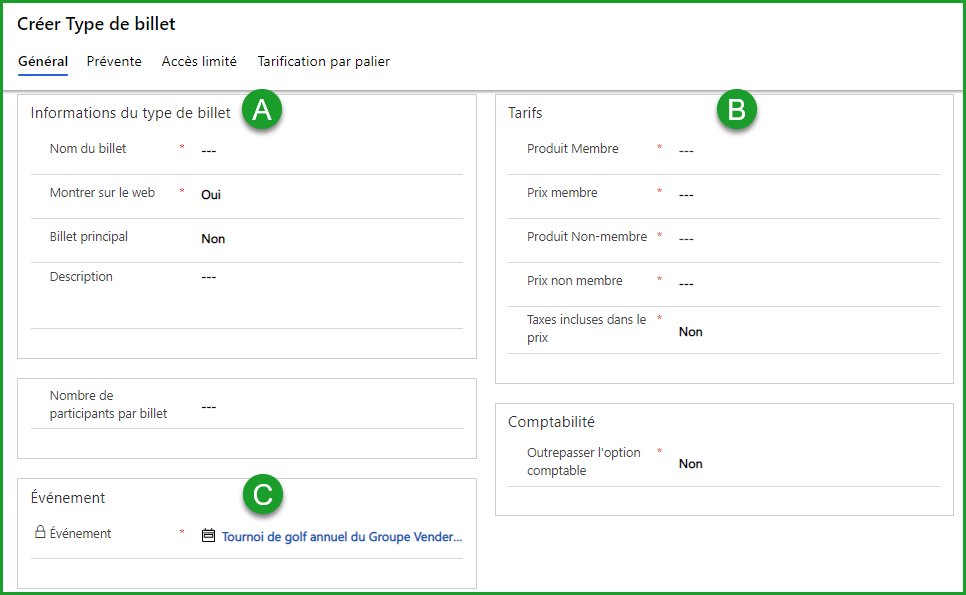
A. Ticket type information
| Options | Description | Example |
|---|---|---|
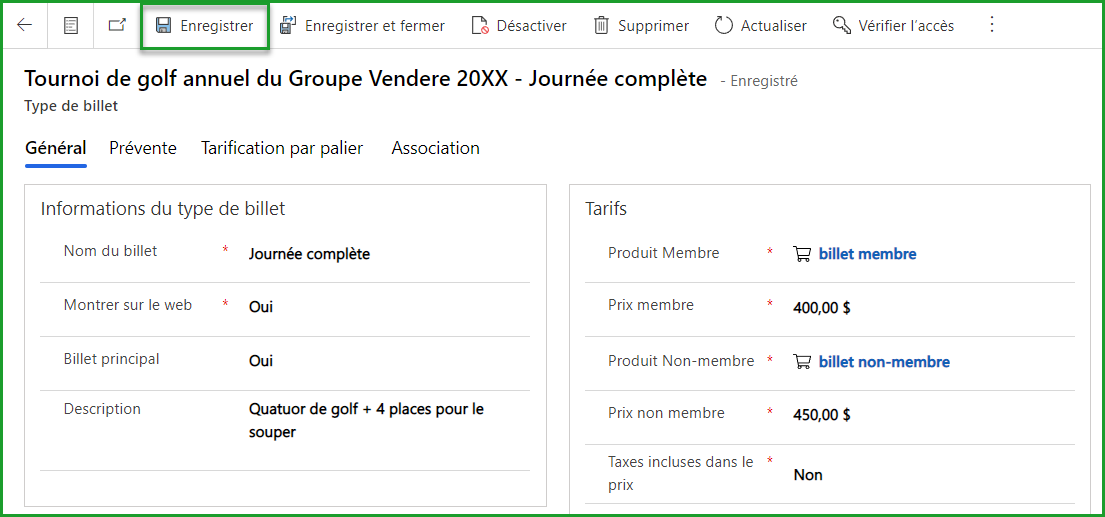
| Ticket name | This is the name of your ticket | Full day and Dinner will be the names of the tickets. |
| Show on the web | This option allows you to display this post in the list of choices on your website. The option to hide a ticket type may be relevant when you do not want attendees to be able to select a ticket type (eg: free ticket for your main partners). | We want to display both types of tickets on our website. |
| Main ticket | This is the type of ticket that will appear first in the choices on the web. | The Full Day Ticket will be our main ticket. |
| Description | This option allows you to add a description of the activities included in the post. | The main ticket includes the registration of a golf quartet and four seats at dinner. The Dinner ticket includes a place for dinner. |
| Order | Sets the order in which tickets are displayed on the website. | Tickets are displayed in chronological order. |
| Number of participants per ticket | Determine the number of participants on each ticket. | Our main ticket includes the registration of a golf quartet. So there will be four participants on this type of ticket. |
Multi-participant tickets
If, like us, you would like to make a ticket that has several participants, you must understand that this ticket will take, for each of the activities included in the ticket, as many places as there are participants.
So our ticket, which has 4 participants, will take 4 places for the dinner activity and 4 places for the golf activity.
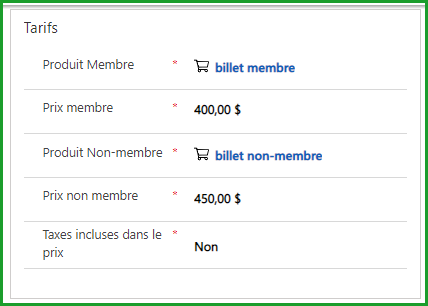
B. Prices
| Options | Description |
|---|---|
| Member product | Enter here your code for your accounting system which indicates that the transaction is that of a member product. |
| Member price | Indicate the price your members will pay for this type of ticket |
| Non-member product | Enter here your code for your accounting system which indicates that the transaction is for a non-member product. |
| Non-member price | Indicate the price that non-member participants will pay for this type of ticket. |
| Taxes included in the price | Determine here whether taxes are included in the quoted price or whether they will be applied when generating the invoice. |
Save your progress
Save your progress to create the ticket in the system and to be able to access the addition of activities.
C. Event
Once the first boxes have been completed and saved, this box should change. Indeed, you will see that it is now possible to add activities to your ticket.
To do this, select Add an existing activity from the three superimposed dots (1). Then search for the activities you want to add to the ticket among those you created in connection with your event. (2-3)
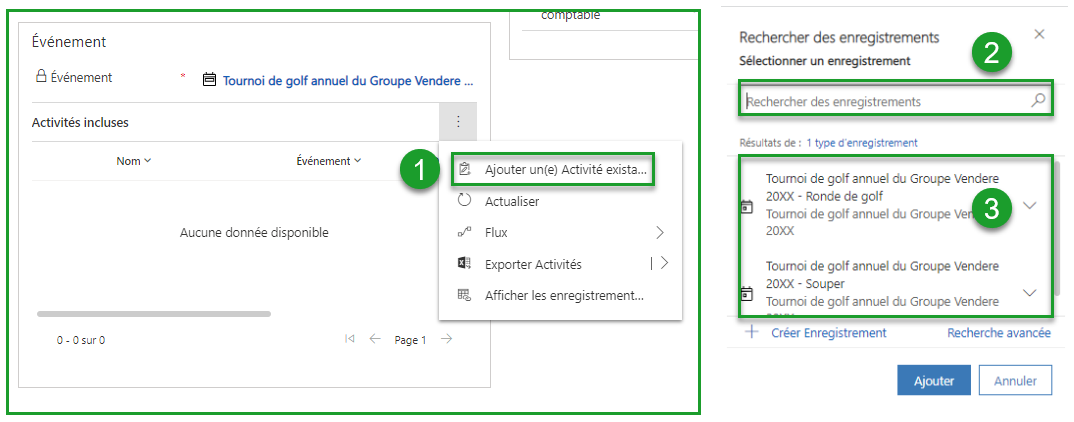
Once you have chosen all the necessary activities for this ticket, save and proceed to the next section.
Presale tab
The presale is a good incentive for the sale of tickets and it allows you to make predictions related to your event.
Select the Presale tab if you wish to pre-sell tickets. By default, Membri is configured not to pre-sell.

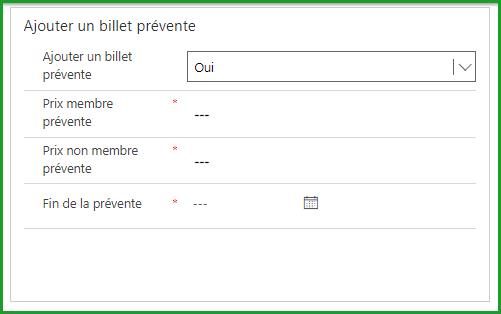
If you choose to add a presale ticket, new fields will appear that allow you to create the presale tickets and determine the deadline for the presale.
| Options | Description | Example |
|---|---|---|
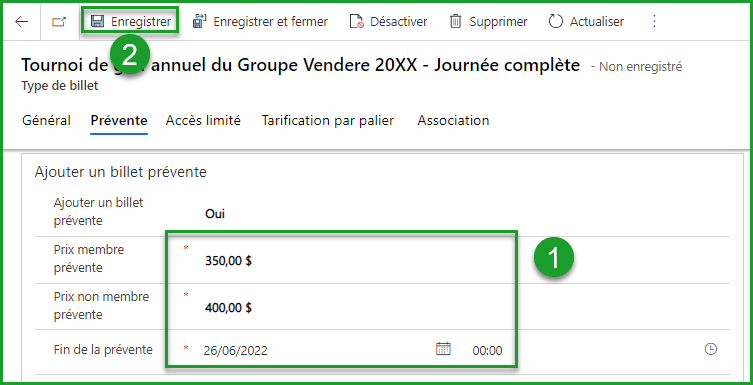
| Add a presale ticket | Decide if you want to sell tickets on presale. | Our presale ticket will be the one for the full day. |
| Presale member price | Adjust the member price for the presale ticket | $ 350 |
| Non-member presale price | Adjust the non-member price for the presale ticket | $ 400 |
| End of presale | You can determine when the presale will end and the regular ticket prices will be active. You can also specify the time at which this presale will end. | The presale will end one month with the event on June 26th. |
Complete the required fields of the form (1) and save the changes made (2).
Limited Access tab
This tab allows you to set limits in relation to the post you are creating. However, it is not displayed if you have presale tickets.

You might want to limit access to this type of ticket for several reasons. Each of the boxes on this tab allows you to limit access in a different way.
Keep in mind that you are still creating a single ticket type and that the limits will only apply to that type of ticket.
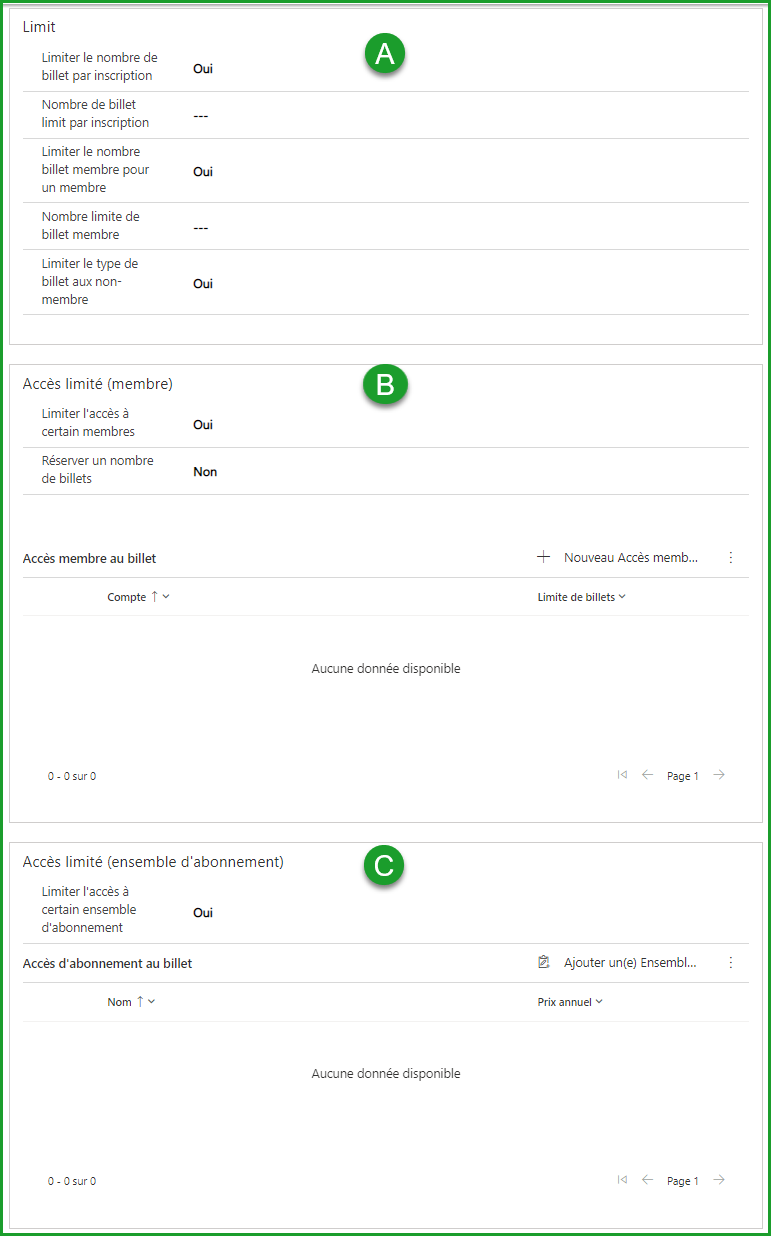
A.Limits
| Options | Description |
|---|---|
| Limit the number of tickets per registration | Determine if you want to limit the number of such tickets that can be purchased when registering for this event. Then determine the number of tickets that can be purchased during registration. |
| Number of tickets limited per registration | Indicate how many tickets of this type can be purchased per registration. |
| Limit the number of member tickets for a member | Choosing Yes here will ensure that this type of ticket will only be accessible to people who are members of your organization. |
| Limit number of member tickets | Indicate how many tickets of this type can be purchased per registration. |
| Limit the type of ticket to non-members | Choosing Yes here will ensure that this type of ticket will only be accessible to people who are not members of your organization. |
B. Limited access (member)
The following options allow you to limit access to this type of ticket to some of your members. It is then only the contacts that you will choose who will have access to this type of tickets.
| Options | Description |
|---|---|
| Limit access to certain members | Determine if you want only some of your member contacts to have access to this type of ticket. |
| Reserve a number of tickets | Indicate whether you want to reserve tickets of this type for the selected member contacts. |
| Number of tickets to reserve | Indicate the number of tickets of this type to set aside for the selected member contacts. |
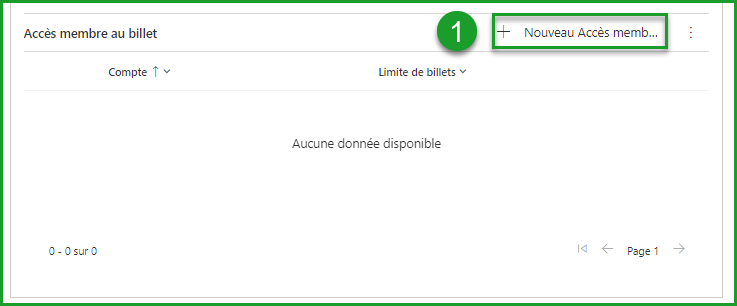
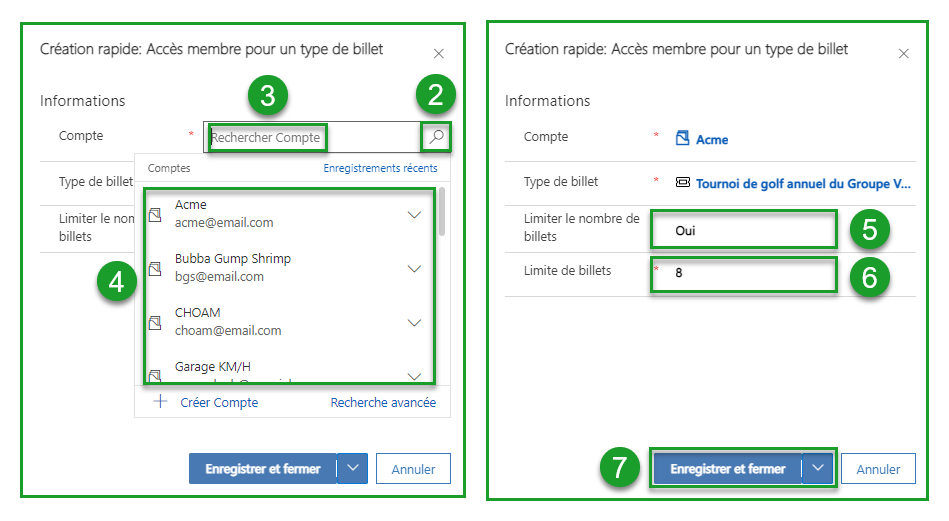
To choose the member contacts who will have access to this type of ticket, select + New Member Access for a type of ticket (1). Search for a contact to whom you want to give access to this type of tickets (2-3) and select it (4). You can then determine how many tickets of this type this contact is entitled to (5-6). Then save your progress (7). Repeat these steps for all other member contacts to whom you want to give access to this type of ticket.
C. Limited access (subscription package)
The following options allow you to limit access to this type of ticket to a set of member contacts who have the same type of subscription. For example, you surely don't want all your members to be able to choose which tickets are reserved for your partners. Then identify that your partner tickets can only be viewed by the appropriate set of subscriptions.
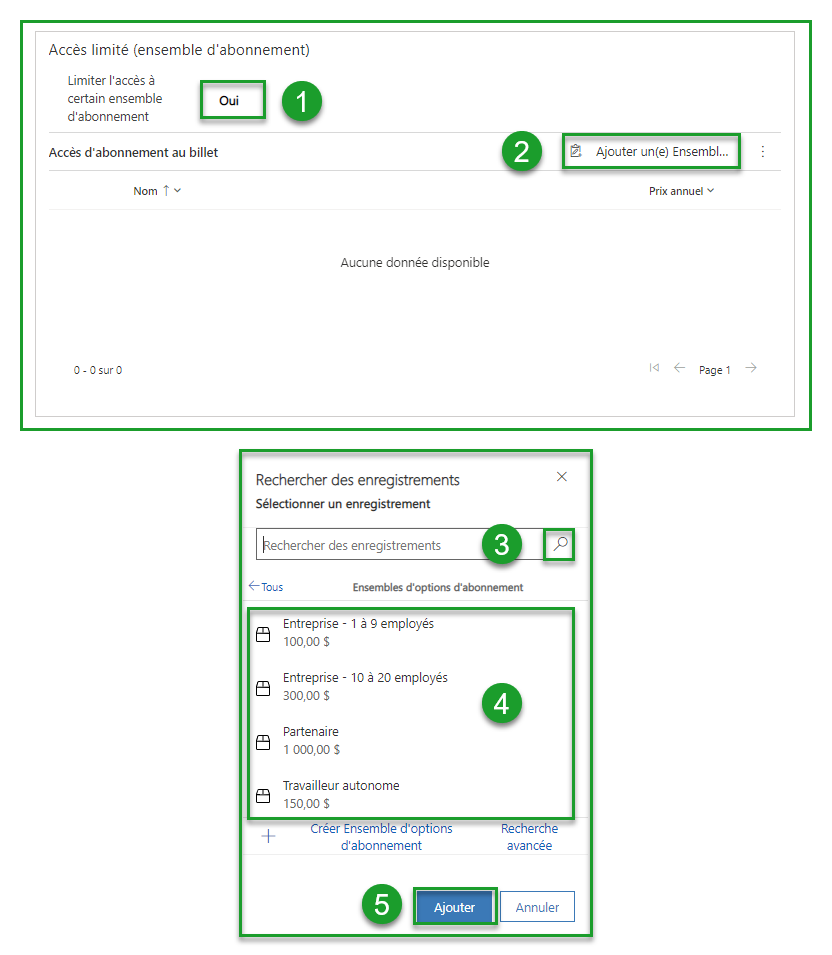
To do this, indicate that you want to limit access to this type of ticket (1). Then select Add an existing Membership package (2). Then search among your membership packages (3) and select the set to which you want to give access to this type of ticket (4).
Tier pricing tab
Tiered pricing allows you to promote the purchase of a specific amount of the type of ticket you are creating.

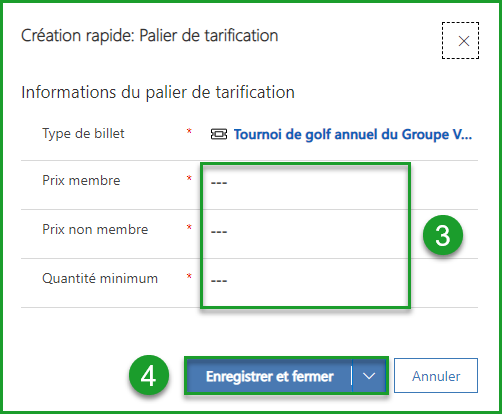
To create a new promotion of this kind for this type of ticket, indicate that you want to use tiered pricing (1). Then select + New Pricing Tier (2).

A quick form New Pricing Tier should open. Complete all fields (3). Register your new promotion (4).
| Options | Description |
|---|---|
| Member price | Enter here the member price to which you applied a discount |
| Non-member price | Enter here the non-member price to which you applied a discount |
| Minimum quantity | Determine the quantity of tickets of this type that must be purchased during registration to benefit from the prices of the two previous fields. |
Save your progress and repeat the ticket creation process for all the tickets needed for your event.
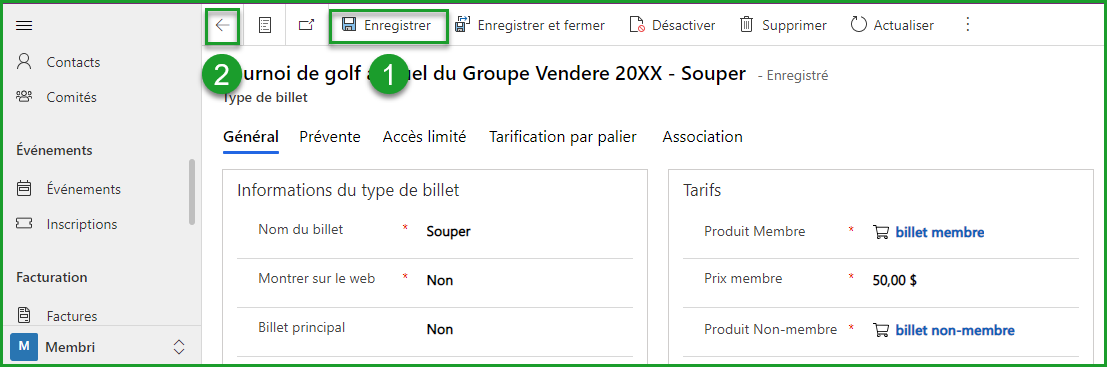
Once this step is completed, save your progress and go to the next tab in the initial form for creating your event: that of the Ticketing
3. Adjust ticketing parameters
The creation of activities and tickets is now complete. However, you haven't quite completed the process of creating an event.
Select the ticketing tab. This tab allows you to adjust some of the integrated ticketing parameters.

Here are the different boxes that you will find there:
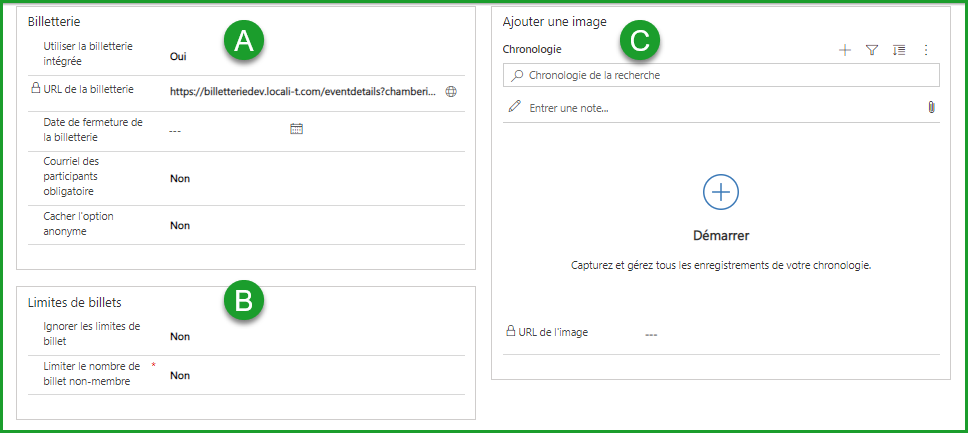
A. Ticketing
| Options | Description | Example |
|---|---|---|
| Using the integrated ticketing | Use this option to determine if you want to use the ticketing system integrated into Membri to manage participant registrations. To use your own URL, set this field to No and enter your URL on the ticket line. This allows you to go through another platform to sell your tickets. | |
| Ticket office URL | Here is the ticket office address related to your event. You can, for example, use it for marketing purposes in signing your emails. | |
| Ticket office closing date | Determine the date you want the online ticket office to close. You will still be able to add attendees manually after the ticket office has closed, but this will prevent last minute registrations. | |
| Participant email required | You can determine whether it is required that all participants enter an email address. If the participant's email address is not entered, they will not receive the reminder, only the primary contact will receive it. | In the case of our main ticket for a golf quartet, it would be nice if all players received the reminder email, so we will state Yes here. |
| Hide the anonymous option | Here you can decide whether participants can purchase tickets anonymously or not. |
B. Ticket limits
| Options | Description | Example |
|---|---|---|
| Ignore Ticket Limits | This option allows you to determine if an attendee can bypass the ticket purchase limit. If you decide on the activity, a participant could in theory purchase all available tickets for your event. | |
| Limit the number of non-member tickets | You can, thanks to this option, limit the number of tickets for participants who are not members. This allows you to ensure that tickets are available for your members. |
C. Add Image
To add an image, select the paperclip icon (1), choose the image you want to add and select Add note (2).
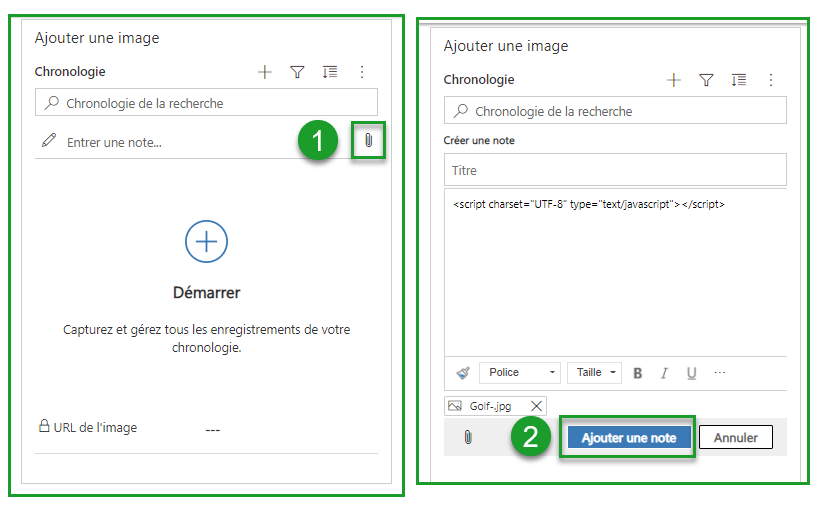
To add an image to your event, make sure your image is in JPG format with a minimum of 720px wide and a ratio between 1: 1 (square) and 2: 1 (landscape format). It is also very important to ensure that the photo does not contain a color profile. So when creating the photo, make sure to uncheck the color profile.
4. Put tickets on sale
You have gone through all the stages of creating an event. All you have to do is wait for the date you want to put the tickets on sale and select On sale in your toolbar.

Make changes to your event
Once an event goes on sale, it's not too late to make changes. Just select Stop Sale from your toolbar. You will only have to relist it once you have made the necessary changes.

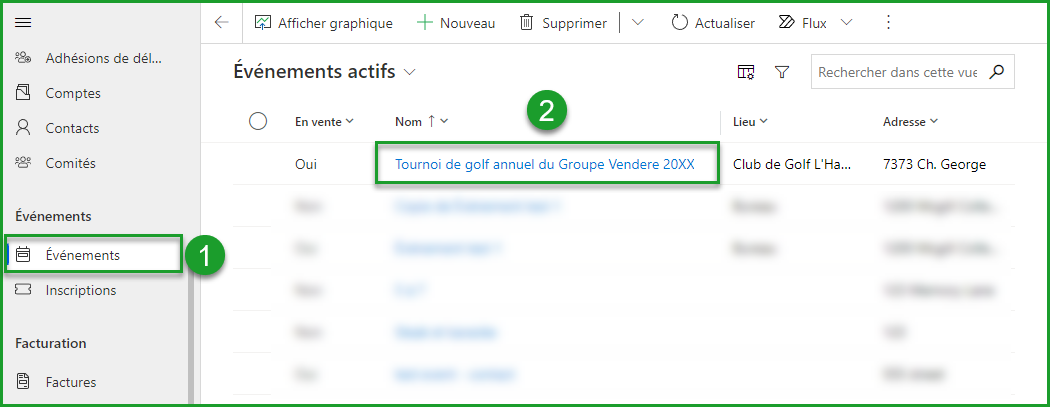
Export a list of participants or responses
The date of your event is fast approaching and you would like to have in hand a list of participants as well as a list of their answers to questions associated with the activities? Follow the steps below to get there:
- In the Events section, select the event that interests you (1-2)
Select the Participants tab (3)
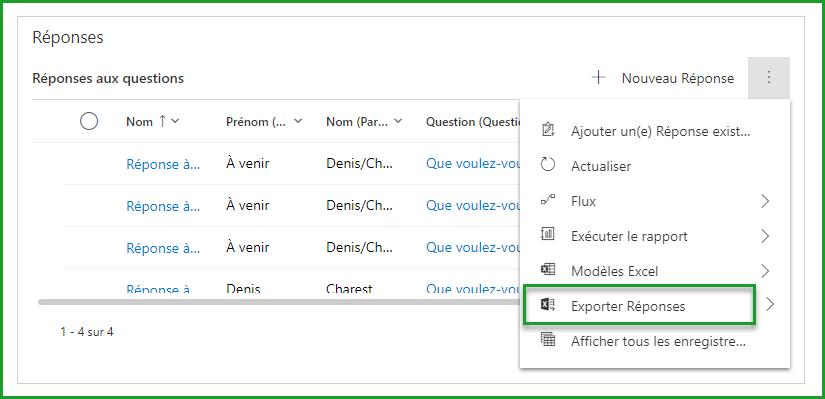
In the Participants box, select Export Participants to download the list in Excel format (4)
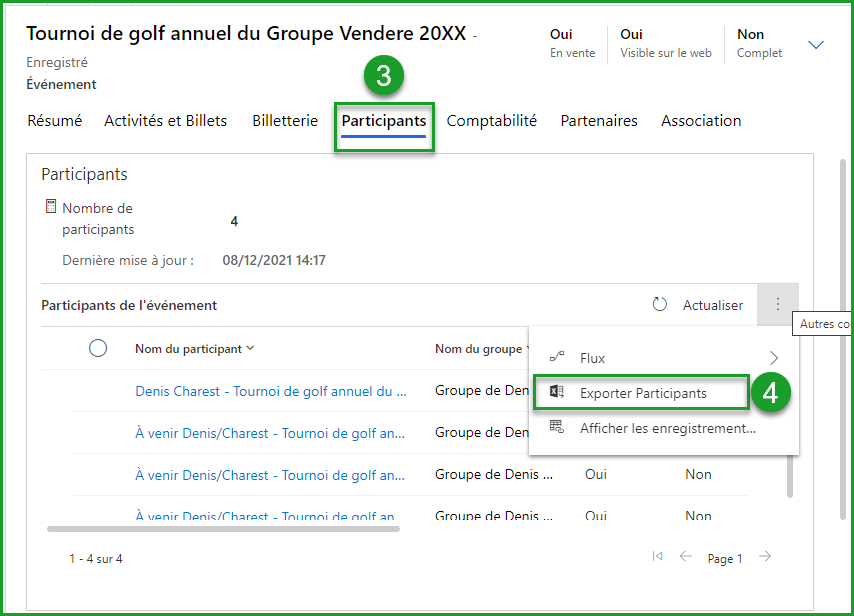
An equivalent button allows you to do the same for participants' responses.
Indicate the presence of participants manually
There is a feed to indicate that people registered for your event were actually present during the event in question.
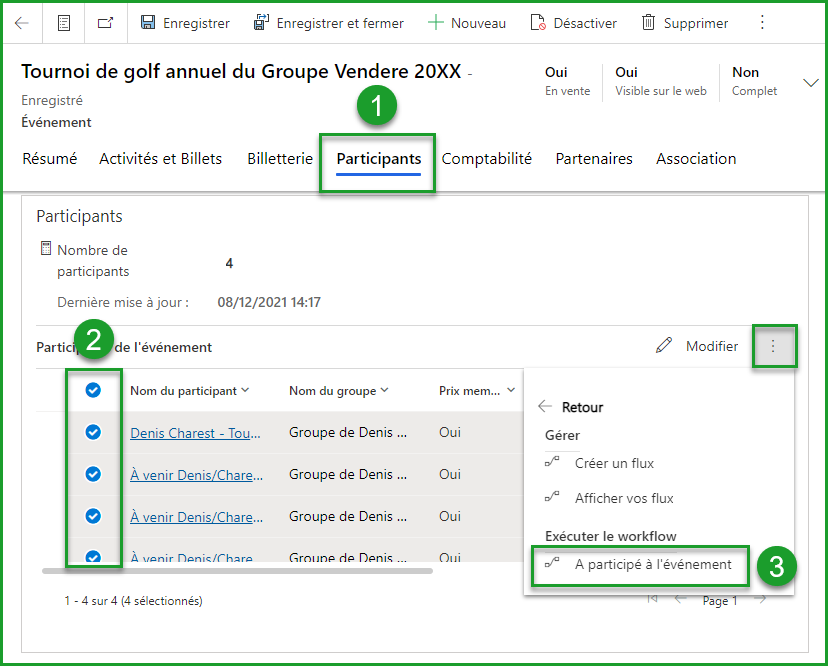
In the Participants (1) tab of a past event, check the participants who were present at the event (2)
Select the flow Participated in the event (3) in the list of flows
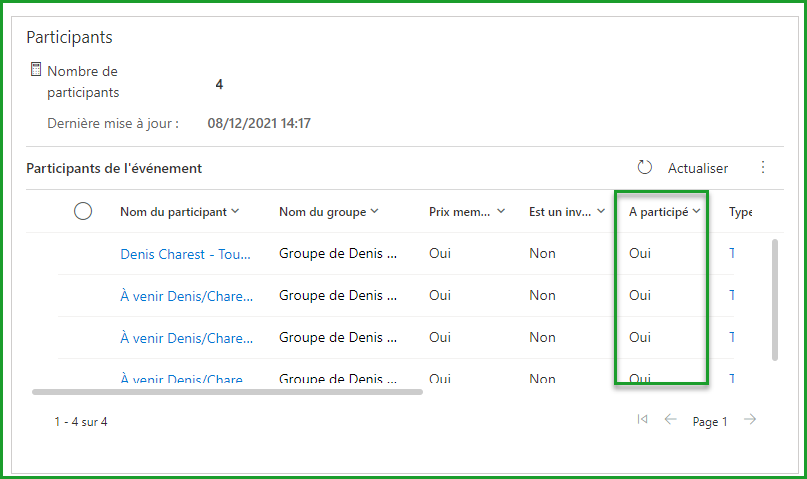
Selected participants should be marked Yes in the Attended column.
Frequently Asked Questions
- Section under development
Still unsure? Contact us - support@vendere.ca