Accounting Synchronization
Accounting synchronization allows you to transfer customer accounts, invoices and payments from Membri to your accounting system. Currently, the system can be integrated with Acomba, AcombaX, Avantage, QuickBooks Online, Sage50, Sage 300, Sage comptabilité and Business Central. The process allows you to create and update customer accounts, create invoices and create payments.
- Understand accounting synchronization
- Install the synchronization tool or update it
- Manage customer accounts
- Manually transfer a customer’s account, an invoice or a payment
- Understand the particularities of accounting systems
- Mapping between Membri fields and those of the accounting system
Understand accounting synchronization
The general process
Invoices are generated in Membri automatically at different times. For example, an invoice is generated at the time of an event registration, a membership registration or a renewal.
They can also be generated manually by creating a manual invoice.
Once an invoice is created, the system indicates that it is to be transferred to the accounting system and, to do this, the person responsible for accounting in the organization must start the synchronization process. Before starting the synchronization, it is possible to validate the invoices, payments and customer accounts to be transferred to the accounting synchronization dashboard.
Once the information on the dashboard has been validated, you can open the synchronization tool and start synchronization.
The synchronization process is installed during implementation on the workstations of your organization's accounting managers or directly on your server to be activated manually. However, it is possible to install it in such a way that the synchronization takes place automatically at regular intervals.
Contact our support team to set up automatic synchronization.
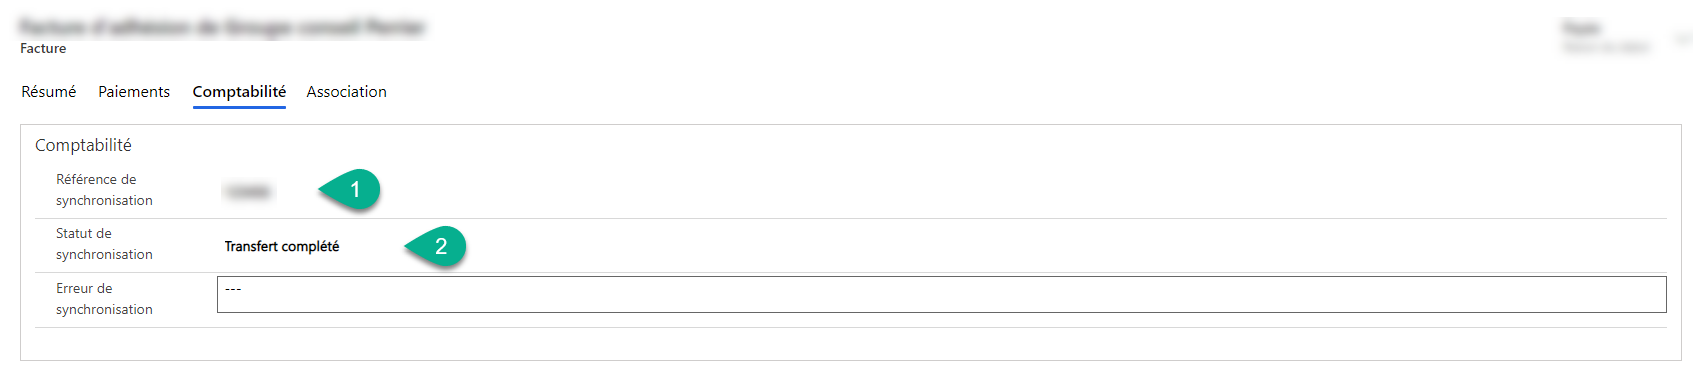
Once the synchronization is complete, the tool indicates to Membri that the account, invoice or payment is transferred as well as the number of the transferred entity in the accounting system. Also, the system indicates if synchronization errors have occurred. It will be necessary to correct the errors and restart the synchronization.
Synchronization Status
During synchronization, the accounting synchronization tool will attempt to synchronize all records (invoice, payment, account) whose synchronization status is To be transferred. However, multiple synchronization status can be used in regards to the situation or your internal policies.
| Possible statuses | Description |
|---|---|
| Stand By | The record is pending, it will not be transferred to your accounting system until you change it back to To Be Transfered. |
| To Be Transferred | The record will be transferred to the accounting system during the next synchronization action. |
| Transfer Completed | The transfer of the record to your accounting system has been completed. |
| Transfer Error | An error occurred while transferring the record to your accounting system. There are many reasons that can lead to a transfer error. They can range from mandatory information missing on your form to trying to synchronize in a closed book. Changes will be required before trying again to transfer the record. |
| Do Not Sync | Synchronization status used when the record is not intended to transfer to the accounting system. |
| In Review | Synchronization status used to review action before setting the sync status at To Be Transferred. This status is mainly used for companies with multiple users with different security levels. It is possible to activate the function in the settings of accounting system settings. |
The synchronization tool
The tool is normally installed on the workstation of the person responsible for accounting and can be run like any other program. Start by opening the tool. You can then click Start to start the accounting synchronization.
It is possible to follow the different operations performed by the tool in the dialog box. Once these operations are completed, the tool will indicate if any errors have occurred.
No data is transferred to the accounting system without the Membri synchronization tool being launched. The tool can be started manually via an application.
Here are the different actions taken by the synchronization tool in order when you start synchronization.
1. Connection to the accounting system
The synchronization tool attempts to connect to your accounting systems using accounting parameters. If the attempt fails, a synchronization tool update may be required.
2. Create new customer accounts
Accounts are created in the accounting system under 2 conditions:
- They have an invoice to transfer
This prevents the creation of customer accounts without a transaction. An account is therefore only registered when it is billed for the first time.
- They have been designated as a new account by a member of your organization. It is possible to designate them as new accounts by indicating Yes in the New account to synchronize field found under the Billing tab of an account file.
Designating new accounts for synchronization manually avoids the creation of duplicates in the accounting system. It is therefore advisable to check whether a customer’s account has a similar/identical name in the accounting system before indicating that an account is a new account for synchronization.
The default behaviour of Membri is to indicate No in the New account to sync field, leaving you to manually decide which customer accounts to sync. However, it is possible that all new accounts are designated as new accounts to be created in the accounting system by changing the value of the Default value of new account for synchronization field found in the settings of your environment.
3. Update customer accounts
Each time a change is made to a customer’s account file and this change has an impact on the accounting system, the account must be updated.
During this step, the synchronization tool searches for all accounts whose Synchronization status field found in the Billing tab of an account file indicates To be transferred.
To learn more about managing customer accounts, see the next section.
4. Creation of invoices
When invoices are invoiced in your Membri environment, they are designated as new invoices to be transferred to the accounting system. The Synchronization status field found under the Accounting tab of the invoice then indicates To be transferred.
The only invoices that can opt out of this behaviour are membership and renewal invoices. Indeed, it is possible to wait for the payment of these invoices before transferring them. To do this, activate the Synchronize subscriptions and renewals when paid field found in the settings of your environment.
5. Synchronization of payments
When a payment is created, it must be transferred. Of course, if the invoice was not previously created in the accounting system, the payment will not be transferred.
If you use Sage 50, payments are not transferred from the CRM to the accounting system, it's the other way around. The synchronization tool checks if new payments have been created in Sage 50 and transfers them to CRM invoices. However, it is not yet possible to see the nature of the payment when they are transferred to the CRM. This is why payments transferred in this way have Sage 50 as the payment type.
So you can only pay bills in Sage 50 and the sync tool takes care of paying bills in Membri. Obviously, this is true if the Sage 50 Payments Transfer field found in your environment's accounting settings indicates Yes.
6. Create journal entries for deferred revenue
Creating journal entries for deferred revenue is an option only available for Sage 300 and Business Central. However, it could be added to the product if needed.
At the time of a dues payment, the synchronization tool creates the journal entries for the income received in advance. Each entry has a different date on which it will be transferred. Upfront revenue can be configured in the billing settings of your Membri environment.
Install or Update the synchronization tool
When a new version of your accounting system is deployed, you must also update the synchronization tool.
Tool Update
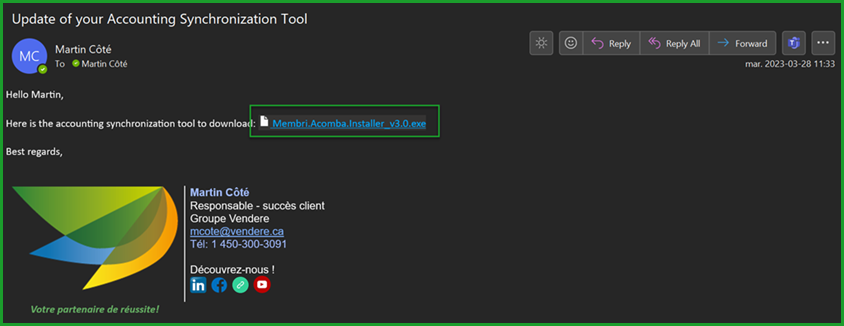
In order to complete your update, you will first receive an email containing a hyperlink to the accounting synchronization tool to download.
Download the Synchronization Tool
Microsoft Edge
A new page will open in your main browser. In this case, we will use Microsoft Edge as our browser.
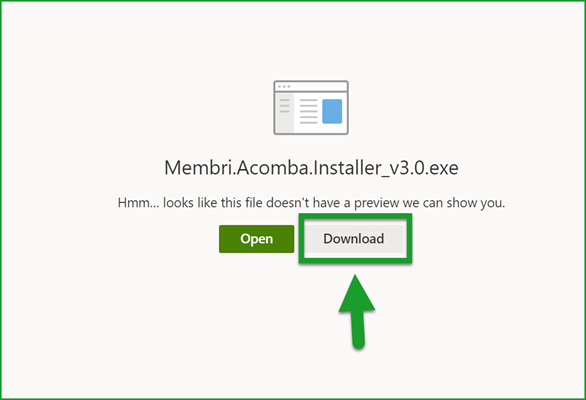
- Once the page has been opened, select the Download option;
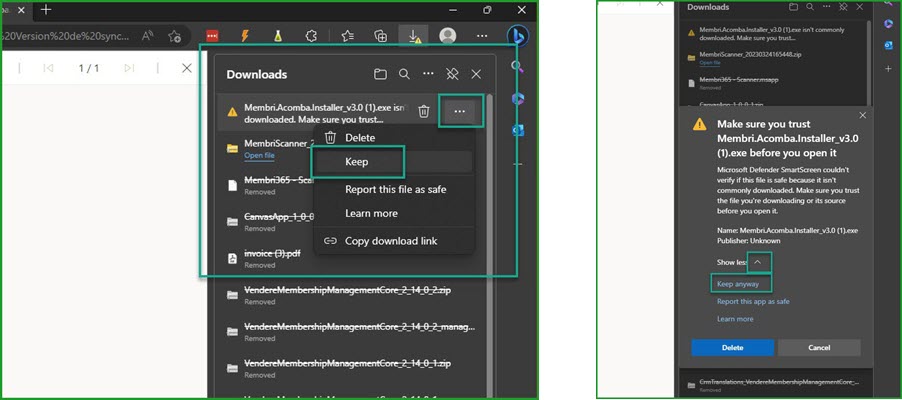
- You will then get a warning from Microsoft. This is normal. Select the icon
 to open the download browser. You will see that the tool is waiting to be downloaded;
 - Right click on the tool and select Keep;
- A new warning window will appear. Select Show more;
- From the drop-down, select Keep anyway;
- A warning window for Windows permissions will appear. Select Yes;
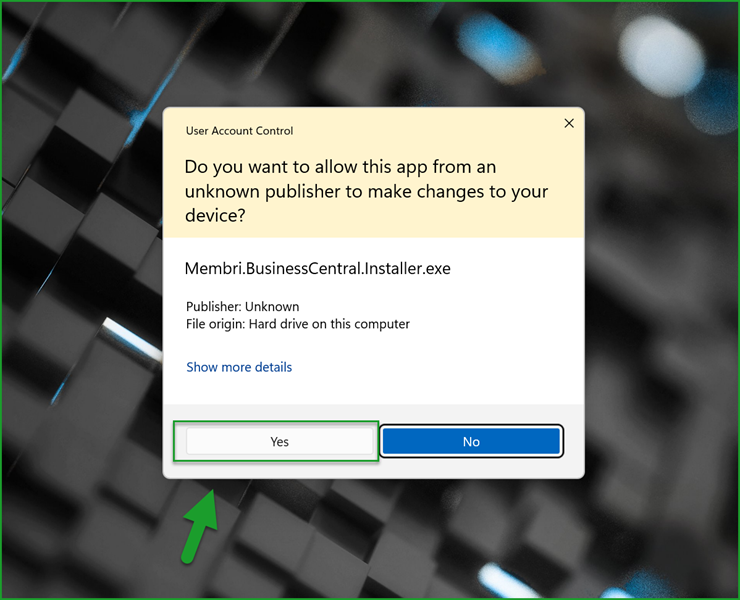
- You have now downloaded your accounting synchronization tool.
Acomba
- Contact us to get the latest version of the synchronization tool;
- Download the synchronization tool to install;
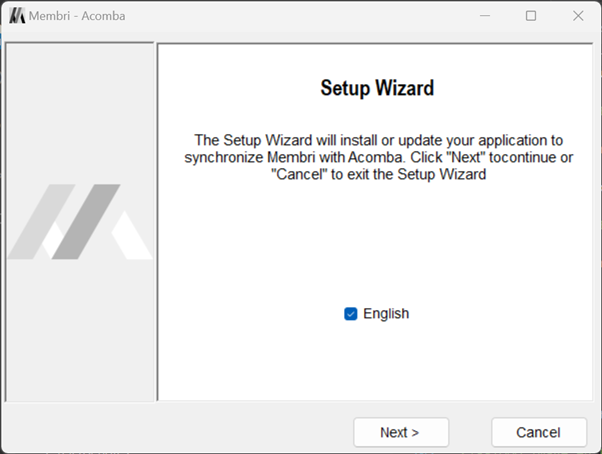
- Close the synchronization tool and your accounting system (if open) and run the executable Membri.Acomba.Installer_v2.X.exe that was downloaded;
- Choose the language of the tool and select 'Next';
- Indicate the location where the accounting synchronization tool should be installed and select 'Next' to proceed to the next step;
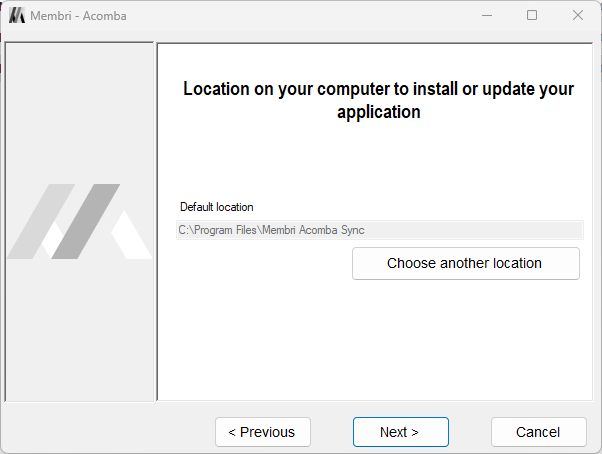
If you chose the correct location for the sync tool, the fields should be filled in automatically during an update.
- Choose the location of Acomba on the position and location of the accounting company;
Acomba Location
Validate with the person charge where Acomba is installed on your computer, but is normally at
C:\Aco_SDK
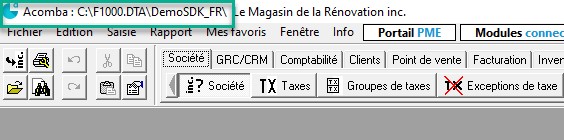
Company Location
The file where your Acomba company is registered. This information is available when you log in to Acomba.
- Select 'Install' to complete the installation of the new version of the sync tool.
AcombaX
- Contact us to get the latest version of the synchronization tool;
- Download the synchronization tool to install;
- Close the synchronization tool and your accounting system (if open) and run the executable CDC.AcombaX.Installer_v2.X.exe that was downloaded;
- Choose tool language;
- Select
Nextto go to the next step and indicate where to install the tool;
Remember this location. You will need to return to it in step 11 of this process.
- Go to the next step;
If you chose the correct location for the sync tool, the fields should be filled in automatically during an update.
- Select
Install; - Using the file explorer, go to the ACCEO Solutions folder;
\ACCEO Solutions\Acomba Server\bin\ClientPackage\SDK
Copy all the files contained in this folder;
Using the file explorer, go to the Acomba X folder that you chose/identified in step 5;
\Vendere\Acomba XPaste the files into this folder and indicate to replace existing files.
Avantage
- Contact us to get the latest version of the synchronization tool;
- Download the synchronization tool to install;
- Close the synchronization tool and your accounting system (if open) and run the executable CDC.Avantages.Installer_v2.X.exe that was downloaded;
- Choose the language of the tool and select
Nextto proceed to the next step; - Indicate the location where to install the synchronization tool and select
Nextto proceed to the next step;
If you chose the correct location for the sync tool, the fields should be filled in automatically during an update.
- Select
Install.
QuickBooks Online
- Contact us to get the latest version of the synchronization tool;
- Download the synchronization tool to install;
- Close the synchronization tool and your accounting system (if open) and run the executable CDC.QuickBooks.Installer_v2.X.exe that was downloaded;
- Choose the tool language and select
Next; - Indicate the location where the synchronization tool is installed and select
Next;
If you chose the correct location for the sync tool, the fields should be filled in automatically during an update.
- Select
Install; - Start the synchronization tool at the end of the installation and select
Authorization;
- Enter your QuickBooks Online login information and copy the authentication code (token) received into the Authorization field of the synchronization tool;
- Select
Startto start accounting synchronization.
Sage50
- Contact us to get the latest version of the synchronization tool;
- Download the synchronization tool to install;
- Close the synchronization tool and your accounting system (if open) and run the executable CDC.Sage50.Installer_v2.X_v202Y.Z.exe that was downloaded;
- Choose the tool language and select
Next; - Indicate the location where the synchronization tool is installed;
- Indicate the location of the Sage 50 .SAI file and select
Nextto go to the next step;
The .SAI file is selected each time you launch Sage 50. You can therefore consult its location when starting your accounting system.
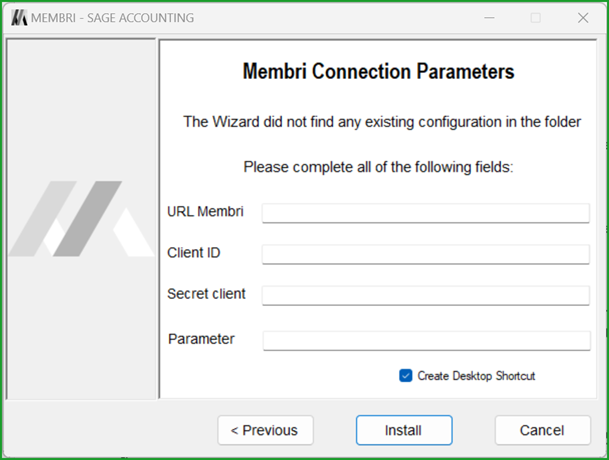
- Complete the fields of the Membri connection parameters;
If you chose the correct location for the sync tool, the fields should be filled in automatically during an update.
| Fields | Description |
|---|---|
| Membri URL | This is your login URL to access Membri |
| Client ID | To obtain your customer ID, contact us at support@vendere.ca |
| Client Secret | To obtain your customer secret, contact us at support@vendere.ca |
| Parameter | This is the name for the chapter that you want to use with synchronization. The chapter name is available in the configuration area of your environment. Select the Chapter entity from the main menu on the left and the name displayed is your chapter. |
- Select
Install.
Sage Accounting
- Contact us to get the latest version of the synchronization tool;
- Download the synchronization tool to install;
- Close the synchronization tool and your accounting system (if open) and run the executable CDC.SageAccounting.Installer_v2.X.exe that was downloaded;
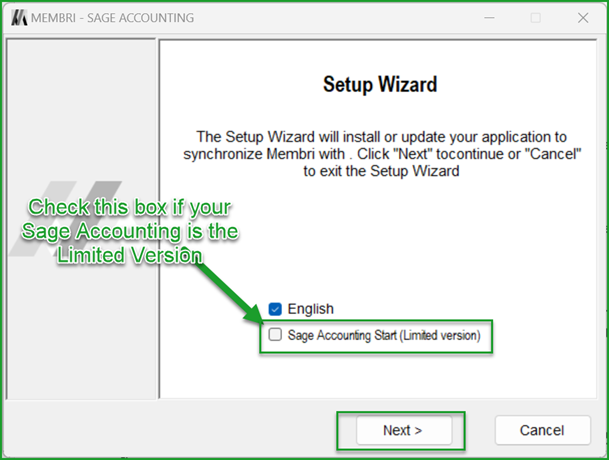
- Choose the language of the tool and select
Next;
You can check if you have Sage Accounting (limited version) by looking at an invoice in Sage. Invoices will not contain a quantity on the lines, only a total amount.
- Indicate the location where the sync tool is installed;
- Select
Next; - Complete the fields of the Membri connection parameters;
If you chose the correct location for the sync tool, the fields should be filled in automatically during an update.
| Fields | Description |
|---|---|
| Membri URL | This is your login URL to access Membri |
| Client ID | To obtain your customer ID, contact us at support@vendere.ca |
| Client Secret | To obtain your customer secret, contact us at support@vendere.ca |
| Parameter | This is the name of the chapter that you want to use with synchronization. The chapter name is available in the configuration area of your environment. Select the Chapter entity from the main menu on the left. |
- Select 'Install'.
Manage customer accounts
Synchronization automatically creates customer accounts in your accounting system provided they are designated as new accounts to be created.
Regular behaviour
By default, when a new account is created in Membri, it will not be automatically created in the accounting system. This avoids the creation of duplicates in your accounting system.
- An account was created on Membri
On the account synchronization dashboard, you will have the list of accounts to check for synchronization. These are the Membri accounts that are neither to be created nor linked to an existing account.
- Check in the accounting system if the account already exists
If the account does not exist in the accounting system
- Indicate that the account is a new account to be transferred in the New account for synchronization field in the Billing tab of the account file
If the account exists in the accounting system
- Select the key of this one in the accounting system. The following table indicates what information from the accounting system to enter depending on the nature of the system:
| Accounting system | Key |
|---|---|
| Acomba X | Customer number |
| Avantage | Customer number |
| QuickBooks Online | Show name as |
| Sage50 | Account name |
- Copy the information from the accounting system and enter it in the Synchronization reference field found in the Invoicing tab of an account file.
Manually transfer a customer account, an invoice or a payment
It is possible to manually transfer a customer account, an invoice and a payment.
- Create in your accounting system the customer account, the invoice or the payment as you would have done normally.
- Copy the name or number of the customer account, the invoice or payment number, indicate it in the Synchronization reference field in Membri.
Understand the particularities of accounting systems
AcombaX
AcombaX synchronization contains an additional step. When a payment is transferred to a paid invoice, the synchronization will make an invoice payment. It will also be done with a credit note if the original invoice has been cancelled.
Avantage
For Avantage synchronization to work, the Avantage TCP tool must be open.
QuickBooks Online
To authenticate to QuickBooks Online, an additional action is required. If the tool is not authorized, an Authorization button will appear.
- Press the
Authorizationbutton to start the authentication, a web page will open in the next few seconds. - Enter your QuickBooks Online login information to log in.
You may need to choose your QuickBooks Online company.
- Copy authorization token value
- Paste this value in the field next to the
Authorizationbutton of the synchronization tool - Press
Startto start the synchronization
The authorization should be valid for 100 days.
Sage50
Sage50 sync does not allow us to create payments in Sage50. To work around this issue, we've changed sync to transfer payments from Sage50 to your Membri environment.
It is possible to activate or deactivate this feature in the accounting parameters of your environment.
If you choose to disable it, payments will need to be created manually in your Membri environment as well as in Sage50.
For customers and invoices, everything works normally, they are created in Membri and transferred to Sage50 at the time of account synchronization.
You must then manually create the payments on the invoices in Sage50.
If a payment is created on an invoice in Sage50, on the next synchronization, the invoice it is associated with in Membri will be closed.
The synchronization tool cannot transfer the type of payments. The type of payments retrieved in the accounting system is always Sage 50.
Mapping between Membri fields and those of the accounting system
This section of our documentation is under development
Mapping of AcombaX
This section of our documentation is under development
Mapping of Avantage
This section of our documentation is under development
Mapping of QuickBooks Online
This section of our documentation is under development
Mapping of Sage 50
This section of our documentation is under development
Still unsure? Contact us - support@vendere.ca