Merge accounts and contacts
Merging eliminates duplicate accounts or contacts in Membri.
Understand duplicate detection rules
Dynamics 365 allows you to define duplicate detection rules. In Membri, there are default rules in place to identify duplicate accounts and contacts.
Each time you try to save an account or contact card that conflicts with the defined rules, a new screen will appear to indicate that duplicates have been detected and offer you to perform an item merge.
The rules in place
Here is a table summarizing the rules default in Membri :
| Rules | Applies to accounts | Applies to contacts |
|---|---|---|
| Same email address | Yes | Yes |
| Same phone number | Yes | Yes |
| Same website | Yes | No |
| Same name | Yes | Yes |
To view the rules, you can go to the appropriate section of the advanced settings:
- Select Advanced Settings;
- Select the Data Management section;
- Select Duplicate Detection Rules;
Want to create new detection rules? Contact us.
Schedule a duplicate detection job
There is no need to wait for the system to send you a notification to clean up the database. You can schedule duplicate detection jobs that will comb through your data and identify conflicting entities. You can then view the results and clean the data by merging elements.
- Select Advanced Settings;
- Select the Data Management section;
- Select Duplicate Detection Jobs;
- Select New, then Next;
- Select the type of entity (Accounts or Contacts) concerned by the job;
- If the database contains a high number of entities of the chosen type, apply filters to reduce the number of entities to be processed during the execution of the job and go to the next step;
You can choose a system or custom view of the environment instead of applying filters manually or you can start from the filters already applied to the selected view.
Select Preview Records to ensure that the results obtained after applying filters are the ones you want.
- Determine when this job should start;
It is possible to create a recurring job and specify an email address to send a notification to when the job is completed.
- Go to the next step and select Submit to finalize the creation of the duplicate detection job.
View and merge duplicates identified by a detection job
- Select Advanced Settings;
- Select the Data Management section;
- Select Duplicate Detection jobs;
- Select the job that interests you;
- Select View Duplicates from the side menu;
- Check the top item in the list to display potential duplicate records related to it in the bottom list;
- Check the bottom element which must be merged with the top element if necessary;
- Select
MergeandSelect Master Recordto proceed with merging the two checked records; - Select the main record and the information to keep;
You can check the Select all fields with data box at the bottom of the window to speed up the process. If the two elements have conflicting data, the data of the record defined as primary will be kept.
- Select
OK
The information contained in the two accounts or contacts to be merged is never lost, because the account or contact to be merged into the master record will be deactivated rather than deleted.
- Repeat the previous steps for all duplicates in your environment.
For the account merger, it is important to validate the contributions of the accounts to be merged. Do not merge two member accounts with an active membership or renewal in progress.
One of the two accounts can be a member or in the renewal process, but not both.
Merge accounts or contacts
- Open the list of accounts or contacts
- Find and tick the two elements to be merged.
For the account merging, it is important to validate the membership of the accounts to be merged. Do not merge two member accounts with an active subscription or renewal in progress.
One of the two accounts can be a member or in the renewal process, but not both..
Select
Mergefrom the toolbarDetermine which of the two elements to keep by checking it on the line Select Primary record (1)
Review the information of the two sheets and indicate which ones to keep one line at a time by checking them (2)
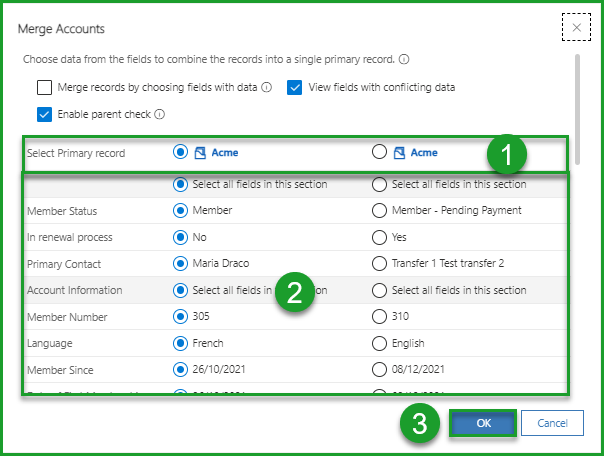
Pay attention to the Member Status field to choose the right one.
- Select
OKto confirm (3)
What's next?
Merging will happen in the background and will take a few minutes at most.
The information contained in the two accounts or contacts to be merged is never lost, because the account or contact to be removed will be deactivated rather than deleted.
Still unsure? Contact us - support@vendere.ca