Events
The Events menu option allows you to create events, prepare for them, and review past events. In this section we will cover these three moments separately. This way, you will have a better understanding of the different features offered by Membri.
- Create an event
- Copy an event
- Generate physical tickets
- Create a secret tickets
- Create questions related to the event
- Send Manual Reminders
- Create a Head Table
- Frequently asked questions
- Field details
Create an event
Are you planning the next edition of an event that you have already created before?
- If the answer to this question is negative, go to the first step of this process.
- If the answer to this question is affirmative, go to our section Copy an event.
The process of creating an event allows you to develop several types of events tailor-made for you, but above all, for your members.
This process will guide you through the following steps:
- Describe the event
- Create activities and ticket types
- Adjust ticketing settings
- Add Event Sponsors
- Put tickets on sale
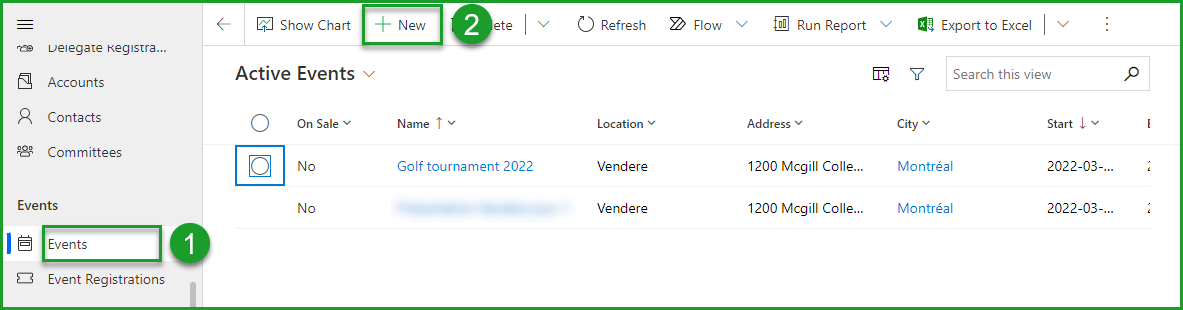
1. Start the creation of your event
To open the event creation form, first go to the Events section of the menu (1) and click on +New in your toolbar (2).
You should see a new section open with the title Create Event. Under this heading, you will see six tabs: Summary, Activities and Tickets, Ticketing, Attendees, Accounting and Sponsors.

2. Describe the event
At any time, you can visit our [Field Details](Field #détails) section to learn more about the fields of the event entity. The section is separated according to the entity's default tabs and sections.
Fill the multiple fields in the summary tab.
Mandatory fields at creation
| Fields | Description |
|---|---|
| Name | Allows you to choose the name of your event. |
| Start | Allows you to choose the date and time your event starts. |
| End | Allows you to choose the date and time your event ends. |
If the Event Location Type field does not indicate Online, the following fields are also mandatory.
| Fields | Description |
|---|---|
| Address | Allows you to specify the address where your event will be held. |
| City | Allows you to specify the city where your event will be held. |
| ZIP/Postal Code | Allows you to enter the postal code of the location where your event will be held. |
Saving progress
The tickets for your event are not put on sale upon saving the event. You only save your progress in the system and this will allow you to access certain fields under the next tabs.
Proceed to save and create your event, by selecting the Save icon in your toolbar.

3. Create activities and ticket types
You can now create the different activities and that will take place during your event and the tickets type that will be available on the online ticketing.
When we use the term Activity, we are talking about the activities that will physically take place during your event.
Activities have nothing to do with pricing. Pricing is based solely on ticket types.
You want to create a golf tournament named Membri 365 Golf Tournament. Depending on the tickets they have purchased, participants in the golf tournament will be able to participate in 2 activities:
- Golf Round
- Dinner
You only need to create 2 activities:
✅ 1. Membri 365 Golf Tournament - Golf Round
✅ 2. Membri 365 Golf Tournament - Dinner
You don't create the activities based on your tickets.
❌ 1. Golf Tournament Membri 365 - Golf round and dinner
❌ 2. Membri 365 Golf Tournament - Golf Round only
❌ 1. Golf Tournament Membri 365 - Dinner only
A. Create a simple event
Membri 365 considers that an event is simple when only one activity takes place and there is only one ticket type that gives access to it. This feature is a shortcut to create your event faster.
Your event has only one activity: select Yes
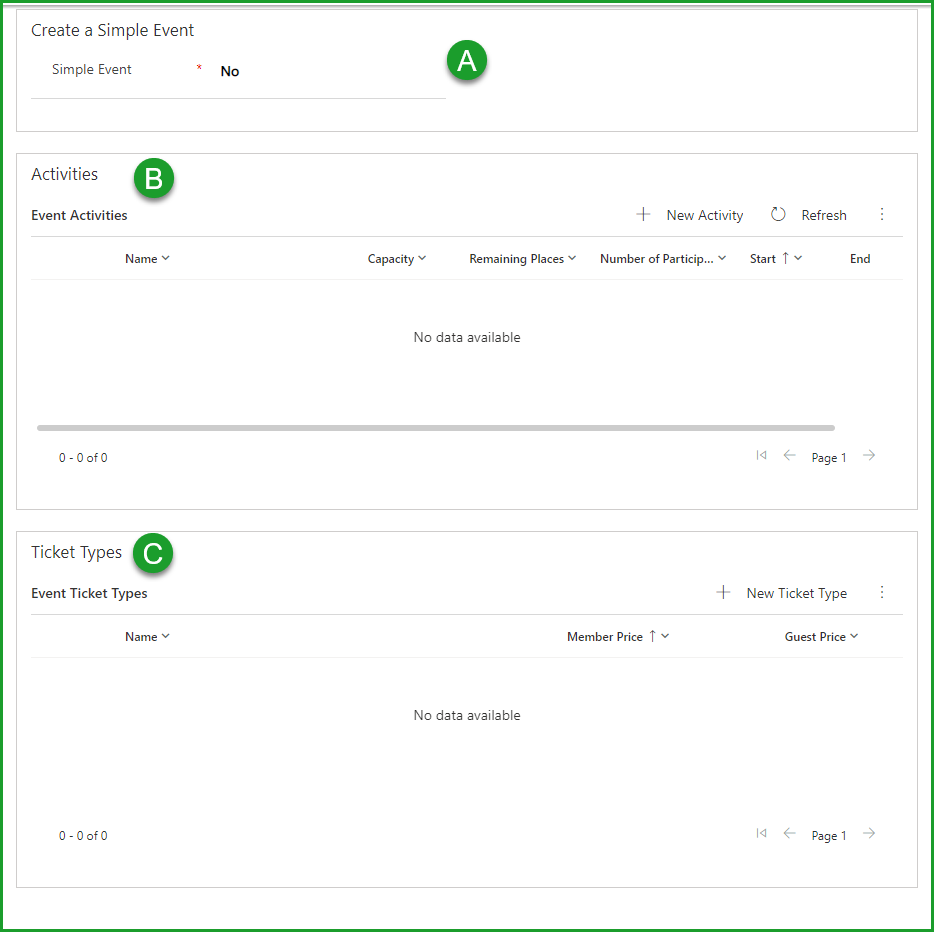
Your event has more than one activity: select No
If you select No, proceed immediately to section B. Create activities.
If you select Yes, several fields will appear and you can create your entire simple event from this simplified form.
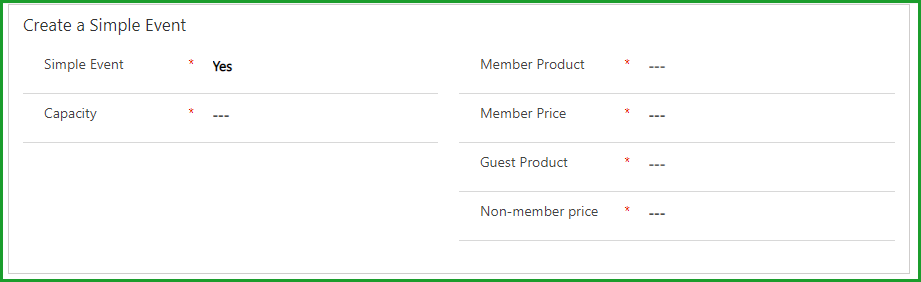
Fill the fields of the section create a simple event.
B. Create activities
It is necessary to have saved during step 2. before proceeding to the creation of activities.
Select the Activities and Tickets tab

Here are the different boxes that you will find under this tab:
Define activity
In this section you will define the activities that will make up your tickets. To create a new activity, select +New Activity at the top of the Activities box.
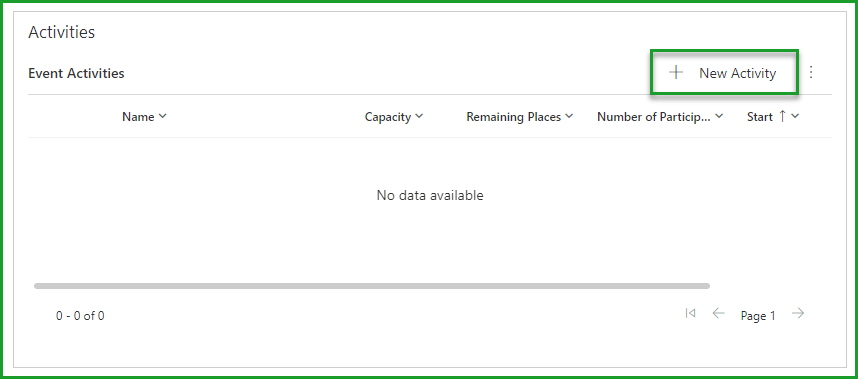
It is important to understand this process, as it is the basis of ticket creation. A ticket gives access to one or more activities.
For example, a convention that takes place over two days will include several activities (conferences, training, workshops, courses, banquet, etc.). Having multiple activities for an event allows you to make tickets that combine some of your activities.
To use the context of a convention, you could have a first ticket which includes all the activities of the first day, a second which includes all the activities of the second day and a third which gives access to all the activities of the two days.
You should see the Quick Create: Activity form appear.
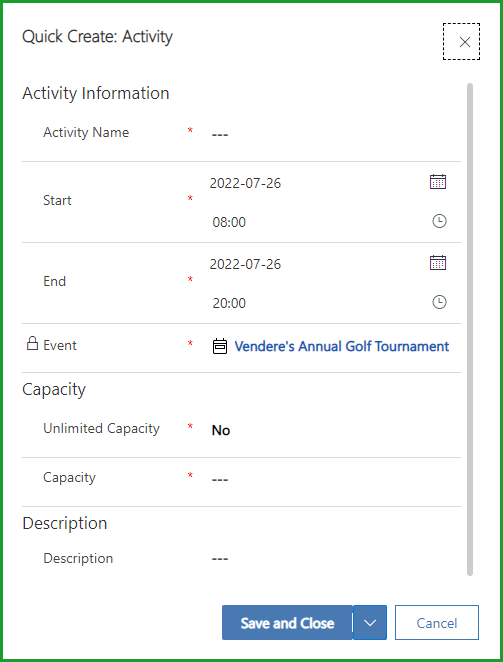
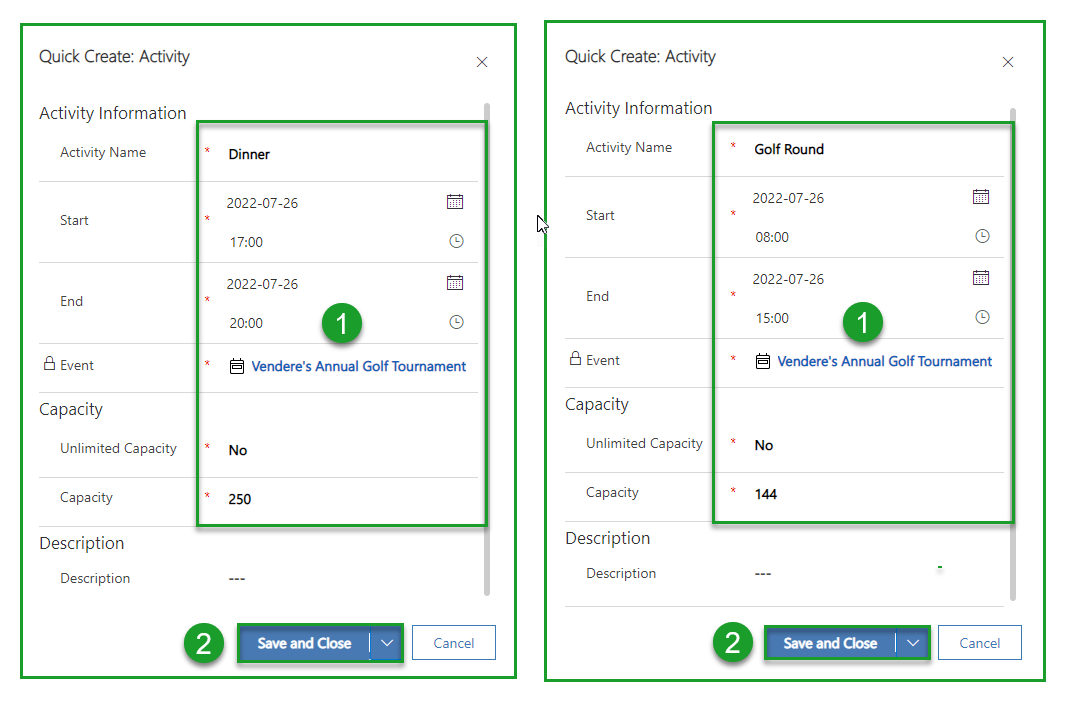
Complete the required fields of the form (1)
- Name your activity
- Establish a time slot for it
- Then determine if your activity has a limited number of places and indicate this number if this is the case.
- The description field is there to give more information about the activity to people who would like to register. One can for example think of the content of a conference/training.
Now save (2) your activity and repeat the process until all activities for your event are created.
For our day of golf, we have defined two distinct activities: The round of golf and dinner.
Creating questions associated with an activity
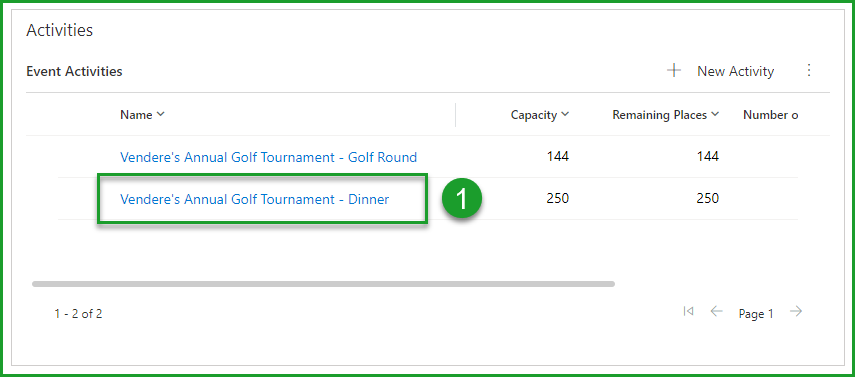
Once an activity has been saved, you can return to it to create questions that will appear on the registration form for that activity.
For example, we want to know what the participants of the Dinner activity would like to eat. So we're going to create a question and give them choices. Follow this procedure for each of the questions you want to create:
- Select the activity to be accompanied by a question
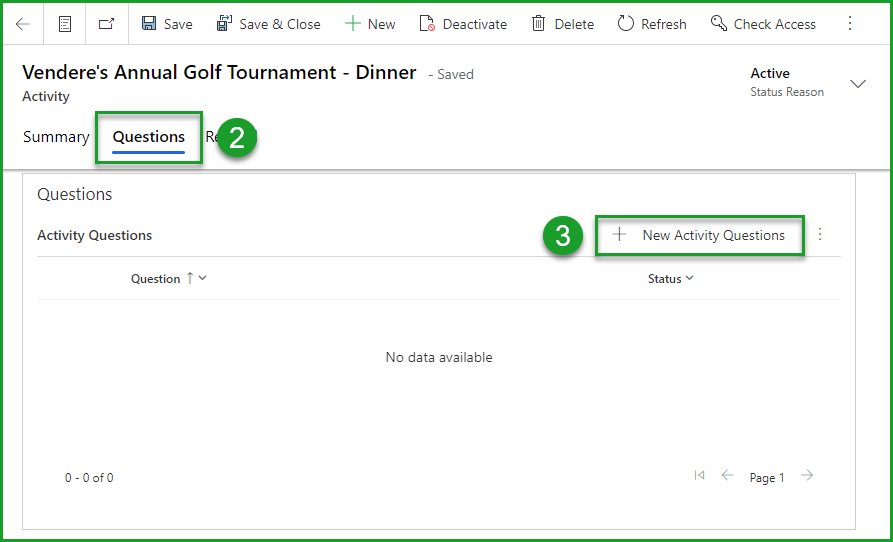
- Select the Questions tab
- Select +New Activity Question at the top of the Questions box
- Select an existing question in your system or create the question you want to ask.
To create a new question, tap the magnifying glass icon in the question field and select the +Create Question option. A new form named Quick Create: Question should appear with three required fields: Question, Type and Answer Required
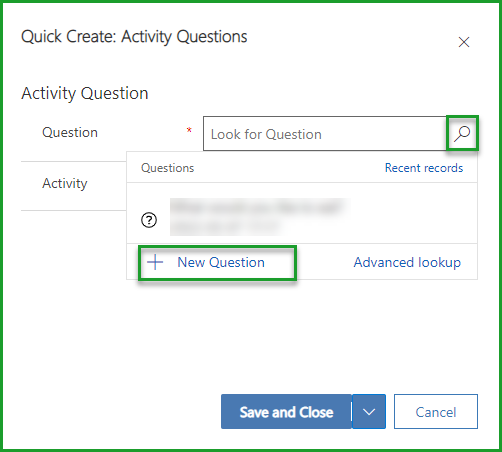
Compose the text of the question in the first field and choose the type of answer you want to receive in the second.
Here is a table showing you the different types of responses you could choose to receive:
| Types | Description |
|---|---|
| Text | It is the freest field. People who register will be able to answer whatever they want in this field. |
| Yes/No | This is the most constraining choice. You must ask a closed question (answer by yes or by no). |
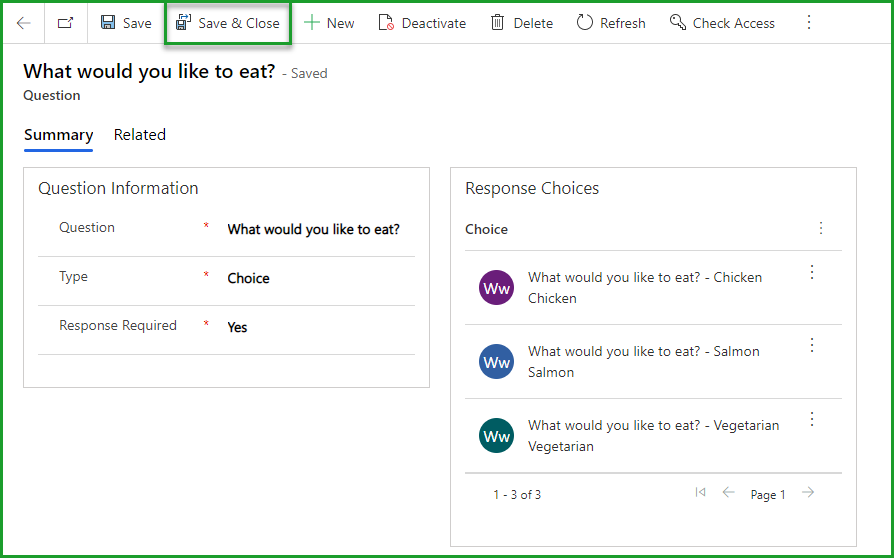
| Choice | Indicates that you want to design a multiple-choice question. This option is a compromise between the first two types. If you choose this question type, you will need to create your answer choices after you save your question. |
You will need to determine whether answering this question is required or not. If the response is required, the person trying to register for this activity must provide a response before proceeding to payment.
- Save your progress
To save your progress simply select Save and Close at the bottom of the forms
- Specify multiple choices
If you have indicated that one of your questions is a multiple choice question, you will want to define those choices.
To specify the possible answers to a multiple-choice question, select the question in box (A). Then select the +New Choice option (B) in the Answer Choices box. If you don't see this option, select the three overlapping points and you will have access to it. Set one of the choices (C) and save (D).

Repeat this manipulation until all your choices are created. Save and return to the Activities and Tickets tab of your event creation using the Back arrow.
In the same way, create all the activities that make up your event.
Create tables related to the activity
It is possible to create groups of participants for each of the activities of your event. This module can be used for tables (as its name suggests) as well as for golf foursomes or for any other group of participants. Once the creation of groups is complete, you can assign participants to each of these groups.
- Select the activity for which to create tables/groups of participants and select the Tables tab
- Select
New Table +in the Tables box to open the table creation quick form - Complete the mandatory and optional fields of the form:
| Fields | Description |
|---|---|
| Name | The name is autogenerated |
| Table code | Enter a code to identify the participant group (ex. T1, T2, T3...) |
| Capacity | Determine the number of participants that can be assigned to this group. |
| Event | Locked field that associates the activity participant group with the event you are creating |
| Activity | The group of participants is linked to an activity. The field should contain the name of the activity from which you are creating groups. |
- Select
Save and Closeto confirm the creation of this group. - Repeat steps 1 to 4 to complete the creation of all groups related to this activity.
When event registrations are made in connection with your event and its activities, you can assign activity participants to each of the groups you have created.
C. Create ticket types
It is necessary to have saved during step 2. before proceeding to the creation of tickets type.
Now that you have defined the activities that make up your event, you can think about how you want to organize them on your tickets.
For our golf day, we anticipate that some of our members will not want to take part in the game of golf, but will instead want to enjoy a good meal. This is why we are going to develop two distinct types of tickets:
Full day (includes golf for four people and dinner for four people)
Dinner only (includes only the dinner activity for one person)
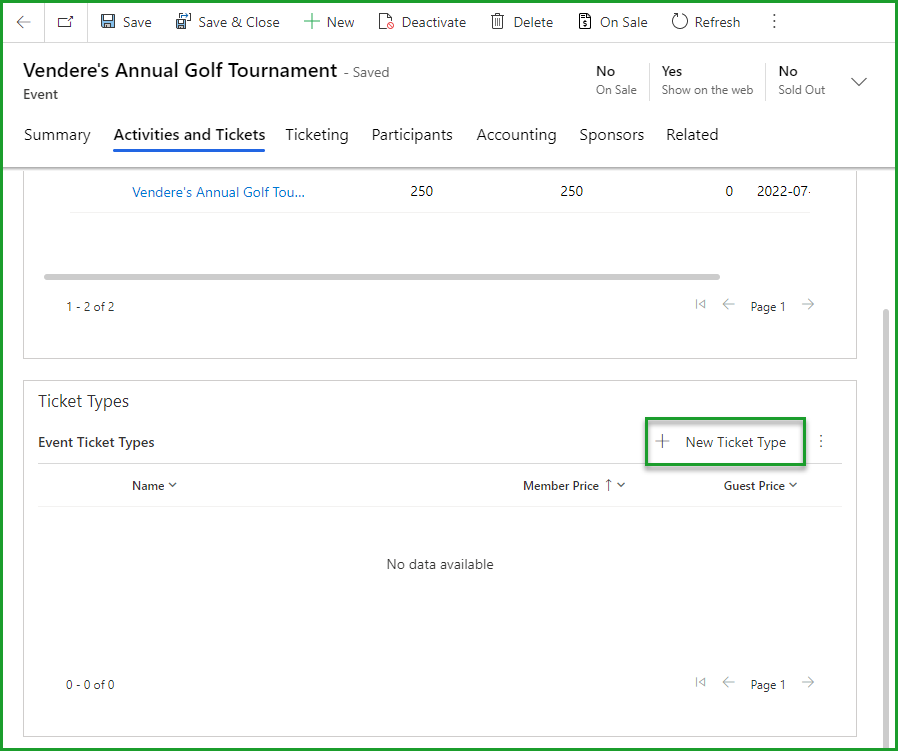
To start creating a ticket, select +New Ticket Type in the Ticket Types box.
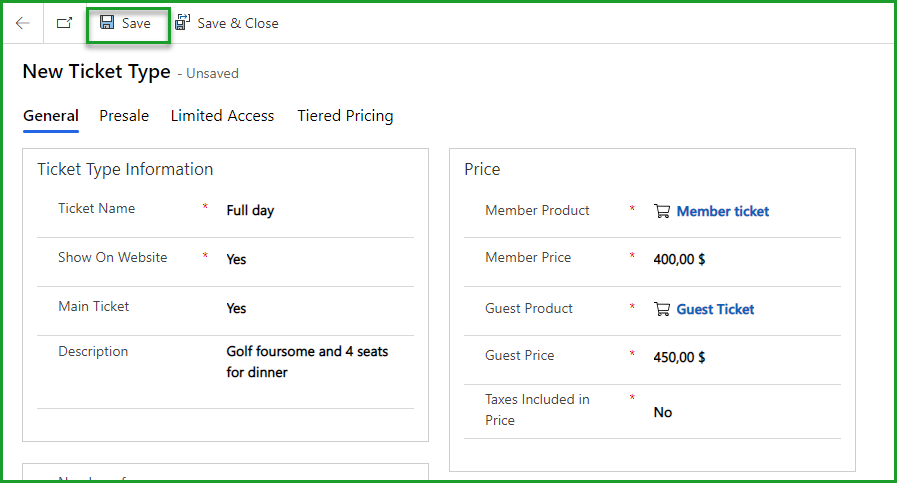
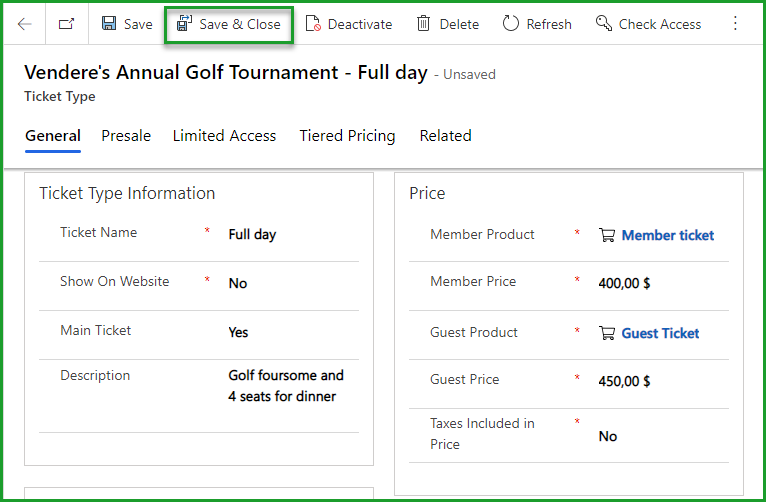
General Tab
You will find yourself in a new form called Create Ticket Type. This form has tabs which have boxes. You must complete the required fields under each tab for your ticket to be created.
Here is the general tab and the different boxes you will find there.
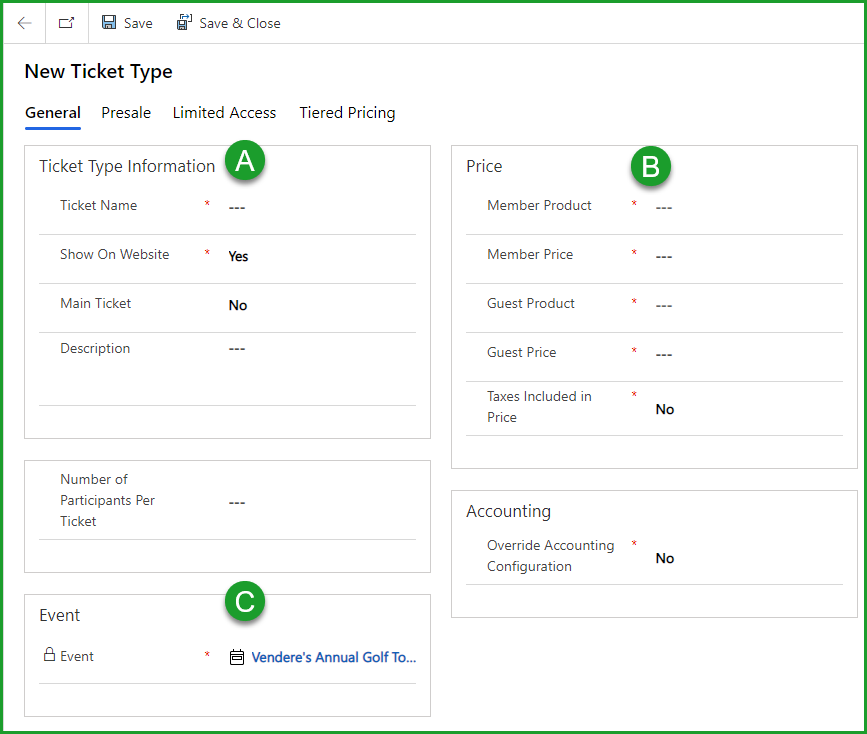
A. Ticket type information
| Options | Description | Example |
|---|---|---|
| Ticket name | This is the name your ticket will have | Full day and Dinner will be the names of the tickets. |
| Show on the web | This option allows you to display this ticket in the list of choices on your website. The option to hide a ticket type can be useful when you don't want attendees to be able to select a ticket type (ex: free ticket for your main sponsors). | We would like to display both types of tickets on our website. |
| Main ticket | This is the type of ticket that will appear first in the choices on the web. | The Full Day Ticket will be our main ticket. |
| Description | This option allows you to add a description of the activities included in the ticket. | The main ticket includes registration for a golf foursome and four dinner seats. The dinner ticket includes a seat for dinner. |
| Order | Sets the order in which tickets are displayed on the website. | Tickets are displayed in chronological order. |
| Number of participants per ticket | Determine the number of participants on each ticket. | Our main ticket includes entry for a golf foursome. So, there will be four participants on this type of ticket. |
Multiple Participant Tickets
In the event that, like us, you would like to make a ticket with several participants, it must be understood that this ticket will take, for each of the activities included in the ticket, as many places as there are participants. So our ticket, which has 4 participants, will take 4 places for the dinner activity and 4 places for the golf activity.
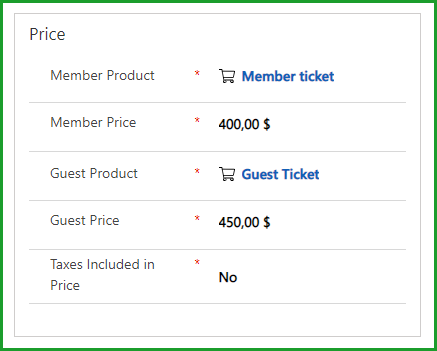
B. Price
| Options | Description |
|---|---|
| Member Product | Enter here your code for your accounting system which indicates that the transaction is that of a member product. |
| Member Price | Indicate the price your members will pay for this type of ticket |
| Guest Product | Enter your code here for your accounting system that indicates the transaction is for a guest product. |
| Guest Price | Indicate the price that non-member attendees will pay for this type of ticket. |
| Taxes Included in Price | Determine here if taxes are included in the price indicated or if they will be applied when generating the invoice. |
Save your progress
Save your progress to create the ticket in the system and to gain access to adding activities.
C. Event
Once the first boxes have been completed and saved, this box should change. Indeed, you will see that it is now possible to add activities to your ticket.
To do this, select Add an existing Activity from the three overlapping dots (1). Then find the activities you want to add to the ticket among those you have created related to your event. (2-3)
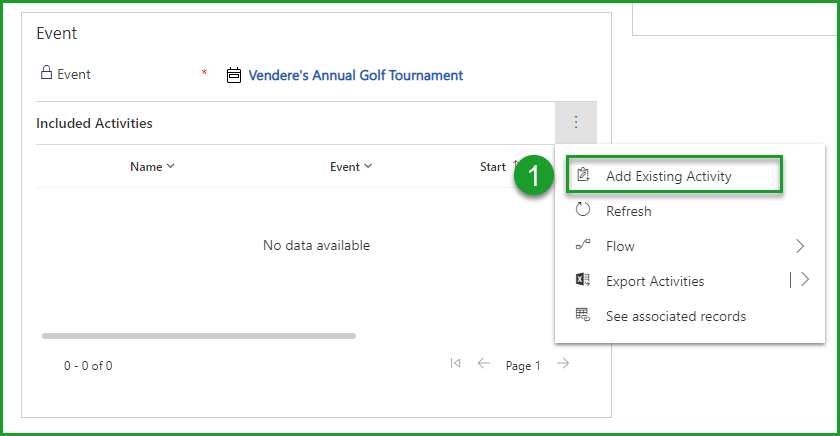
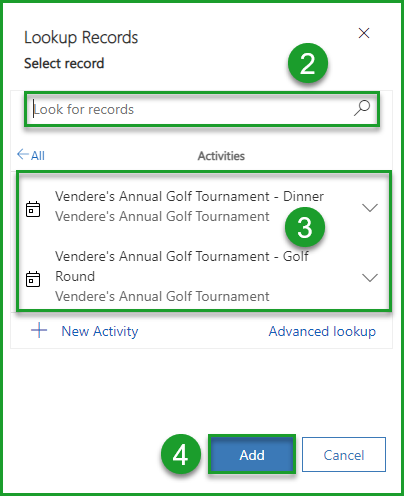
Once you have chosen all the necessary activities for this ticket, save and move on to the next section.
Presale Tab
Pre-sales are a good incentive for ticket sales and allow you to make forecasts related to your event.
Select the Presale tab if you wish to pre-sale tickets. By default, Membri 365 is configured to not pre-sell.

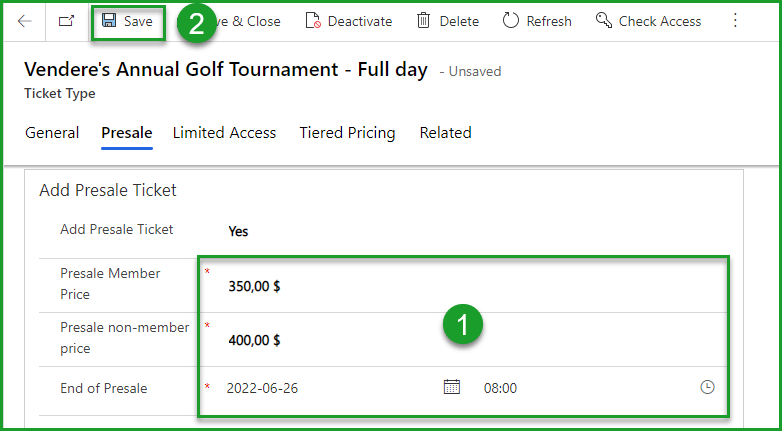
If you choose to add a presale ticket, new fields will appear that allow you to create presale tickets and determine the presale deadline.

| Options | Description | Example |
|---|---|---|
| Add presale ticket | Decide if you want to sell presale tickets. | Our pre-sale ticket will be the one for the full day. |
| Presale member price | Adjust member price for pre-sale ticket | $350 |
| Presale non-member price | Adjust non-member price for pre-sale ticket | $400 |
| End of presale | You can determine when the presale will end and regular ticket prices will be active. You can also specify the time at which this presale will end. | The presale will end one month with the event on June 26. |
Complete the mandatory fields of the form (1) and save the changes made (2).
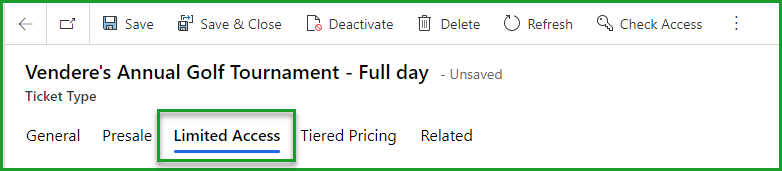
Limited Access Tab
This tab allows you to set limits related to the ticket you are creating. However, it does not display if you have pre-sale tickets.
You might want to limit access to this type of ticket for several reasons. Each of the boxes in this tab allows you to limit access in a different way.
Keep in mind that you are still creating a single type of ticket and that the limits will only apply to this type of ticket.
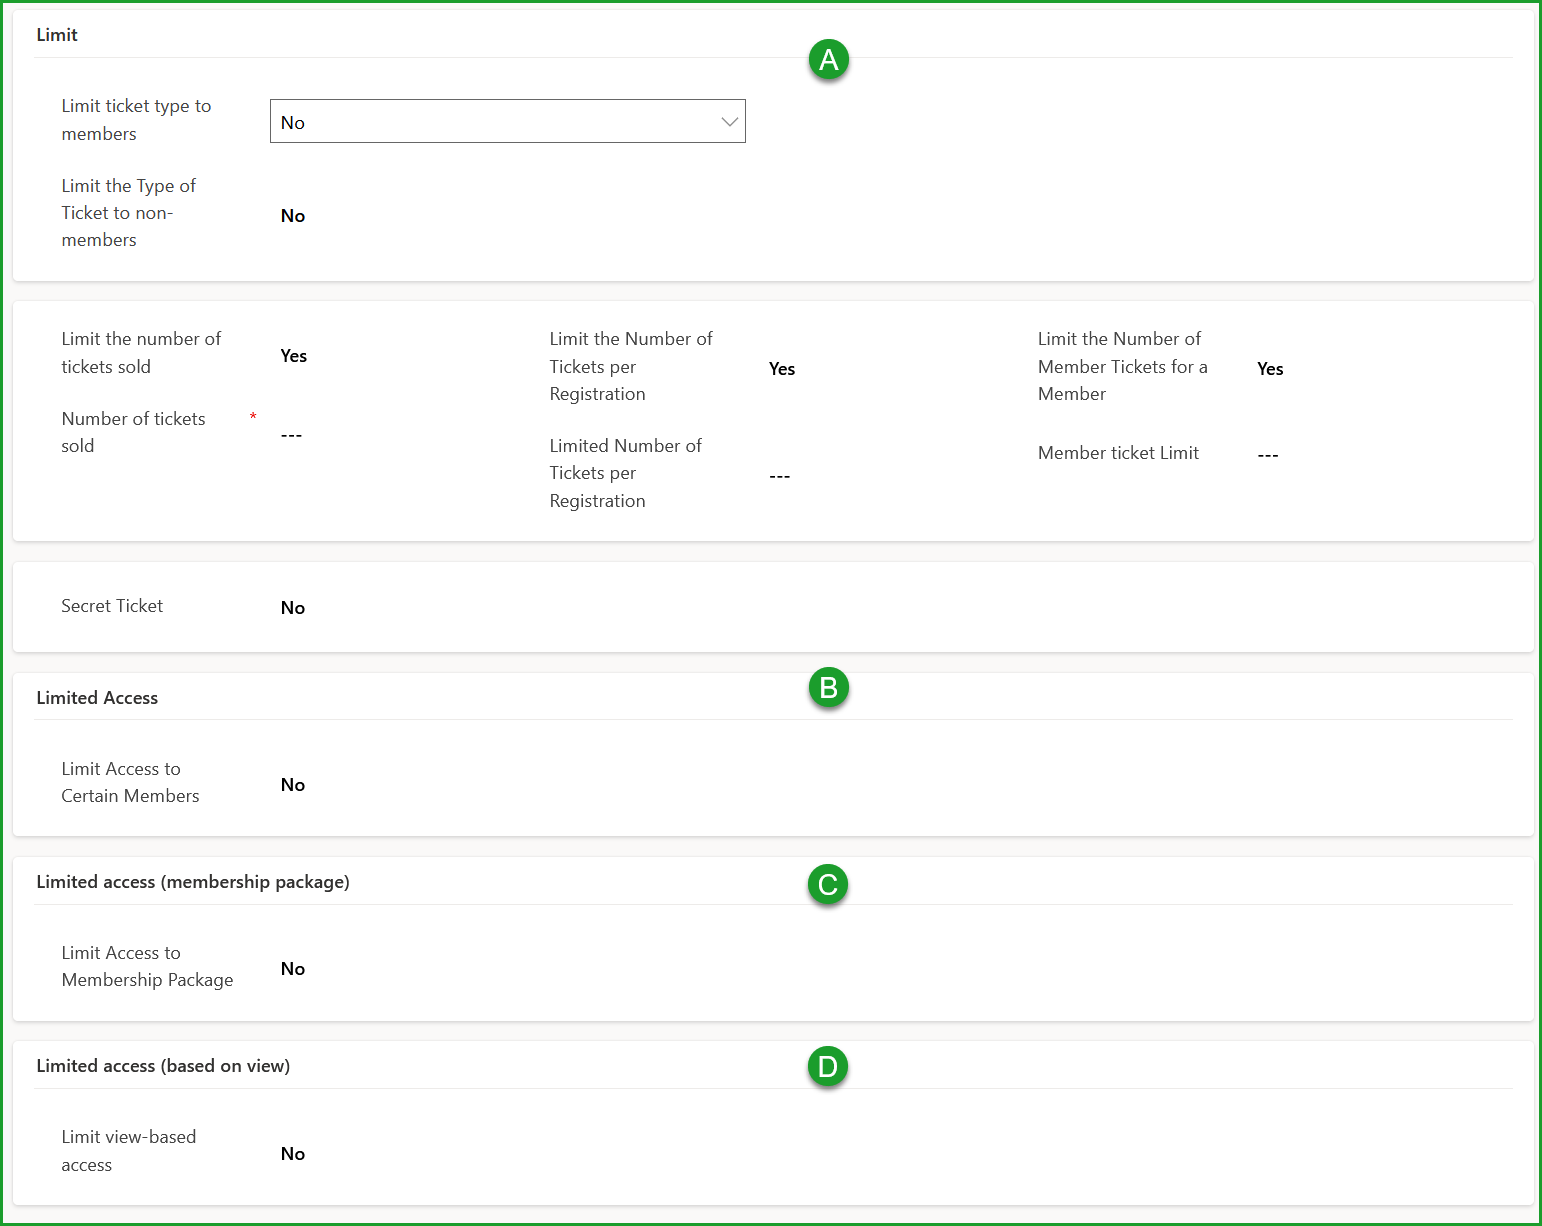
A. Limits
| Options | Description |
|---|---|
| Limit ticket type to members | When this field is enabled, the ticket you create will only be visible to members of your organization. |
| Limit ticket type to non-members | Choosing Yes here will make this ticket type only available to people who are not members of your organization. |
| Limit the number of tickets sold | Allows you to fix a limit of tickets sold for this ticket type. This limit does not only apply to an event registration, but to the ticket type as a whole. |
| Number of tickets sold | If the Limit the number of tickets sold field is Yes; Allows you to indicate the limit of tickets sold for this ticket type. |
| Limit the number of tickets per registration | Determine if you want to limit the number of tickets of this type that can be purchased when registering for this event. Then determine the number of tickets that can be purchased at registration. |
| Number of tickets limited per registration | Indicate how many tickets of this type can be purchased per registration. |
| Limit the number of member tickets for a member | Choosing Yes here will make this ticket type only available to people who are members of your organization. |
| Limit number of member tickets | Indicate how many tickets of this type can be purchased per registration. |
| Secret Ticket | Functionality that allows you to limit this type of ticket to people with a URL that contains a secret code. The ticket is therefore linked to a URL and not to a member status or to elements of the database. |
| Secret code | Secret code that appears at the end of the URL associated with a secret ticket. |
| URL for secret-tickets | The URL that contains the secret code that gives access to the secret ticket. This URL is auto-generated when you indicate that the ticket is a secret ticket, enter a secret code and save this type of ticket. This URL can be copied and added to any type of communication. |
B. Limited access (member)
The following options allow you to limit access to this type of ticket to certain of your members. Only the accounts you choose will have access to this type of ticket.
| Options | Description |
|---|---|
| Limit access to certain members | Determine if you want only some of your member accounts to have access to this type of post. |
| Reserve a number of tickets | Indicate whether you want to book tickets of this type for selected member accounts. |
| Number of tickets to reserve | Specify the number of tickets of this type to set aside for selected member accounts. |
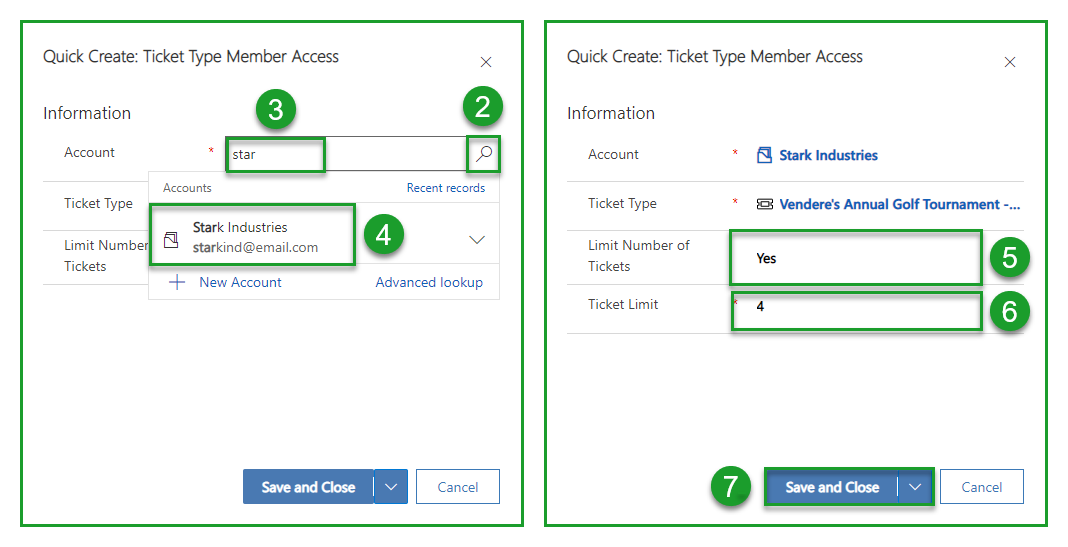
To choose which member accounts will have access to this ticket type, select +New Member Access for a ticket type (1). Search for an account you want to give access to this type of tickets (2-3) and select it (4). You can then determine how many tickets of this type this account is entitled to (5-6). Then save your progress (7). Repeat these steps for any other member accounts you want to give access to this type of post.

C. Limited access (Membership package)
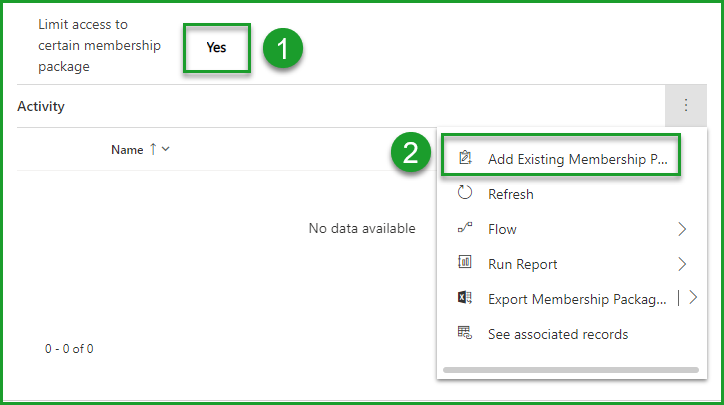
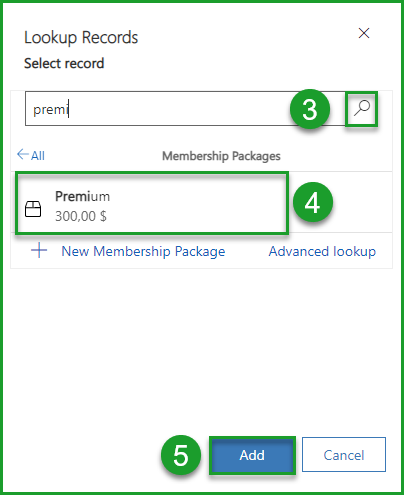
The following options allow you to limit access to this type of post to a set of member accounts that have the same subscription type. For example, you probably don't want all your members to be able to choose tickets that are reserved for your sponsors. Then identify that your sponsor tickets can only be seen by the appropriate subscription set.
To achieve this, indicate that you want to limit access to this type of ticket(1). Then select Add an existing Subscription Option Set (2). Then search among your subscription sets (3) and select the set to which you want to give access to this type of ticket (4).
D. Limited access (based on view)
This limit is probably the most flexible to use for your ticket types. As the name suggests, it is possible to limit the access of your ticket types with a view of accounts or contacts.
- Create a view with filters of accounts or contacts in your environment;
Savenew view;
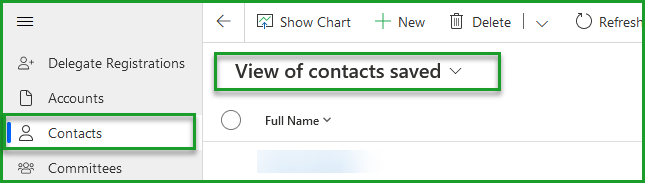
Copy the name of the view so that you can easily reinsert it into the upcoming text field.
- Select the Limited access tab;
- Select the ticket type you want to limit the access to a view;
- Change the Limit view-based access field to Yes;
- Complete the text field View Name by inserting the exact name of the view you created;
- Using the Entity type field, select whether it is an account or contact view;
Save.
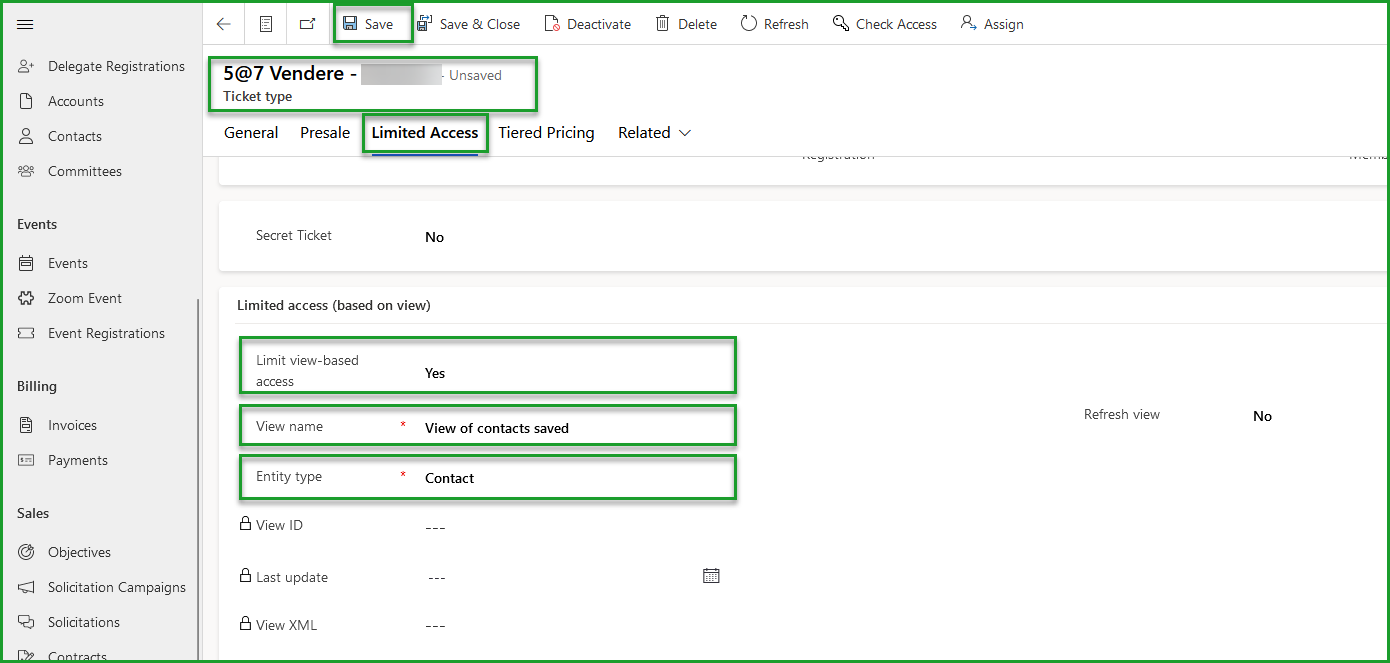
If records are added to the selected view after you create your limited access, you can refresh the view to reflect the new items it contains.
- Change the Refresh View field to Yes;
Save.

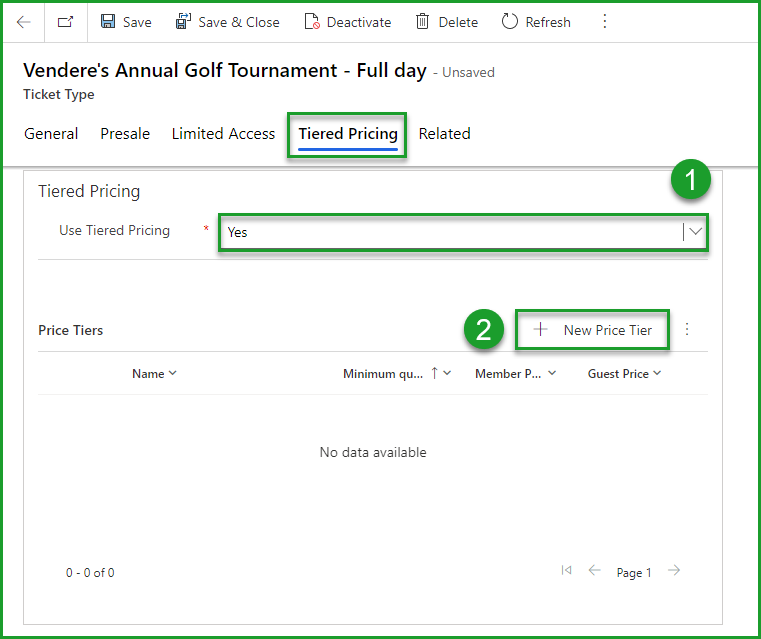
Tier Pricing Tab
Tiered pricing allows you to make promotions for the purchase of a specific quantity of the type of ticket you are creating.
To create a new such promotion for this ticket type, indicate that you want to use tiered pricing (1). then select +New Pricing Tier (2).
A Quick Create: Pricing Tier quick form should open. Fill in all fields (3). Save your new promotion (4).
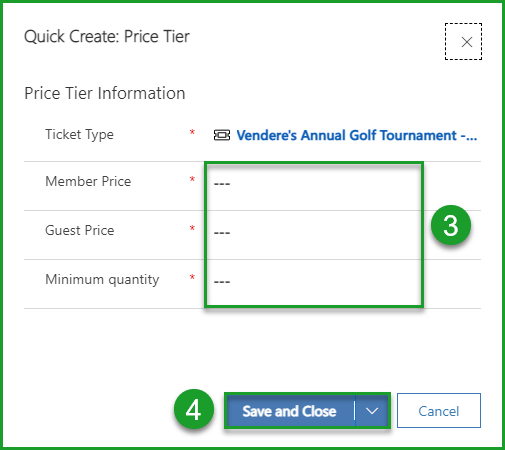
| Options | Description |
|---|---|
| Member price | Enter here the member price to which you have applied a discount |
| Non-member price | Enter the non-member price you discounted here |
| Minimum quantity | Determine the quantity of tickets of this type that must be purchased during registration to benefit from the prices of the two previous fields. |
Save your progress and repeat the ticket creation process for all tickets needed for your event.
Once this step is completed, save your progress and go to the next tab in the initial form of creating your event: that of Ticketing
4. Adjust ticketing settings
The creation of activities and tickets is now complete. However, you have not quite completed the process of creating an event.
Select the ticketing tab. This tab allows you to adjust some of the integrated ticketing settings.
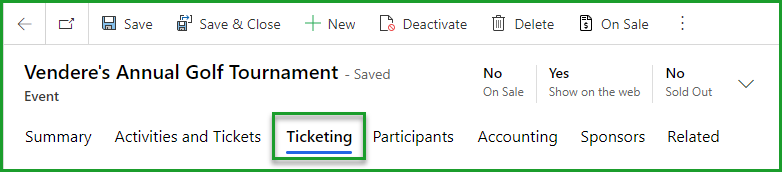
Here are the different boxes you will find there:
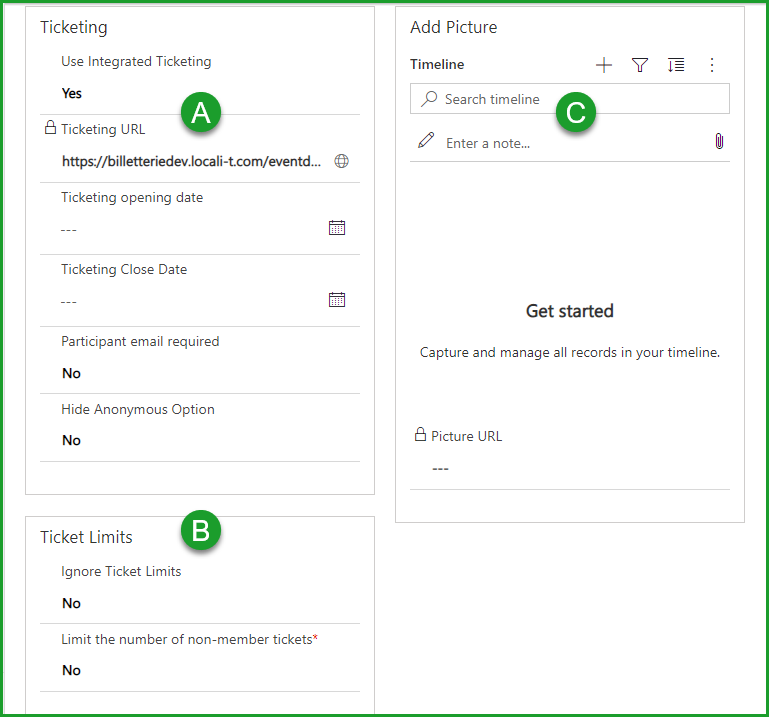
A. Ticketing
Fill the fields of the ticketing section.
B. Ticket Limits
Fill the fields of the ticketing section.
C. Add an image
It is possible to add a .png or jpeg/.jpg type image and there is no limit on the image ratio.
5. Put tickets on sale
You have gone through all the steps of creating an event. Now all you have to do is wait for the date you want the tickets to go on sale and select On Sale from your toolbar.
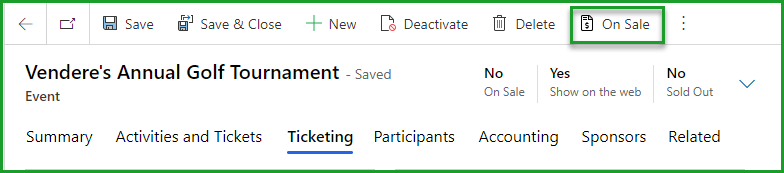
Make changes to your event
Once an event goes on sale, it's not too late to make changes to it. Just select Stop Sale from your toolbar. You will only have to put it back on sale once you have made the necessary changes.

Copy an event
Are you planning the next edition of an event that you have already created before?
If the answer to this question is affirmative, know that it is possible to copy all the details of an existing event. You can of course make the necessary changes (dates, price increase, changes in the description, etc.). The copied event will have all the configurations of the original event. Of course, the new event will not have the history and registrations of the old one.
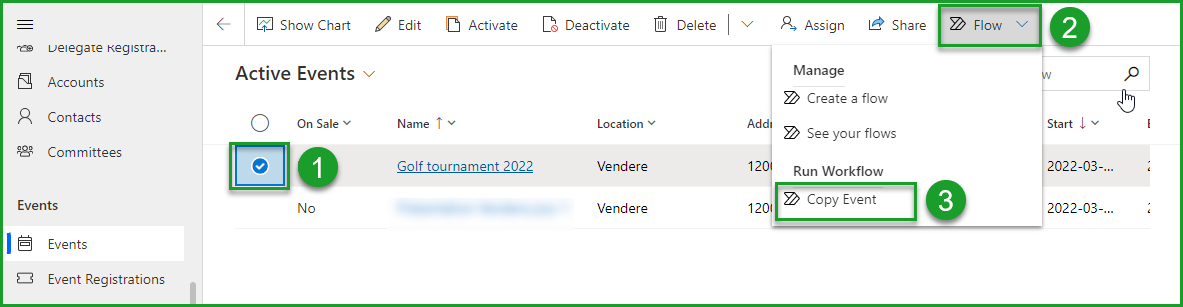
1- To copy an event, start by selecting the existing event to be copied by checking it (1).
2- Then select Flows from the toolbar (2) and use the Copy event flow (3).
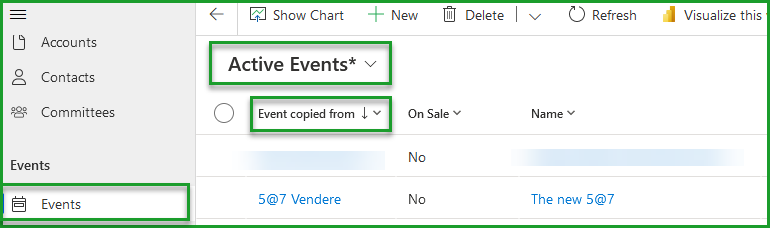
You can find out which event is a copy using the Event copied from field.
- View the list of all your active events;
- Add Column Event copied from.
Generate Physical Tickets
You can, through the app for scanning physical tickets, generate physical tickets and at your event to know the presence of participants.
In order to use this function, it is necessary to configure the physical tickets in Membri 365 with a member of our team. Feel free to contact us at support@vendere.ca to schedule the setup of this feature in your environment.
Configure Physical Tickets in Membri365
On your side
- Ensure that the Generate Tickets field in the Summary tab of each event for which you want to send physical tickets indicates Yes;
- Download the app for scanning physical tickets.
On the side of our technicians
- Ensure that the Use Physical Tickets field in the system settings indicates Yes;
- Ensure there is an email template for physical tickets selected in the chapter;
- Configure registration confirmation and reminder templates to include the URL of the physical tickets.
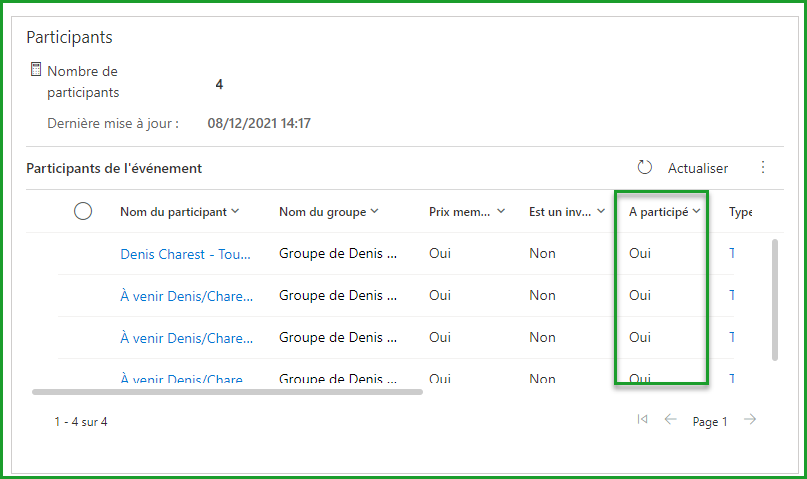
Once the ticket is scanned using the app, the presence of the participant whose ticket you scanned will be indicated in the Attended column of the Participants tab of your event.
Set up physical tickets in Membri 365
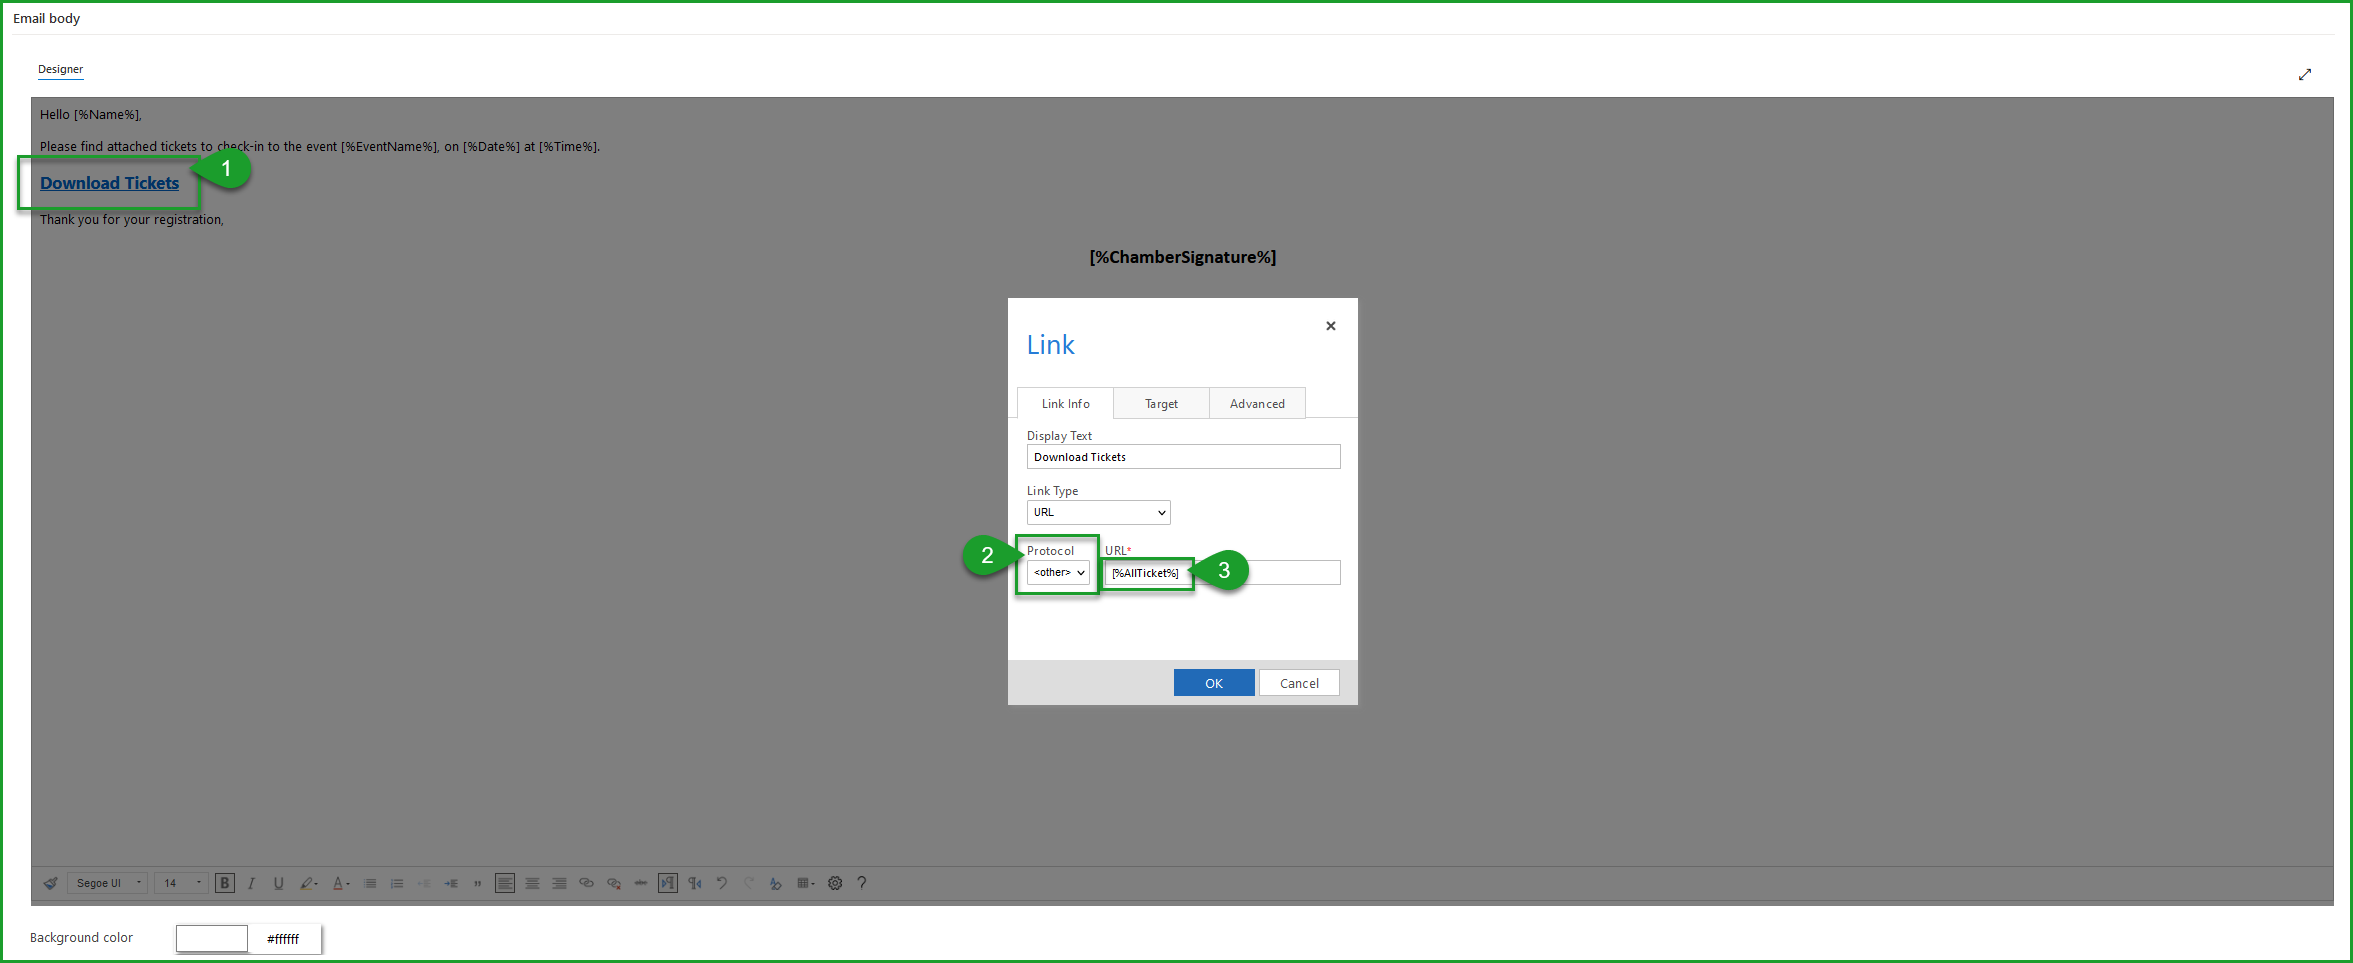
Physical Tickets
Embed the [%AllTicket%] token in a URL link within the email. The Protocol of the link should be identified as Other in the URL link.
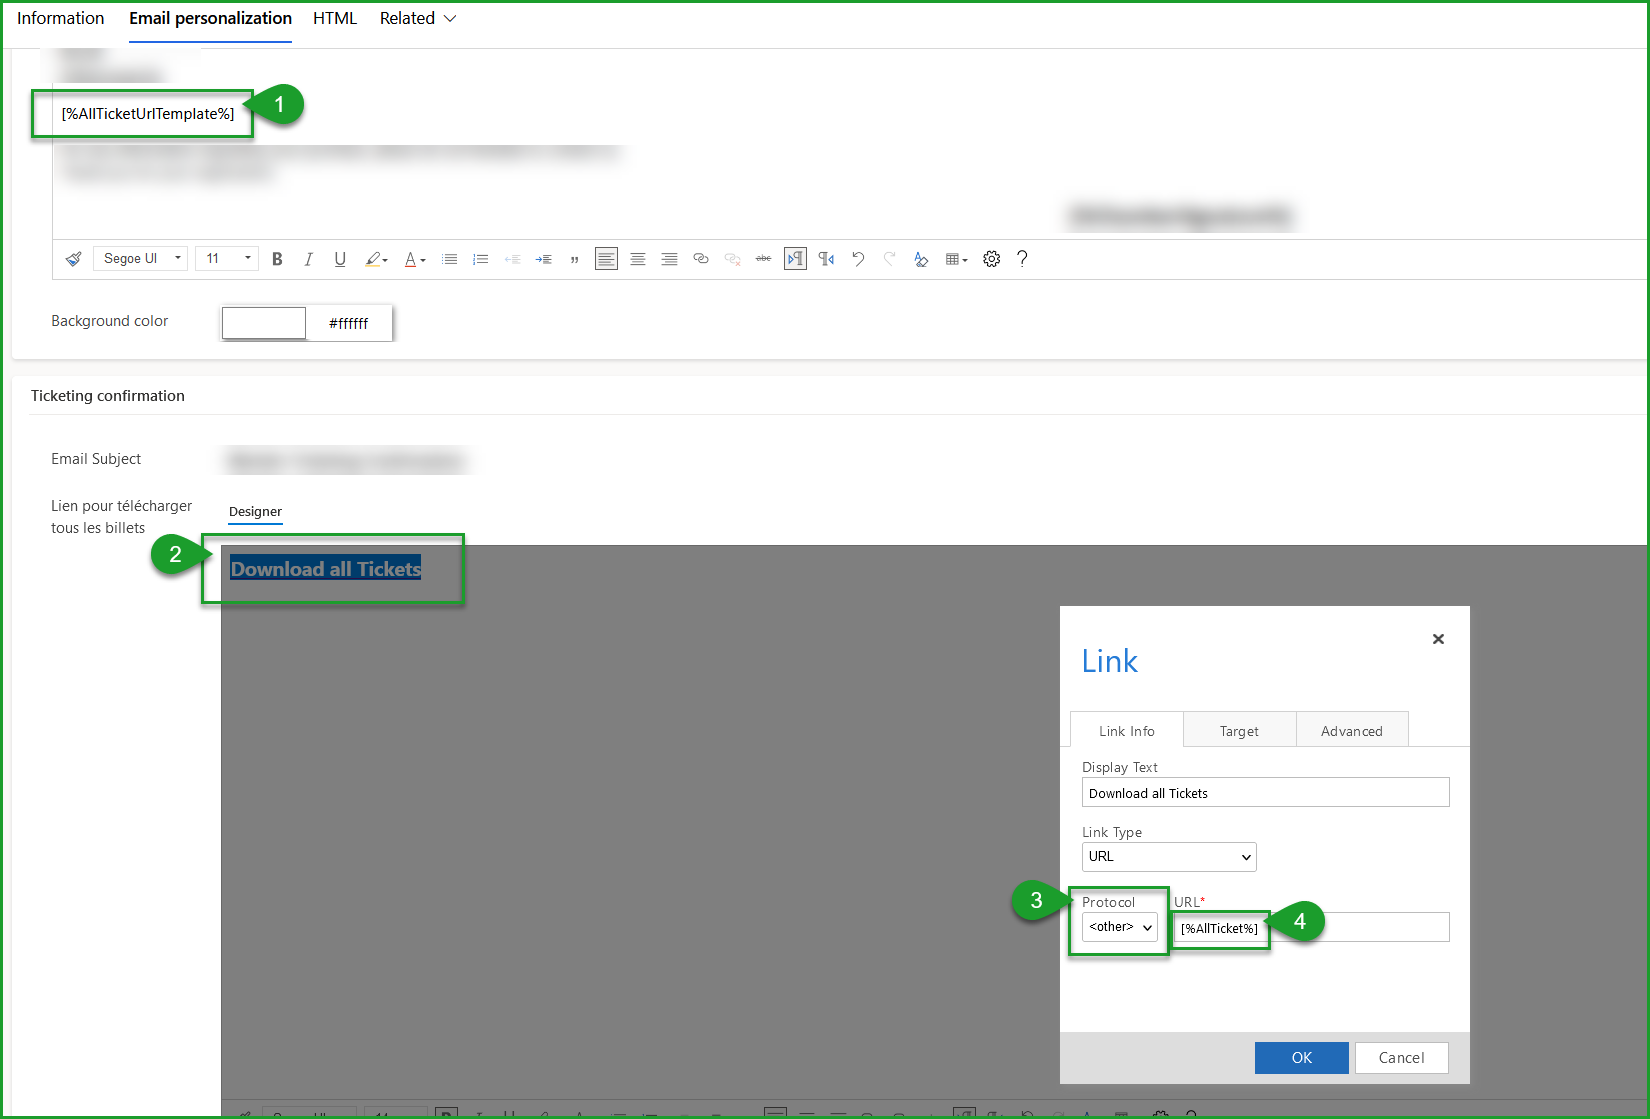
Confirmation and Registration Reminder
Embed the [%AllTicketUrlTemplate%] token in the body of your email.
In the Link to download all tickets field, add the text and URL link through which the [%AllTicketUrlTemplate%] token will be replaced. The Protocol of the link should be identified as Other, and the URL link should be the [%AllTicket%] token.
Resend physical tickets
Physical tickets can be resent to the owner of the event registration of your choice.
Decided to generate physical tickets, but there are already registrations for your event?
Send physical tickets to registration owner who have already been created before activating the Generate Tickets field. Registrations created after activating the field will receive the link to download their tickets in their event registration confirmation.
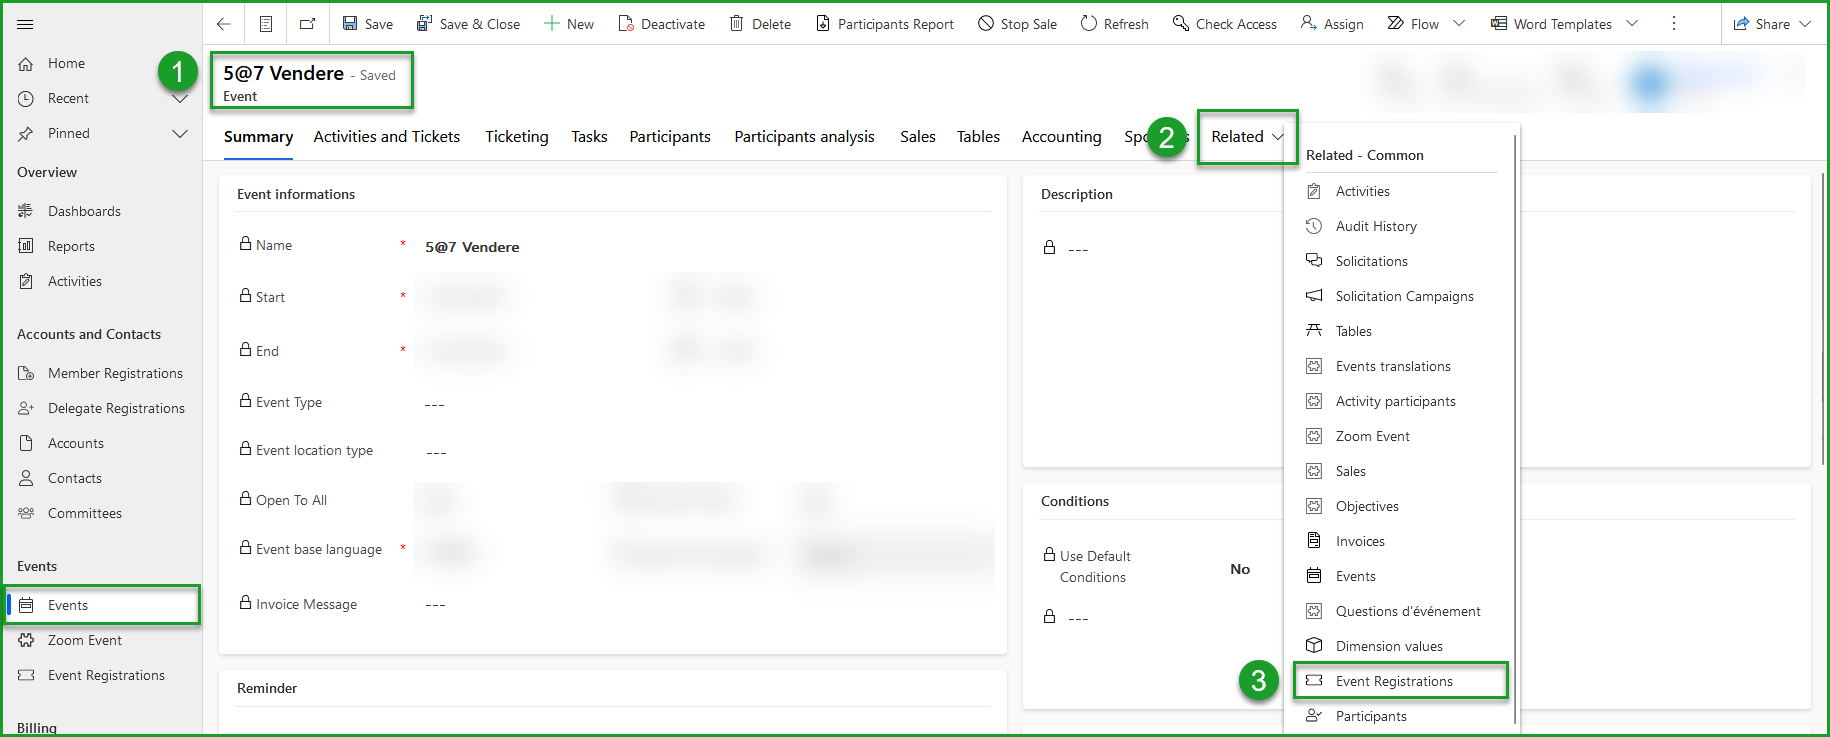
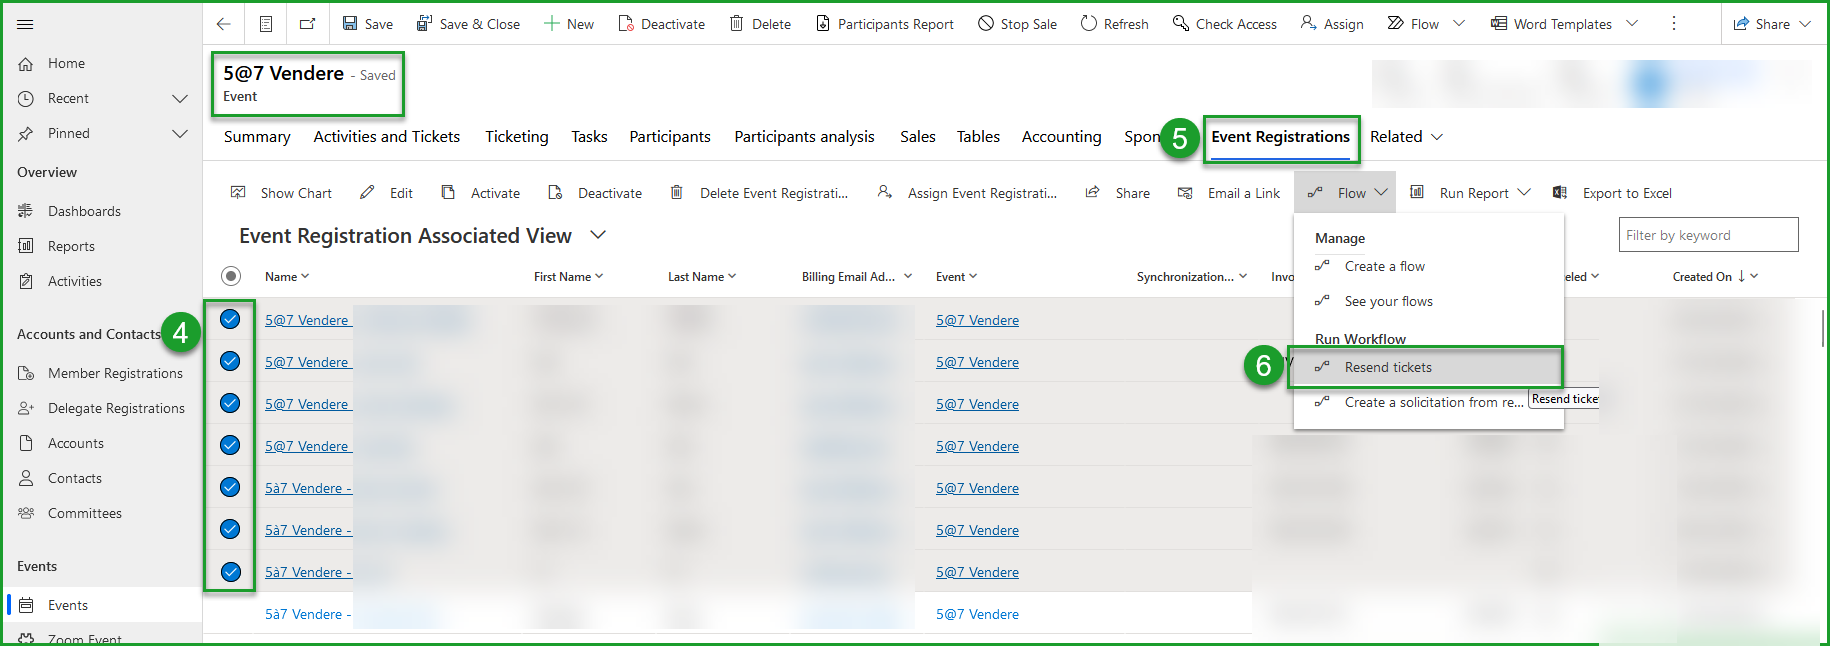
- Access the event to which you wish to resend the tickets;
- Select the Related tab;
- From the drop-down, select the Event Registrations tab;
- Select the registrations to which you want to resend the tickets;
- Select the
Flowbutton; - From the drop-down, select Resend Tickets;
Create a secret ticket
Secret tickets are accessible via a specific URL that contains a secret code.
It is not necessary to be a member of your organization or even to be in the database to have access to this ticket. All you need is the URL that points to the secret ticket.
Ideas
For example, you might want to give a discounted rate to people who are on a certain social media platform.
You could also create a secret ticket for students only accessible when a specific email is received.
- Create the ticket type;
- Select the Limited Access tab;
- Indicate Yes in the Secret Ticket field of the Limit box;
- Enter a secret code that will be displayed at the end of the URL that gives access to this ticket in the Secret Code field;
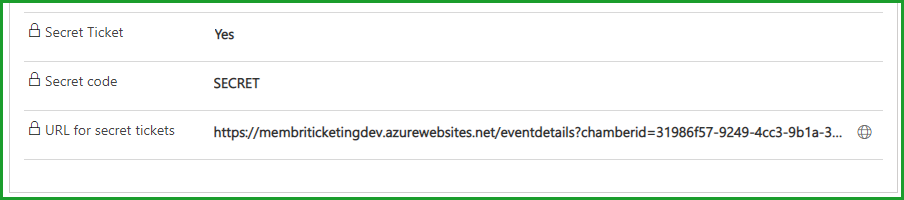
- Copy the URL generated in the URL for secret tickets field and insert it in the place of your choice (email, button, bio, etc.) so that the targeted audience can access this ticket directly on the online ticket office.
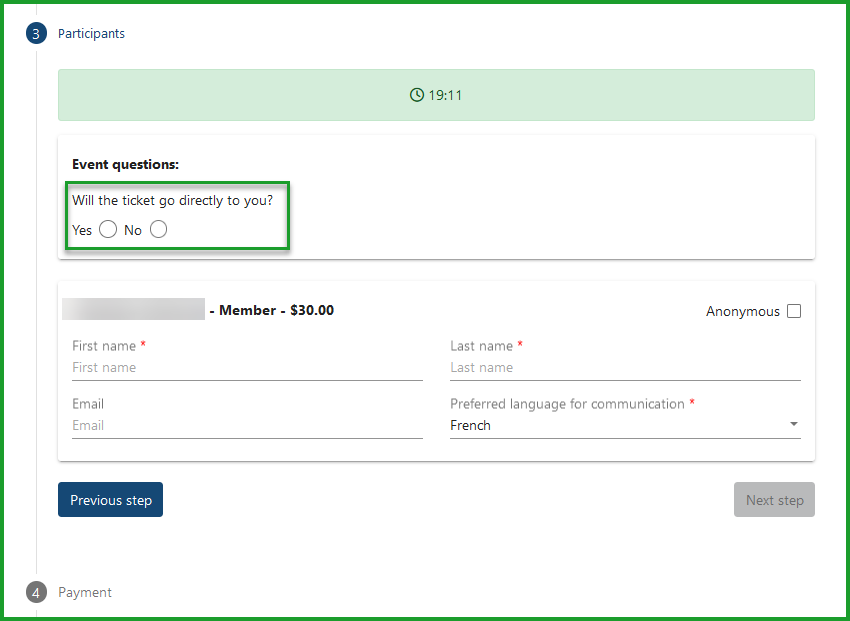
Create questions related to the event
As the title suggests, questions created here will apply to the event. They will therefore be asked systematically for each event registration regardless of the activities associated with the tickets of the participants on the registration.
If you instead want to create questions that are related to the different activities that make up an event, see this section.
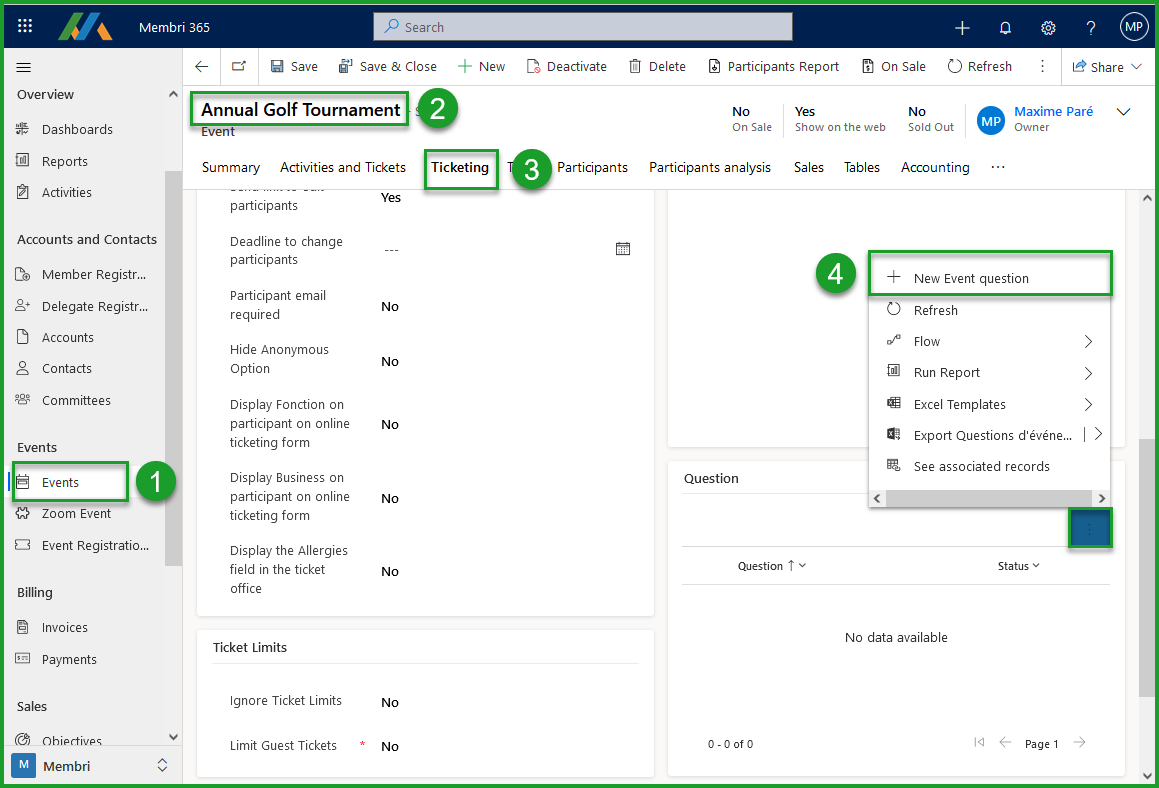
- Select the
Eventssection from the main menu; - Select the event to link questions to;
- Navigate to the
Ticketingtab; - Select
New Event Questionfrom the Question section to open the quick create event question form;
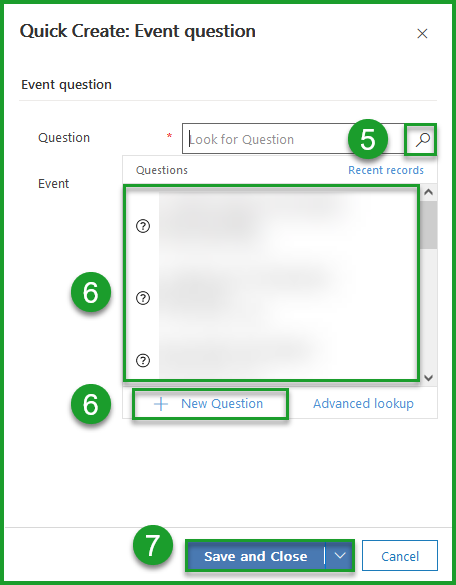
- Select the magnifying glass of the search field Question;
- Choose an existing question or select
New Questionto create a new event question;
These questions are in all respects identical to questions related to activities.
- Select
Save and Closeto associate the chosen question with the event.
The questions will related to the event will appear at the top of third step of the event registration process on the online ticketing.
Send Manual Reminders
Send manual reminders to selected registrations according to your specific needs. These reminders work like automated reminders, ensuring effective communication without duplicates. Each reminder is sent to the registration owner and each participant, avoiding multiple reminders to the same address.
Sending manual reminders offers increased flexibility. You can customize the reminder text and override the email template used for the send. This feature is particularly useful for last-minute changes requiring quick communication with participants. Additionally, it facilitates logistical management, such as resending physical tickets before the event.
The added reminder text will be inserted into your reminder email template. Avoid repetitions, such as usual greetings, to ensure your reminder email appears correctly.
If necessary, feel free to create a new email template for your manual reminder send.
- Select the event for which you want to send a manual reminder;
- Select the Manual Reminder tab;
- Configure your manual reminder to be sent according to your needs;
- Add personalized text to the email templates;
- Override the email template to be used with another event reminder template from the environment;
- Decide if you want to send the reminder only to registration email;
- Save;
Important: It is essential to save the reminder configurations before generating the sends.
- Select the event registrations for which you want to send the reminder;
- Click the
Send Manual Reminderbutton to finalize the send.
We recommend always sending only one manual reminder first and reviewing it to ensure it meets your needs before sending all reminders.
Once the send is completed (which may take a moment, so feel free to refresh the data), the Last manual reminder sent on field will automatically be updated in your event registration view, allowing you to track effectively.
Create a Head Table
You can create a head table for your guests using personalized participation invitations for certain members. This feature allows you to send invitations to selected contacts.
Upon responding to your invitation, you can either Accept the invitation sent to them to include them as participants at the head table or Decline and keep track of the invitations sent.
Guests at a head table are not automatically added to the event's participant list.
Use the standard table module to assign event participants to a table.
- Select the Head Table tab.
- Change the
Has a head tablefield to Yes. - Select the user or email address to send the invitations via the
Send invitation emails fromfield. - Choose the Email template to use for head table invitations. Use the magnifying glass to choose from available templates.
- This choice sets up the overall message, but you can customize the content in the text fields to automatically integrate information into the template when sent.
Save.
Configure the Sent Invitation Message
Fill in the text fields to customize the messages contained in the invitation sent to participants. The entered text will automatically be added to your email template at the location indicated using the token associated with the field.
| Text Field | Explanation |
|---|---|
| Email custom text | Allows you to write the body of the text that will be displayed in the email, informing the recipient of the reason for it. Template Token: [%TextEmail%] |
| Email presenter text | Allows you to add the speaker's invitation text. By default, this text is designed to appear in the attached invitation email. Template Token: [%TextPresenter%] |
| Email extra notes text | Allows you to add details related to the invitation, intended to appear in the attached invitation email. Template Token: [%TextNotes%] |
| Email registration text | Allows you to add details regarding registration for the event, which should appear in the attached invitation email. Template Token: [%TextRegistration%] |
| Email contact ressource text | Allows you to add information about the event organizer. Template Token: [%ContactInfo%] |
Create and Send Invitations
To create invitations, use the Invitations to Send or Pending Invitations sub-grid.
- Choose
+ New Invitation to the head tableorGenerate multiple invitations. - Select the recipient contacts.
Save.
To send invitations, access the Invitations to Send sub-grid.
- Select the invitations to send.
- Click
Send multiple invites.
Approve or Decline a Pending Invitation
In the Pending Invitations sub-grid, quickly approve or decline a head table invitation.
- Choose the invitation to edit.
- Make the necessary changes:
Accept Inviteto create a participant at the head table.Decline Inviteto remove the invitation from pending invitations.
Depending on your choice, the invitation will be moved to the Head Table Participants sub-grid for participant management or to Declined Invitations for tracking.
Export Head Table Participants
Export the list of participants from the Head Table Participants sub-grid using the Export Head Table Participants option.
Frequently asked questions
Why can't I edit my event?
Want to edit your event, but all fields are locked? No problem! You just have to stop ticket sales.
Do service fees apply for a free event?
No, ticketing service fees do not apply if the ticket price is $0. You can therefore use the integrated ticketing for all your events.
In what order are the tickets displayed on the online ticket office?
You can mark a ticket as the main ticket. When enabled, this ticket appears at the top of the list. All other tickets follow the order set in the 'Order' field, or by creation date if the field is left blank.
How do I create a members-only ticket?
A new ticket limit allows you to create tickets that are only accessible to your members. Their non-member rate is therefore never displayed.
- Select the ticket concerned ;
- Select the
Limited Accesstab ; - Activate the field
Limit ticket type to members; - Select
Save.
Previously, you had to make this post visible only to accounts that had a membership package linked to their account file. It's still possible, it works, but we've made it easier for you.
How do I create a free ticket?
Creating a free ticket is quite simple. You just have to enter that the price is $0. What is more difficult is to limit its access to the right people.
You want to do all those registrations manually
When creating the ticket, change the value of the Show on website field to No. It will then be impossible for anyone to see this ticket when they register on the ticket office. You will need to register manually.
You want people to book their own ticket(s)
Limit access to this ticket to accounts to whom you want to offer this ticket for free.
- Select the ticket concerned;
- Select the
Limited Accesstab and use one of the following three limits to identify the accounts that are entitled to freebies;- Limited access (member): To choose accounts one by one;
- Limited access (membership package): To choose accounts that have in common to have the same set of subscription options on their subscription. You can choose multiple sets;
- Limited access (based on a view): To limit access to this post to all accounts or contacts of a certain view of the Membri 365 environment.
- Select
Savefrom the toolbar.
How do I add a project number to my event?
Accounting by projects helps keep tracks of costs and benefits associated with a project. It is possible to associate a project code with an event, without having to create a new product. For that you need to :
Your event CANNOT be On Sale for this to work.
- Find the project number associated with your event in your accounting system;
- Select the
Accountingtab, from the events; - Indicate yes in the
Override Accounting Projectfield; - Enter the project number in the field
Project Number; - Select
Savefrom the toolbar.
How do I export a list of participants or answers?
See Participants section to learn how to export a list of participants or how to export a list of participants responses.
How to indicate the presence of participants
See Participants section to learn how to indicate the presence of participants.
Field details
The reading key helps you to better understand the vocabulary used in this section.
If necessary, use the quick search command on your keyboard Ctrl + F to target the terms you are interested in.
| Term used | Explanation |
|---|---|
| Allows | Fields that can be modified to perform a specific task |
| Displays | Field information that cannot be changed |
| During | Indications related to an important milestone the field |
| If | Prior Action or Other Field Condition |
| Warning | Important information not to be overlooked in relation to the field concerned |
Tab - Summary
Section - Event Information
It's not enough to say you want to generate physical tickets for the system to generate them. See the next section for more details on using physical tickets.
| Fields | Description |
|---|---|
| Name | Allows you to choose the name of your event. |
| Start | Allows you to choose the date and time your event starts. |
| End | Allows you to choose the date and time your event ends. |
| Event Type | Allows you to choose an event type using Quick Search or Quick Create. |
| Event location type | Allows you to choose the type of location for your event.
|
| Open to all | Allows you to choose whether the event is open to all or only to members. |
| Generate tickets | Allows you to generate physical tickets with a QR code with event registrations.
|
| Event Base Language | Allows you to choose the base language to use when exchanging with participants.
|
| Supported Languages | Allows you to choose if you want to use bilingual ticketing.
|
| Invoice Message | If you used the [%Description%] token (present by default) on your billing email template; Allows you to choose the message displayed on the invoice at the location of the token [%Description%]. |
Section - Reminder
It is not possible to send more than one reminder. If the reminder has already been sent, even if you change the date in the field Reminder sent, the system will not send a second reminder.
| Fields | Description |
|---|---|
| Send reminder on | Allows you to choose the date and time of the reminder to be emailed to participants before the event. |
| Send Reminder for Registrations Received After Initial Reminder | Allows you to send a reminder to the registrations received after the initial reminder. |
| Reminder Message | If you used the [%ReminderEvent%] token (present by default) on your registration reminder email template; Allows you to choose the message displayed on the callback at the [%ReminderEvent%]. |
| Used a personalized reminder email | If you have determined the date and time in the Send reminder on field; Allows you to choose whether you want to override the email template used for this event. |
| Custom Reminder Email Template | If the Used a personalized reminder email field is Yes; Allows you to choose the email template to use for recalling this event. |
| Reminder sent | If the reminder has been sent to participants; Displays that the reminder has been sent to participants. |
Section - Place
This section is displayed only if the Event Location Type field does not display Online.
| Fields | Description |
|---|---|
| Location | Allows you to specify the name of the event location. |
| Address | Allows you to specify the address where your event will be held. |
| City | Allows you to indicate the city where your event will be held. |
| ZIP/Postal Code | Allows you to enter the ZIP/postal code of the location where your event will be held. |
| Additional venue information | If you used the [%ReminderEvent%] token (present by default) on your registration reminder email template; Allows you to choose the message displayed on the callback at the [%ReminderEvent%]. |
Section - Description
| Text Field - Description |
|---|
| Allows you to add a description to the event. |
| If the event is posted on your website; The description will also appear on your website. |
Section - Conditions
| Fields | Description |
|---|---|
| Use default conditions | If you have configured a set of conditions that you want to apply to all your events; Allows you to apply them to this event. (We are talking about cancellation policy, refund policy, etc.) |
| Blank field | If you used the [%Conditions%] token on your invoice email template; Allows you to add special conditions that you want to apply only to this event. They will appear on your invoices at the location of the token [%Conditions%]. |
Section - Event registration confirmation
| Fields | Description |
|---|---|
| Event registration confirmation | If you used the [%ConfirmationEvent%] token on your ticket purchase email template; Allows you to add a text from the registration confirmation that will appear at the location of the [%ConfirmationEvent%] token. |
| Use a custom email template | Allows you to choose if you want to override the email template used to register for this event. |
| Event registration confirmation email template | If the Use a custom email template field is Yes; Allows you to choose the email template to use for registration for this event. |
Section - Chapters
| Fields | Description |
|---|---|
| Main Chapter | Allows you to choose the main chapter associated with this event. During event creation, the default chapter specified in your settings will be used. |
Section - Translations
| Subgrid - Translations |
|---|
| Displays a list of translations available for billing for this event. Allows you to edit or create a new translation for billing for this event. |
Tab - Activities and Tickets
- This tab allows you to create activities and create ticket types for your event.
Section - Create a simple event
This section disappears after an activity or event is created.
For details, see A. Create a simple event.
| Fields | Description |
|---|---|
| Simple Event | Allows you to determine if your event is a simple event. Membri 365 considers an event simple when it takes place only one activity and there is only one type of ticket that provides access to it. This feature is a shortcut that is offered to you to create an event faster. |
| Capacity | If the Simple Event field is set to Yes; Allows you to choose the number of seats available for your single event. |
| Member Product | If the Simple Event field is set to Yes; Allows you to choose the product used for the sale of member tickets for your single event. |
| Member Price | If the Simple Event field is set to Yes; Allows you to choose the price for participants who are members of your single event. |
| Guest Product | If the Simple Event field is set to Yes; Allows you to choose the product used for the sale of guests' tickets to your single event. |
| Guest Price | If the Simple Event field is set to Yes; Allows you to choose the price for guests of your single event. |
Section - Event Activities
This section displays only after you saved the creation of your event.
For more details, see B. Create activities.
| Subgrid - Event Activities |
|---|
| Displays a list of activities for this event. |
| Allows you to edit or create new activities for this event. |
Section - Event Ticket Types
This section displays only after you saved the creation of your event.
For more details, see C. Create ticket types.
| Subgrid - Event Ticket Types |
|---|
| Displays a list of ticket types for this event. |
| Allows you to edit or create new ticket types for this event. |
Tab - Ticketing
This tab includes features that require the use of the built-in ticketing of Membri 365. To use the built-in ticketing of Membri 365, make sure that the Use integrated ticketing field is set to Yes.
Section - Ticketing
| Fields | Description |
|---|---|
| Use Integrated Ticketing | Allows you to choose if you want to use Membri 365's integrated ticketing. |
| Ticketing URL | If the Use Integrated Ticketing field is set to Yes; Displays the URL of the built-in Membri 365 ticketing you are using for your event. If the Use integrated ticketing field is set to No; Displays the URL of the ticketing you use for your event; Allows you to insert the ticketing link you want to use for your event. |
| Ticketing Opening Date | Allows you to determine the date on which you want online ticketing to open. You will still be able to post your event on the web, but online ticketing will not be available for registrations until the specified date. |
| Ticketing Close Date | Allows you to determine when you want online ticketing to close. You will still be able to add participants manually once the ticket office closes, but this will prevent last-minute registrations. |
| Allow to pay later | Allows paying later when registering online. |
| Allow to use membership credits | Allows using membership credits for the payment of the registration invoice. |
| Allow member pricing to VIP contacts | Allow member pricing to VIP contacts on online ticketing. |
Section - Unnamed
| Fields | Description |
|---|---|
| Send link to edit participants | Allows attaching the participants' edit URL to the ticket purchase confirmation email. |
| Deadline to change participants | Allows you to determine the deadline for editing participants using the URL. You will still be able to edit participants manually, but this will prevent last-minute changes. |
| Participant Email Required | Allows you to make it mandatory to add an email for each participant of the registration. |
| Participant emails must be unique | Allows you to make all participants have a unique email on the event registration. |
| Hide Anonymous option | Allows you to deny participants being registered as Anonymous. |
| Display Fonction on participants on online ticketing form | Allows you to add a Fonction field to complete for each participant on the ticket office. |
| Display Business on participants on online ticketing form | Allows you to add a Business field to complete for each participant on the ticket office. |
| Display Allergies field in the ticket office | Allows you to add an Allergies field to be completed for each participant on the ticket office. |
Section - Ticket limits
| Fields | Description |
|---|---|
| Ignore ticket limits | Allows you to determine if a participant can bypass the ticket purchase limit. If activated, a participant could theoretically buy all available tickets for your event. |
| Limit Guest Tickets | Allows you to limit the number of tickets for guests. This allows you to ensure that a certain number of tickets will only be available to members. |
| Number of Guest tickets | If the Limit Guest tickets field is set to Yes; Allows you to choose the number of tickets that guests will be able to purchase. |
Section - Organizer
| Fields | Description |
|---|---|
| Organized by a third party | Allows you to identify if the event was organized by a third party. |
| Organized by | Allows you to identify the third party that organized the event. |
Section - Event image
| Button - Choose an Image |
|---|
| Allows you to add an image to your event. |
Section - Questions
| Subgrid - Question |
|---|
| Allows you to create questions related to the event |
Tab - Tasks
Section - Note text
| Subgrid - Note text |
|---|
| Displays the task list for this event. |
| Allows you to add tasks to your event. |
Tab - Participants
Section - Event Participants
| Subgrid - Event Participants |
|---|
| Displays the list of participants for this event. |
| Allows you to export the list of participants. |
Section - Responses to questions
| Subgrid - Answers to questions |
|---|
| Displays a list of answers to questions from this event. |
| Allows you to add answers to questions from this event. |
| Allows you to export the list of answers to the questions. |
Tab - Participants analysis
- In development
Tab - Sales
- In development
Tab - Tables
It is best to go through the activities of your event to assign participants effectively. See Create tables related to the activity for more details.
Section - Activity
| Subgrid - Activity |
|---|
| Warning, if you have created tables for more than one activity, all tables of all activities will be visible in this subgrid. |
| Displays all tables you created for the event. |
| Allows you to add tables to this event. |
Section - To assign
| Subgrid - To assign |
|---|
| Warning, if a participant needs to be assigned to 1 table for more than one activity, then the participant will be displayed as many times as he needs to be assigned to separate tables. |
| Displays a list of all activity participants to assign for this event. |
| Allows you to assign activity participants to a table. |
| Allows exporting the list of activities participants who need to be assigned to a table with their assignment preferences. |
Section - Participants assigned to a table
| Subgrid - Participants assigned to a table |
|---|
| Displays a list of activity participants who have already been assigned to a table. |
| Allows you to modify the table assigned to a participant in an activity. |
| Allows exporting the list of participants of activities with the table assigned to them. |
Tab - Accounting
Section - Project
| Fields | Description |
|---|---|
| Override Accounting Project | Allows you to override the project number associated with registration invoices for this event. |
| Project Number | If the Override Accounting Project field is set to Yes; Allows you to choose the project number that will be assigned to the products of this event. |
| Tax Group | Allows you to use a different tax group than the default for your event. |
Section - Costs and Income
| Subgrid - Costs |
|---|
| Displays a list of costs for this event. |
| Allows you to add costs to this event. |
Section - Unnamed
| Fields | Description |
|---|---|
| Transfer invoices to the accounting system | Allows you not to transfer invoices associated with this event to the accounting system. |
Tab - Sponsors
Section - Event Sponsors
| Subgrid - Event Sponsors |
|---|
| Displays a list of event sponsors for this event. |
| Allows you to add event sponsors to this event. |
Contact us - support@vendere.ca