Activities
- Types of activities
- Manage tasks
- Synchronize CRM activities in Outlook
- Synchronise Outlook items in the CRM
- Checking email delivery
Types of activities
Here are the different types of activities that can be added to the timeline of an entity in your CRM.
| Types of activities | Description |
|---|---|
| Phone call | Phone call summary that allows you to take notes during or after a phone conversation with an account/contact. |
| It is possible to send emails from the CRM, provided they have been activated. Emails will be sent from your CRM user's email address which should be the same as Outlook and will be added to the relevant entity's timeline. You will also be able to see emails sent from the CRM in your Outlook outbox. | |
| Appointment | This entity is identical to that of Outlook. It reserves a time slot in your calendar and sends invitations to identified participants. |
| Task | This activity is an action to be taken in connection with the entity it concerns. A task has a due date and a priority level. The task in your CRM is identical to the one found in Outlook and can therefore be synchronized there. |
What of notes?
Notes are not considered activities.
You can still use them, but we recommend avoiding them when it comes to doing your various follow-ups.
Since they do not contain a field, they cannot be organized as a list. This means that they cannot appear in dashboards either. They are therefore confined to the timeline in which they were created.
Manage Tasks
The tasks are ideal for following up with the different entities of Membri, for working as a team and for ensuring that you keep track of the work accomplished on each of your files.
Create a task
You can create tasks in two ways:
From a timeline
- Select the entity that interests you;
- In the Timeline module,
select
+to create an activity; - Select Task to open the task creation quick form;
- Fill in the various fields of the form;
- Select
Save and Closeto proceed with task creation.
It is still possible to select Open Record to make changes to this task. You can also select it from a task list.
From the Activities section
- Navigate to the Activities page of the Overview section of the main menu;
- Select
Taskto open the task creation form; - Complete the various fields of the form;
- Be sure to identify the entity that is concerned by this task since the Regarding field is not filled in automatically if you do not go directly through the chronology of the entity concerned;
- Select
Save and Closeto proceed with task creation.
Assign a task
- Check one or more task(s);
- Select
Assignfrom the toolbar; - Choose the user to assign the task(s);
Are you going on vacation? No problem, make a request to have all your tasks that come due during your vacation and assign them to other CRM users. Be sure to let them know beforehand though!
View your tasks
The tasks module would be rather useless if the tasks were only visible in the timeline of the entities concerned by the task.
To work effectively with tasks, follow these tips:
Check the My Tasks list in the My Activities system dashboard to see all open tasks owned by you.
Consult the Activities page of the Overview section of the main menu and use the various system views and the deadline filter to identify the tasks that interest you
Create a custom view of tasks and save it as a new view. For example, maybe you want to have all the tasks you own that are due in the next 7 days and organize them in order of priority.
Add this view to a custom dashboard to always have your tasks in view.
Make sure to synchronize tasks created in the CRM in your Outlook if you prefer to work in Outlook.
Close Tasks
Nothing is more satisfying than completing a task.
- Select the Activities page from the Overview section of the main menu;
- Select the My tasks view or any other view that you could have created in connection with the tasks;
- Check the tasks that are completed;
- Select
Mark completefrom the toolbar; - Indicate whether the task is completed or cancelled;
- Select
Close task.
If you closed a task by mistake, you cannot reopen it.
Synchronize CRM activities in Outlook
In order for activities created in the CRM to be transferred to Outlook, you must first install and configure Dynamics 365 for Outlook
You will also need to enable sending email from the CRM.
Synchronize tasks from CRM to Outlook
Of course, in order for the synchronization to take place between your Outlook and Dynamics, you will first need to download Dynamics 365 for Outlook and configure it.
Make sure you have an administrator license. Otherwise, discuss this change in the environment settings with your administrator.
- Select the gear that leads to CRM settings in the colored ribbon;
- Select Advanced Settings;
- Select Administration;
- Select System Settings;
- Select the Synchronization tab;
- Check the Synchronize appointment attachments with Outlook or Exchange parameter;
- Select
OKto confirm this parameter change.
Tasks that you close in the CRM will also be closed in Outlook and vice versa
The synchronization of tasks from the CRM to your Outlook is not instantaneous.
Synchronize appointment attachments with Outlook
Attachments that you add to appointments when creating them in the CRM are not, by default, synchronized in Outlook. However, it is possible to do so by modifying a parameter of your environment.
Make sure you have an administrator license. If not, discuss it with your administrator.
- Select the gear that leads to CRM settings in the colored ribbon;
- Select Advanced Settings;
- Select Administration;
- Select System Settings;
- Select the Synchronization tab;
- Check the Synchronize appointment attachments with Outlook or Exchange parameter;
- Select
OKto confirm this parameter change.
Synchronize Outlook items in the CRM
Synchronize an email or an appointment
Have you sent an email or meeting invitations via Outlook and realize that this information should end up in the CRM? No problem!
- In Outlook, select the item to transfer to the CRM;
- Select the Dynamics 365 icon from the toolbar/ribbon;
- Search for the CRM entity concerned by the email or appointment so that the Outlook item has to appear in its timeline.
Synchronize a task
Unlike the other two activity types discussed in the previous section, you won't find the Dynamics 365 icon in the Outlook toolbar/ribbon when you select a task. It is still possible to synchronize it.
It's much easier to create tasks directly in the CRM and automatically sync them to Outlook, but we like to give you options here.
- In Outlook, select the task(s) to be synchronized in the CRM;
- Select
Categorizefrom the toolbar/ribbon; - Select
Tracking in Dynamics 365(It's navy blue category); - Wait 5 minutes for the tasks to be transferred to the CRM;
- Select the Activities page from the Overview section of the main menu;
- Select the My Tasks view;
- Select each of the tasks and designate the entity concerned in the Regarding field.
Checking Email Delivery
Sometimes, one of your members might not have received an email. Whether it's an automated email, like a renewal notice, or a manual email from you, you can always verify the email delivery.
If you're using Outlook as your email client, you can check the emails you've sent by looking in your Outlook's Sent Items folder.
Checking Email Delivery on the Account
You can confirm email delivery by checking the account's timeline.
- Find the email in the timeline of the relevant account.
- Use the square icon to
Open the record;

- Verify the
Status Reason; - Confirm the email addresses used in the
Used TO emailsandUsed CC emailsfields.

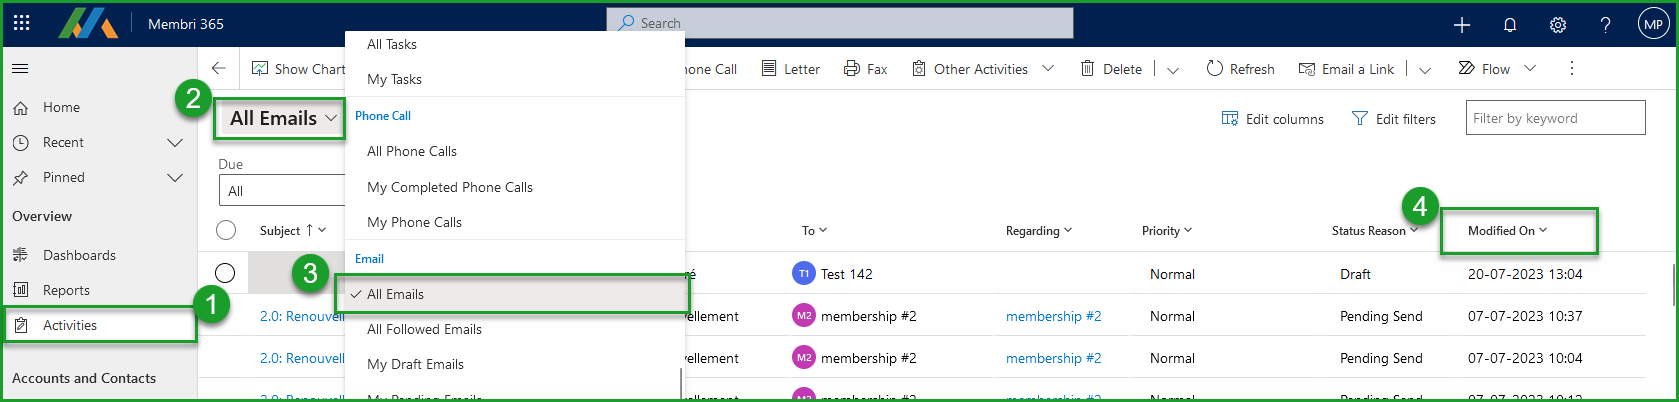
Checking All Your Sent Emails
You can review all the emails sent through Membri.
- Select the Activities section from the main left menu;
- Switch the view to All Emails;
- Choose the Modified On column;
- Sort your emails from newest to oldest.
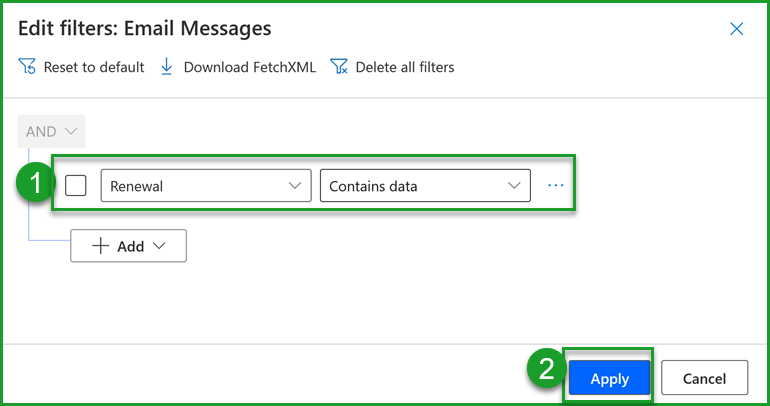
Renewal Notice Emails
You can filter all the emails related to renewal notices.
- Access all your sent emails;
- Select the
Edit Filtersbutton; - Add the Renewal filter followed by Contains Data;
- Select
Apply;
This field also allows direct access to the renewal associated with a renewal notice message.
- Access the message from the account section or from activities;
- Select the renewal at the bottom of the page.

Still unsure? Contact us - support@vendere.ca.