Accounts
The accounts are the basis of Membri, they contain all the information relating to companies, members or not. From the Accounts option in the main menu, it is possible to create non-member accounts, to consult an account file and to modify its information.
- Create a non-member account
- Consult an account file
- Update account information
- Child and parent accounts
- Make an account non-member before the end of its membership fee
- Generate a renewal before the end of a membership
- Frequently asked questions
- Field details
Create a non-member account
It is possible to create an account that does not wish to become a member directly from the list of accounts. To get there, follow these steps:
1. Start creating the account
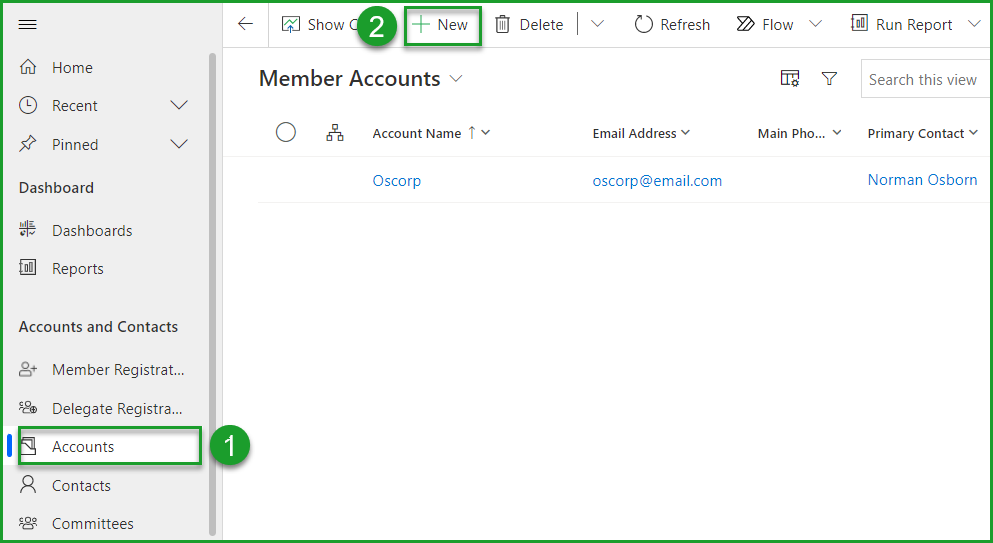
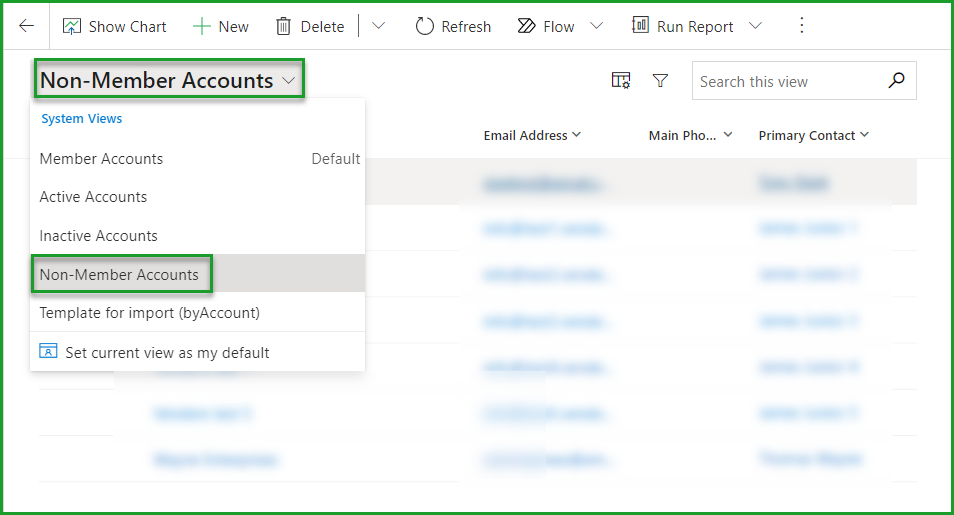
Open the form for creating a non-member account from the Accounts option of the main menu (1) by selecting the + New option from the toolbar (2)
If ever a non-member account wishes to become a member. You have to go through the Registration module and do the registration of an existing account.
2. Define basic account information
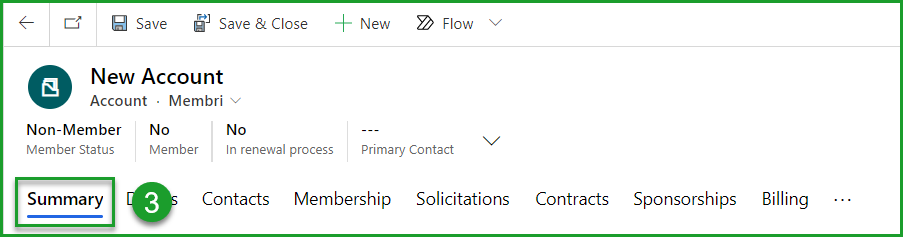
Complete the boxes in the Summary tab (3).
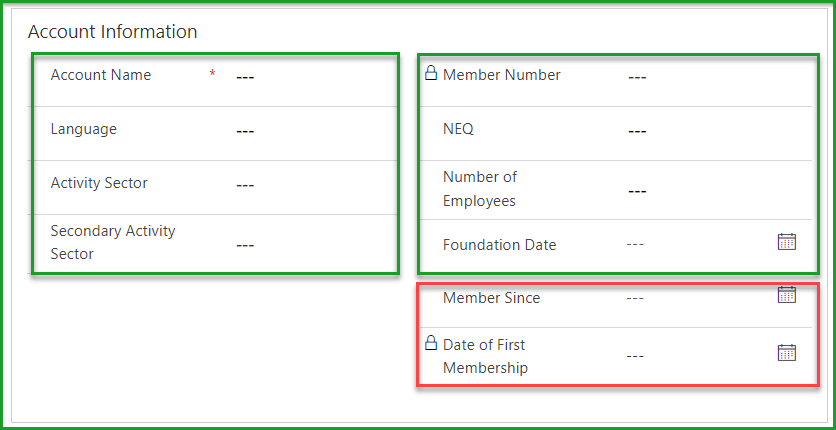
A. Account information
Enter general information about the business in the text box. You can skip all fields that are not mandatory. Also, since you are creating a non-member account, some fields (such as Member since) will not be relevant to this process.
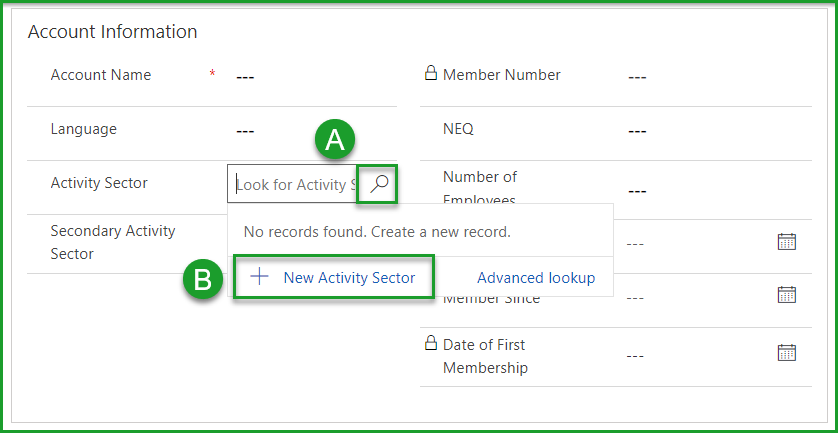
Create an activity sector
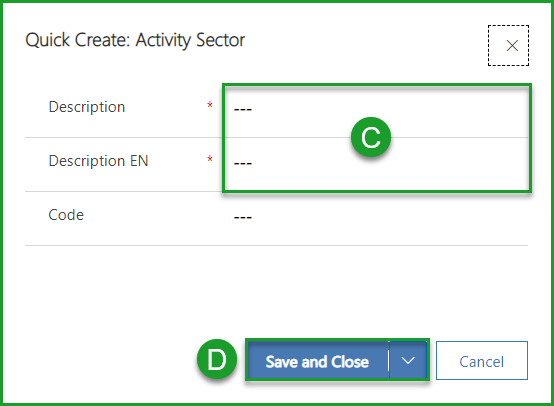
For the Sector of activity and Sector of secondary activity fields, it is possible to create a sector of activity within the field by pressing the magnifying glass (A) and selecting the option + Create Sector of activity (B) at the bottom of the drop-down menu.
The following form will open. You only have to enter the name of the desired sector of activity (C) as well as its English translation (EN). Save (D) the form to validate the creation of this activity field.
 The sectors of activity is another one of your lists that can be customized with Membri.
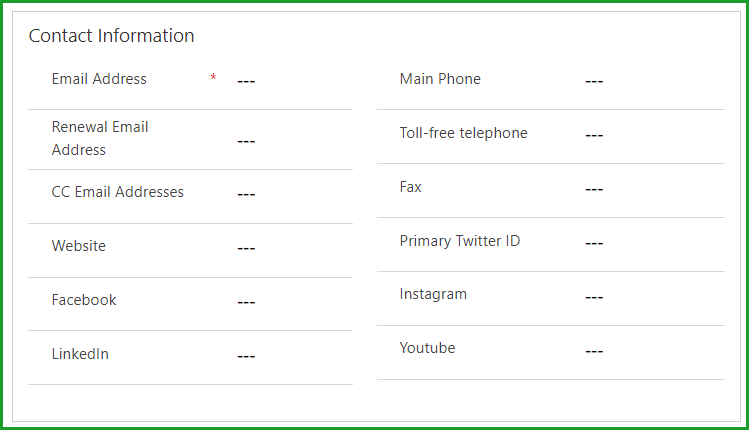
B. Contact details
Enter the details of the account you are creating.
| Fields | Description |
|---|---|
| The primary email for corporate communications. | |
| Email for renewal | The email through which your automated renewal email should go. In this case, it is not significant because you are adding a non-member account. |
| CC Emails | Emails that will receive your organization's communications in carbon copy |
C. Description
Write a brief description of the business if you wish. This description will appear on your website if the link is configured this way.
D. Notes
Write your internal notes on the company.
E. Main address
Enter the business address of the account. This address will allow the route module to locate the company on the map.
3. Add missing details
Go to the Details tab and complete the boxes found there (4).

As its name suggests, this tab is used to enter additional details to complete the basic information entered in the previous tab. Fill in the fields for which you have information.
Chapters
The Chapters section only concerns you if your organization manages several entities in the same database. You will then want to determine which part of your organization is responsible for this account card and everything related to it.

4. Add a primary contact
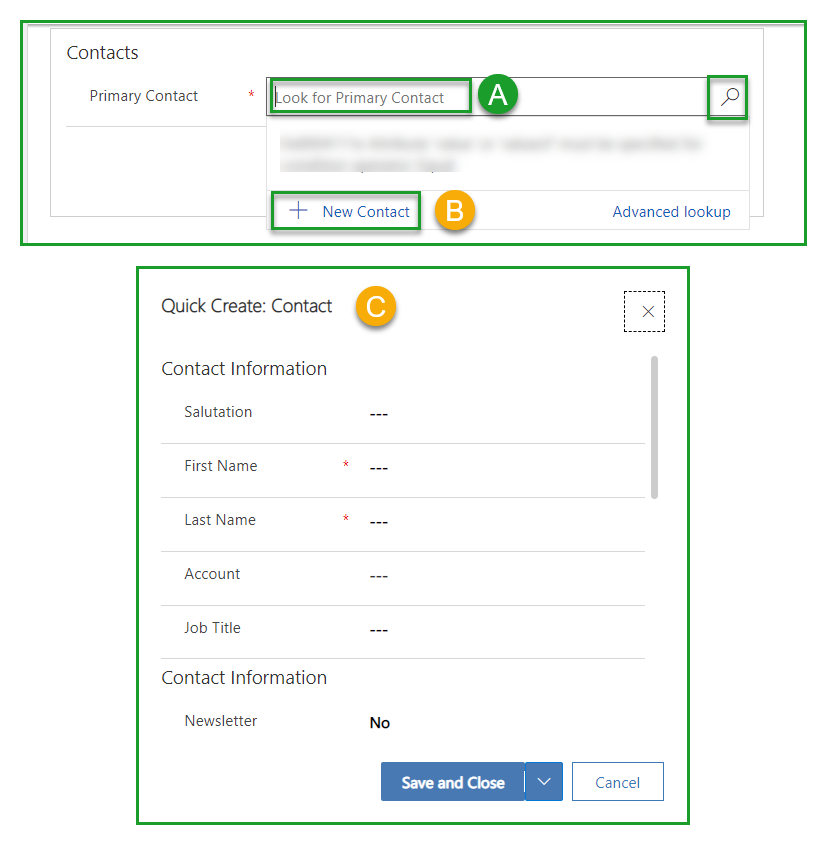
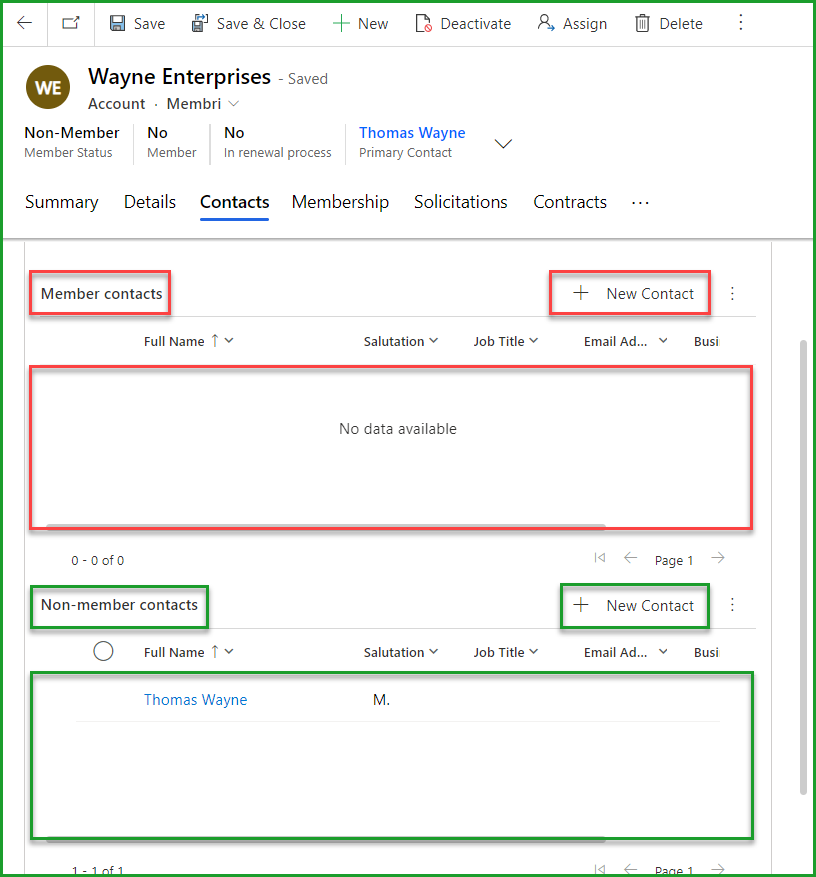
Switch to the Contacts tab (5) and add a primary contact to the company account (6).

Search your database for an existing contact (A) or create a new contact (B) to associate with the account being created using the quick form Quick creation: Contact (C).
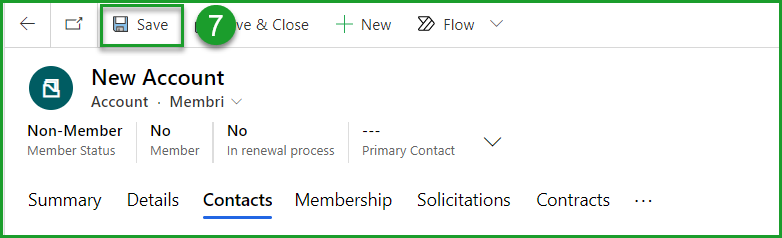
5. Save progress
Save (7) to create the account in the system. You can continue to modify it. In addition, new fields will appear to let you add secondary contacts to the account.
6. Add secondary contacts
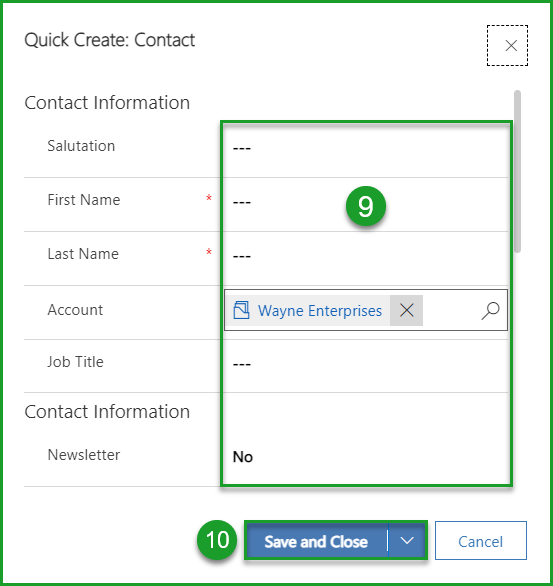
Add other contacts for whom you have information as needed. Select + New Contact (8) so that a quick form Quick creation: Contact is displayed.
As you are not registering a new member account, it is not possible to create a member contact using the + New Contact button in the Contacts tab of this form. A contact created in this way will be found among the non-member contacts.
Complete the compulsory fields of the form and the secondary fields if necessary (9) and save the contact (10). Repeat these steps if you want to add multiple new contacts related to this account.
7. Define membership options
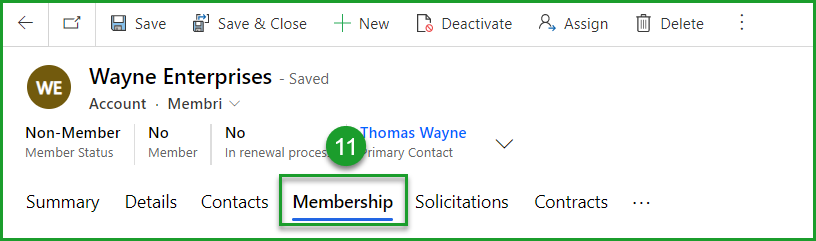
Go to the Membership tab (11).
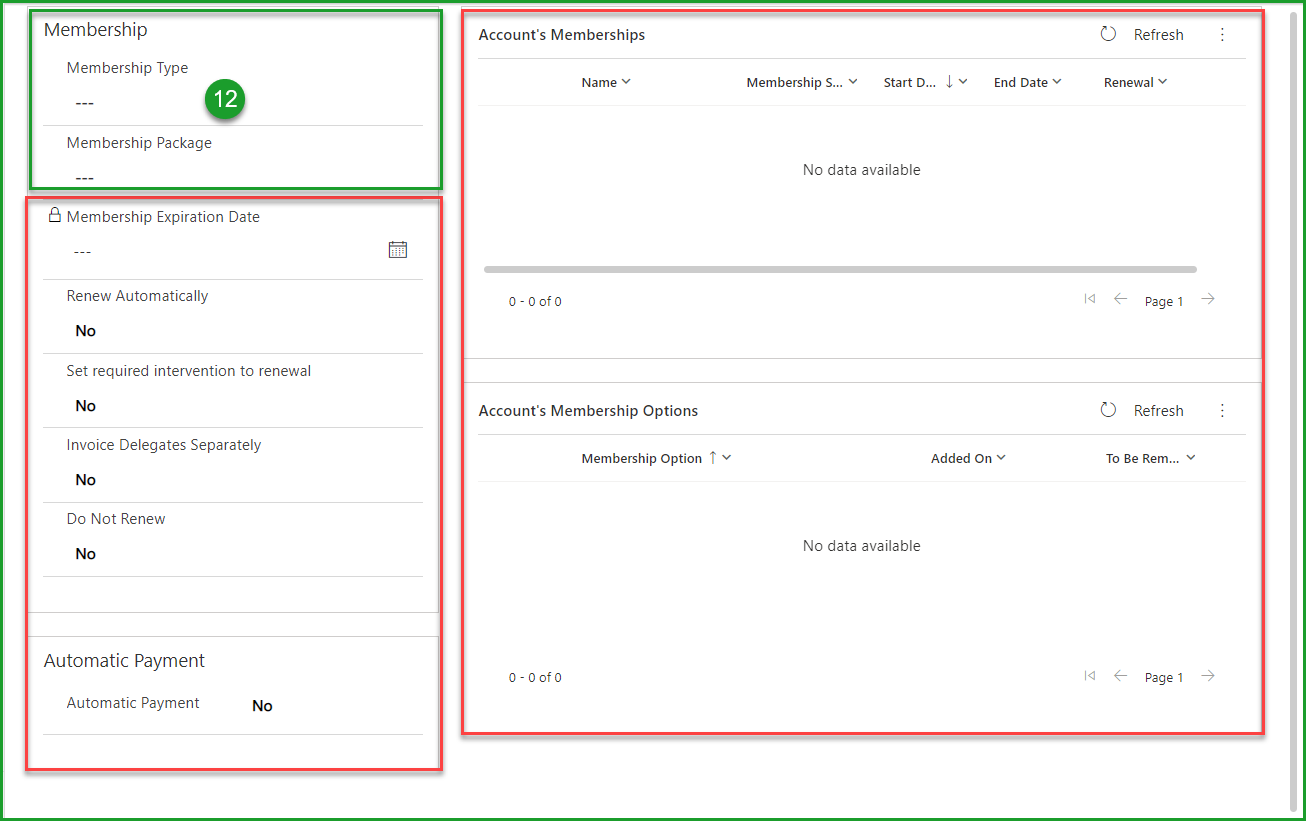
There you can determine the potential membership category of this account (12). The other boxes and their fields are used for renewal. It is not relevant here since the account is not a member of your organization.
Why pre-define a membership?
You may already want to register what membership this account would have if it were a member of your organization. This could come in handy during a possible solicitation campaign with all non-member accounts of a certain type, for example.
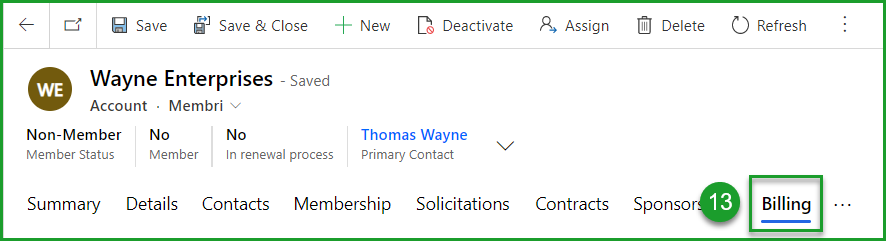
8. Enter billing details
Go to the Billing tab (13). This is where you can establish the links between your accounting system and the new account.
Enter the various information relating to invoicing in the fields of the following boxes (14) to be able to invoice this account should it ever become a member of your organization.
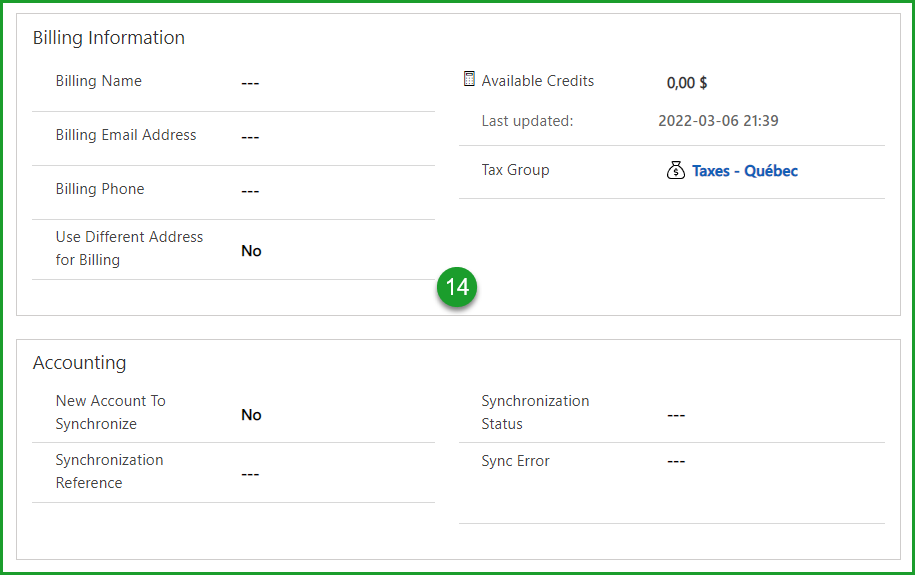
However, it is not necessary to have this information in order to create the account in the system.
9. Finalize the creation of the account
Save and close the form for creating a non-member account (13)
The other tabs
The following tabs house add-ons to Membri which are licensed. They will not appear without purchasing the license.
It is not necessary to enter information in the following three tabs when creating a non-member account:
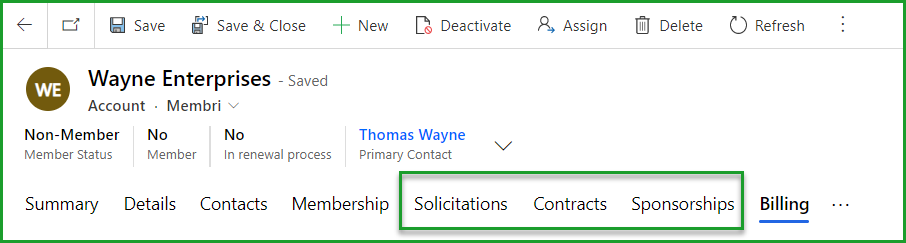
Solicitations tab
It is better to use the solicitation module in the main menu than this tab in the account file to build your solicitation campaigns.
Contracts tab
This tab takes into account any contracts you may have with this account (e.g. consultation). If you have this kind of connection with the account you are creating, you can register it here.
The Sponsorships tab
This tab records the history of the various sponsorships between your organization and the account you are creating. If you have this kind of connection with the account you are creating, you can register it here.
The account is now created and you will be able to find it in the list of non-member accounts.
Consult an account file
From this section, you can view your accounts. Here is an overview of the information that you will find on the account sheet.
Timeline
The account file always gives you access to the history of links between your organization and that of the account through the Timeline module.
Membership section
The membership section contains the information on the current membership, it reflects the information that is in the active membership.
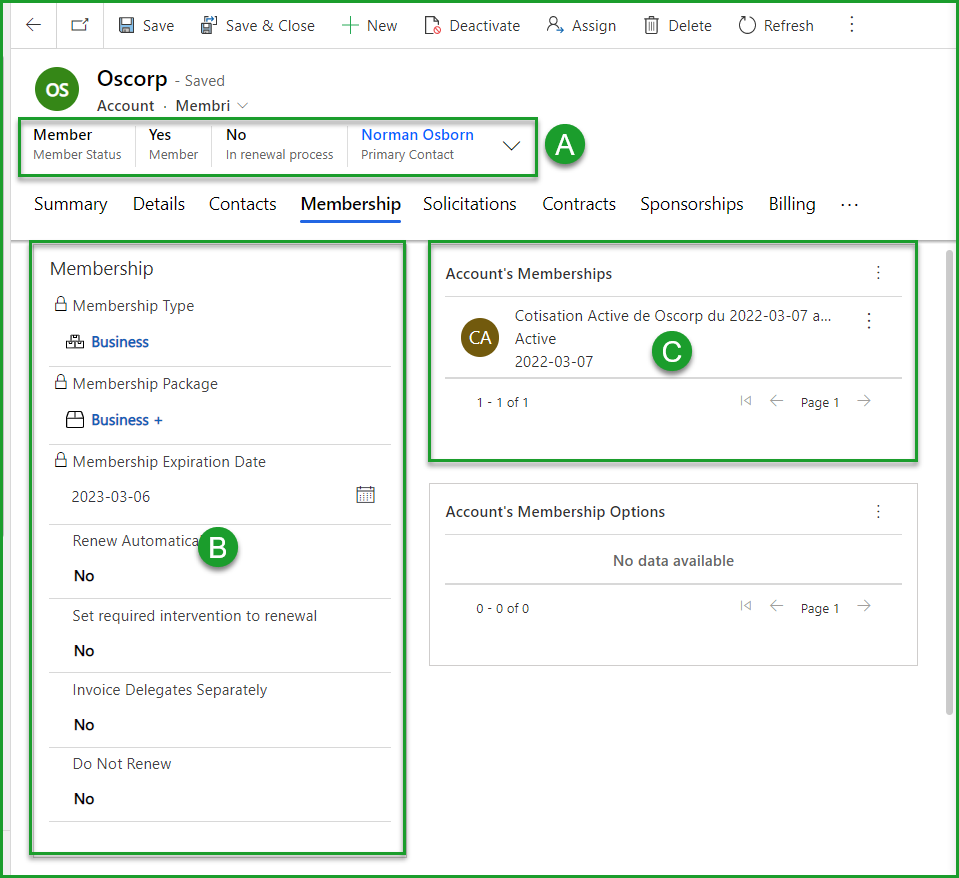
A. Membership status
Although this information is visible no matter which tab you are in, it is all related to the membership of the account you are viewing.
| Sections | Description |
|---|---|
| Member status and Is a member | You can see if the account is a member of your organization. |
| In renewal | You can see if the member is in the process of renewing. |
| Main contact | You can see the main contact associated with the account and select it to access his contact |
| Possible statuses | Description |
|---|---|
| Member | An account is a member of your organization when its membership is paid and active. After a membership ends, the account will still be a member of your organization during the grace period. This period is a number of days during which members will not lose their status. |
| Upcoming Member | This status is assigned automatically by the system when a membership is created for an account through the registration process. Once the registration invoice has been paid, the membership will be activated and the account status adjusted to Member. As long as an account has this status, it is considered Non-member. Resetting a registration will change the status back to Non-member or Past Member. |
| Non-Member | Status assigned to an account that does not have and has never had a membership |
| Past Member | This status is assigned to accounts that were once members of your organization, but are no longer. To have this status, an account must have an expired membership and be out of the renewal process. |
| Member-Pending Payment | The membership of this account has come to an end. However, the account remains a member of your organization for a certain number of days. This theoretically gives the member enough time to renew and start a new membership without losing membership privileges. At the end of this grace period, the member will have the status of Suspended until they renew (in which case they will become a member again) or refuses his renewal ( in which case, he will have the status of Past Member). |
| Suspended | An account is suspended at the end of the grace period if it is still in the renewal process. If the renewal is declined, the account status will change to Past Member. If the renewal is approved and the renewal invoice is paid, they will be a Member again. |
B. Membership and Automatic payment
| Fields | Description |
|---|---|
| Auto-renew | This option can be changed at any time. If you select Yes for this field, the member account will directly receive an invoice with the same options during the next renewal rather than a renewal notice followed by an invoice. |
| Automatic renewal until | This field is displayed only if you entered Yes in the previous field. You can then enter an end date for the period during which the renewal will be done automatically if you wish. |
| Action required for renewal | Indicate Yes in this field if the person responsible for the renewal must intervene in a specific way in relation to this account. For example, one of your members might decide to become an annual partner and need to change their membership type. The Reason for action required field will appear and you can indicate which action is required. |
| Bill delegates separately | This field allows you to separately invoice the membership to paying delegates. Each delegate will therefore receive his fraction of the membership price. |
| Do not renew | Indicate Yes in this field if the member does not wish to renew his membership. |
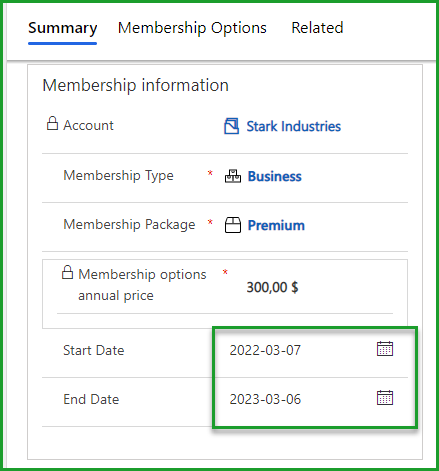
C. Memberships
Membership fees represent members' memberships. It is possible to select them to have access to several relevant information concerning the membership.
Here are a few :
- The type of membership
- the membership package
- The start and end dates of the membership
- The main delegate
- Secondary delegates and membership options
Membership fees (A) are created automatically by the system upon membership or when a renewal (B) is approved.
They are categorized according to 4 statuses:
| Membership status | Description |
|---|---|
| Active | The membership fee is paid and in progress. Everything is in order! |
| Waiting | This implies that the member is in the process of renewal and that you are awaiting payment. |
| Paid | The membership is paid, but it is not yet active. The current membership must first end. The paid membership will then become active. |
| Expired | When a membership ends, the member's membership becomes due. You always have access to the full history of an account. |
Update account information
You have received new information relating to one of the accounts in your database. You can update this information directly from an account card.
Update general information
It is always possible to update information that does not relate to an account membership. You just have to go to the account file in question and replace the old information with the new one.
For example, a change of email address or physical address has no impact on a member's membership. It is therefore possible to change these at any time.
Update membership details
Here are some changes that will impact the membership:
- Change of main contact
- Change of membership type
- Addition of additional delegate
- Modification of the membership dates
Before showing you how to make the changes that have just been listed, it is important to know the status of the membership to know where to go to make these changes.
You are making changes to an ongoing membership
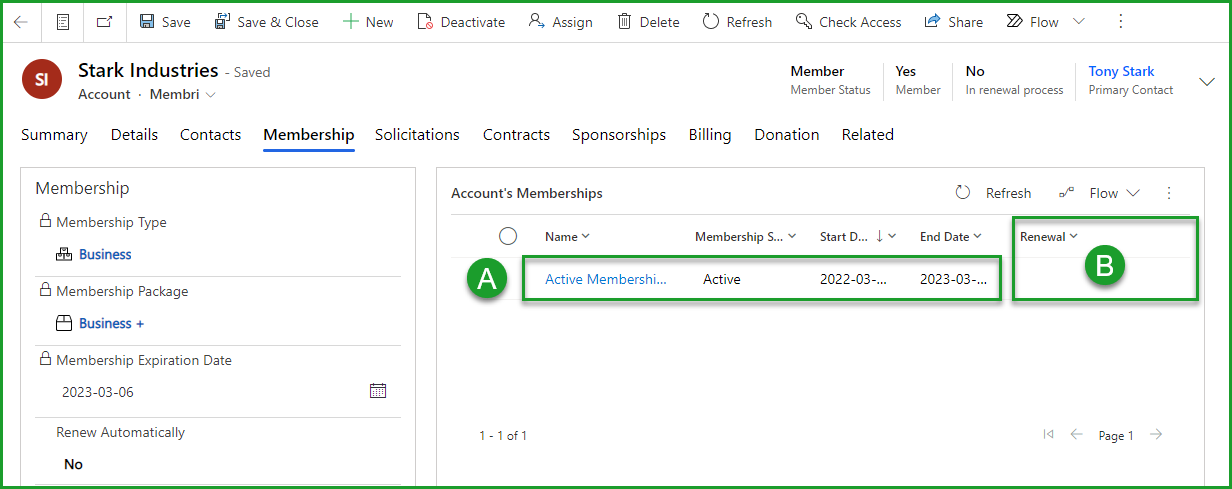
If you want to make changes during the membership and the account is not in the process of renewal, you will have to select the active membership (A) to make the necessary changes.
Changes made to a current membership do not result in the production of an invoice.
:::
You make changes to an account in the process of renewal
See the Renewals section for more details on this process.
Have you sent a renewal notice to a member account and have been informed of changes related to the next membership fee? Make the necessary changes directly in the renewal (B). The next membership will include your changes.
You cannot make changes on a renewal that you have already accepted. They will have to be made on the membership that was created (pending) when you approved the renewal of this member.
However, if you make changes that would affect the invoice amount, you will need to reset the renewal before making the changes.
See the section Making changes to an accepted renewal for more information on the subject.
Once you have correctly determined the membership status, select the membership or renewal to update and make one of the following changes:
Edit primary contact
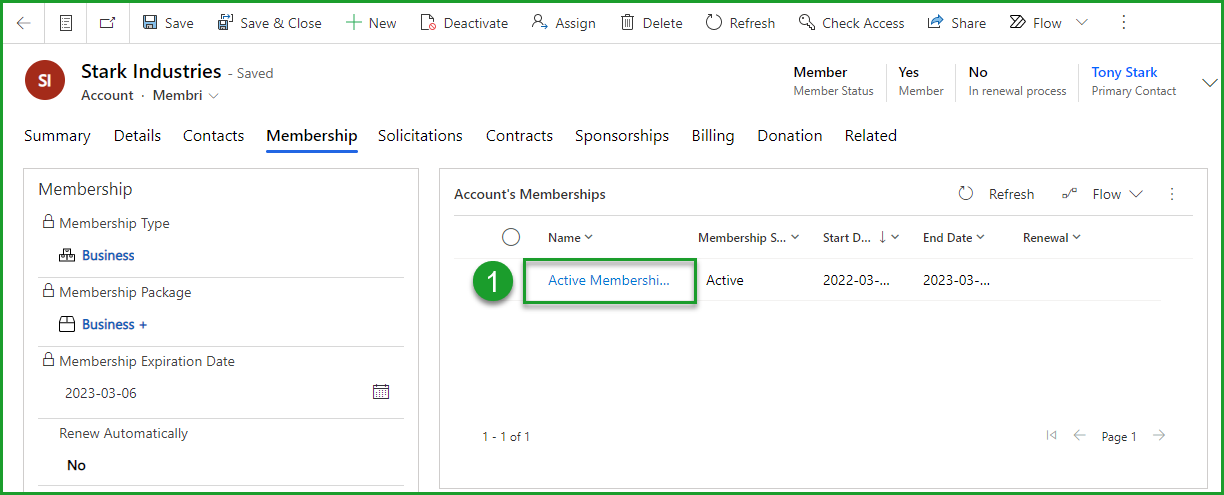
- Open the appropriate membership or renewal (1)
- Select the field Main delegate in the section Delegates (2)
- Delete the existing contact by clicking on the X (3)
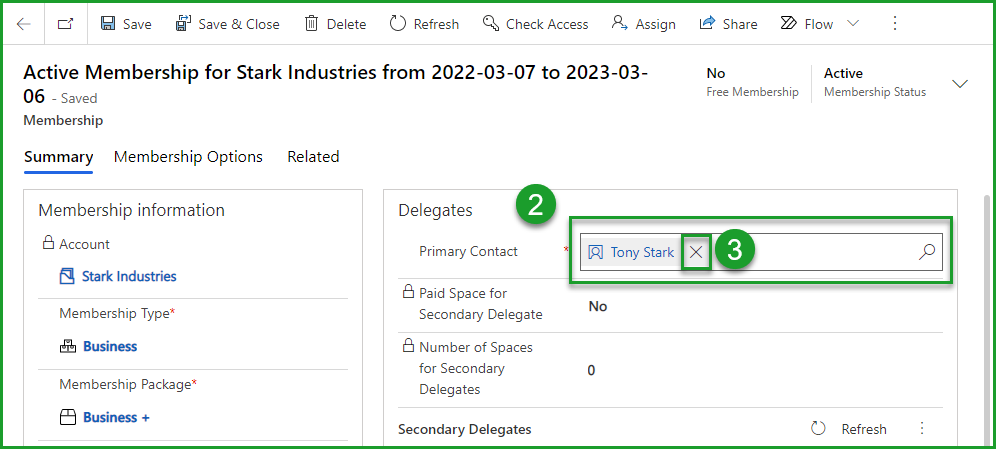
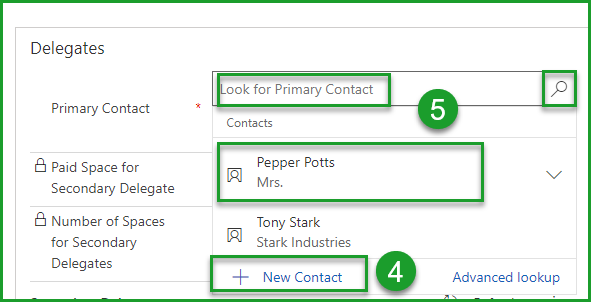
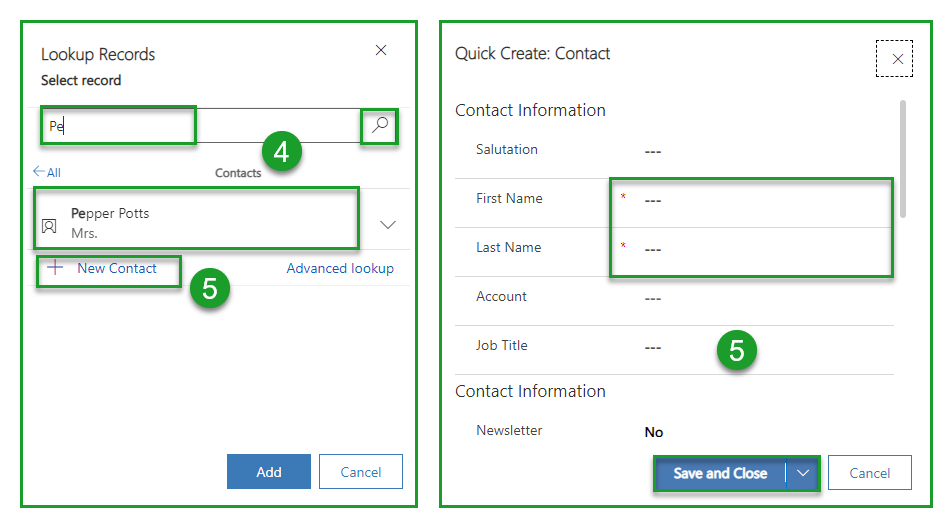
- Create a new contact by selecting the option + Create Contact (you will have to fill out a quick contact creation form) (4) or choose the new contact from your existing contacts using the advanced search (5)
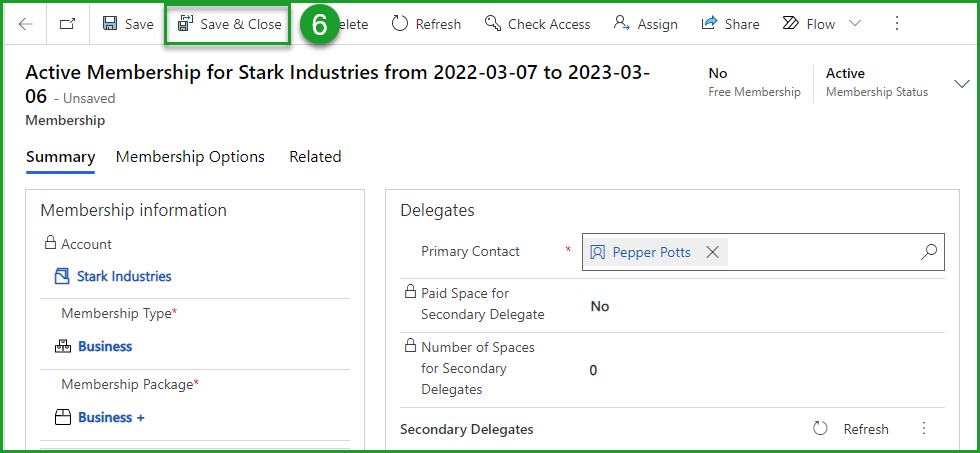
- Save changes (6)
Change the type of membership
- Open the appropriate membership or renewal (1)
- Click on the Membership type field in the Summary tab (2)
- Click on the X to delete the existing type (3)
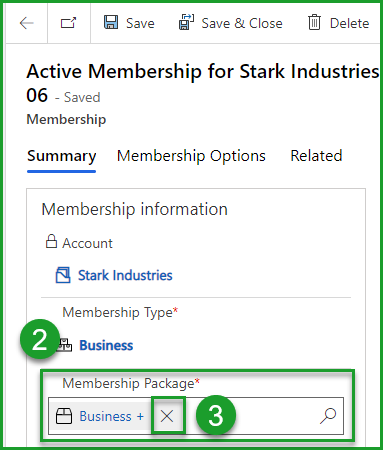
- Click on the magnifying glass to see the available options and select the new type of membership (4)
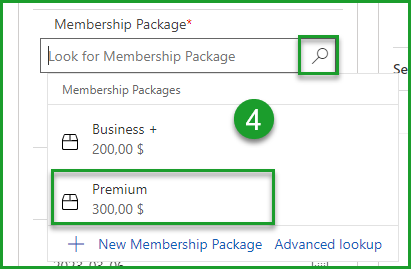
- Repeat these steps to change the membership package
- Save the changes
If the membership type is changed after invoicing, there is no automatically generated adjustment invoice.
Modify additional delegates
Add a secondary delegate
This is only possible if the membership package allows the addition of secondary delegates.
- Open the appropriate membership or renewal (1)
- Check if there are any free spaces for secondary delegates (2)
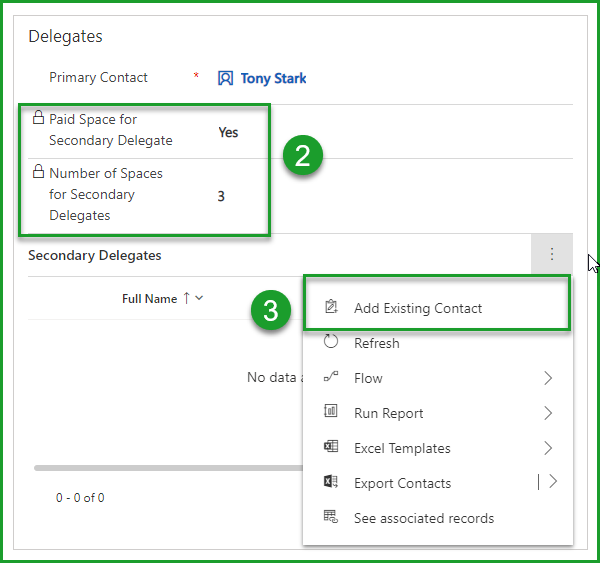
If there is no more space included, you can still add a secondary delegate through delegate registration.
- Select Add a Contact (3)
- Select an existing contact (4) or create a new contact from the quick contact creation form. (5)
- Register the new secondary delegate membership
Remove a secondary delegate
It is also possible to withdraw a secondary delegate from a membership or renewal.
- Open the appropriate membership or renewal
- Select the delegate to remove (1)
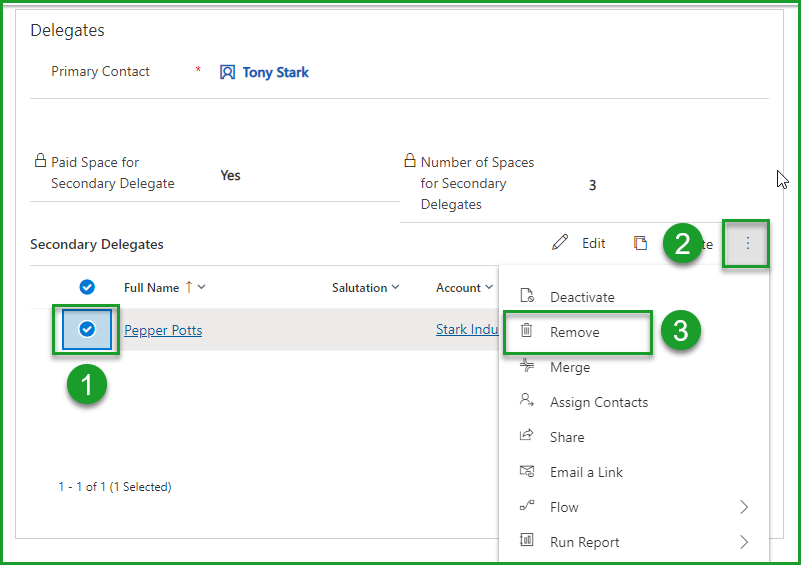
- Click on the three dots on the right, at the top of the table (2)
- Select Remove (3)
- Save this withdrawal
Change membership dates
Open the appropriate membership or renewal
Select the Start date field to choose a new membership start date.
Select the End date field to choose a new end date for the membership.
Child and parent accounts
To allow the association between a parent account and a child account, you must activate the option Allow child accounts in the settings section.
A child account is an account that inherits membership status from the parent account with which it is associated.
For an account to be selected as a child account, it must meet certain conditions:
- It must not be a member of your organization
- It doesn't have a pending membership
- It is not in the process of renewal
Associate a child account with a parent account
- Select the child account to associate with a parent account in the list of non-member accounts
- Navigate in the account file to the
Membershiptab - In the section Parent Account Membership, search for the parent account using the search field Parent Account
- Select
Save & closein the toolbar to validate this association
What's next?
- The hierarchical link is created between the two accounts.
- The child account displays the membership information of its parent in the
Membershiptab of its file. - The child account is displayed in the
Membershiptab of the parent account file.
Make an account a non-member before the end of its membership fee
It is possible to withdraw membership status from an account without having to wait for the end of its membership.
- Navigate to the account card from which you want to withdraw the member status
- Select the
Membershiptab - Indicate Yes in the field Do not renew
You could stop here and save if you wanted to wait until the terms to revoke their membership.
- Select the current membership
- Select the calendar field End date
- Replace the end date of the membership with a date earlier (the day before) than when you make these changes
For example, if the date on which you make these changes is February 19, 2022 and the membership theoretically ends on May 21, 2022, indicate that the membership ended the day before, February 18, 2022.
- Select
Save & closefrom the toolbar to confirm changes to the membership
The renewal tool is not constantly active. This is why it may take up to 15 minutes before you can confirm the member's status change.
Manager contacts and VIP contacts
Add manager contacts
These contacts are not necessarily members, but will receive the account assessments instead of the primary contact.
- Navigate to the Accounts page in the Members section of the main menu
- Find and select the account to add manager contacts to
- Select the
Contactstab - Navigate to the Manager Contacts module of the Contacts section
- Select
Add an existing Contactto open a contact search form - Use the magnifying glass to select the contact to add as manager or create the contact by selecting
+ Create Contactto open a quick contact creation form - Select
Addto add the new manager contact
Add VIP Contacts
- Navigate to the Accounts page in the Members section of the main menu
- Search and select the account to add VIP contacts to
- Select the
Contactstab - Navigate to the VIP Contacts module in the Contacts section
- Select
Add an existing Contactto open a contact search form - Use the magnifying glass to select the contact to add as manager or create the contact by selecting
+ Create Contactto open a quick contact creation form - Select
Addto add the new VIP contact
Generate a renewal before the end of a membership
- Select the account file whose renewal you want to create;
- Select the Membership tab;
- Select the active membership;
- Select
Renew Nowfrom the toolbar; - Wait for the renewal handler to generate the renewal.
Track usage of membership credits and benefits
The Benefits and Credits tab of an account file allows you to view the balance of credits and benefits linked to the account. Of course, you must first have linked a benefit package or an amount of membership credits to the membership package found on the account's membership for a member to have benefits or membership credits.
Consult the balances of benefits or credits
The Account's benefits and Membership Credits lists allow you to view benefits and account credits. You can consult the balance as well as the expiration date.
By default, credits and benefits are valid for 12 months. You can always change this value in your environment settings or override this behaviour for each membership package.
When an account is suspended, the membership credits associated with it are also suspended. Therefore, contacts related to this account won't be able to apply credits on transactions on the online ticket office. For benefits, as all transactions are done manually by a CRM user, there is nothing to worry about.
Consult the credit or benefit transactions history
The Benefit transactions and Credit transactions lists allow you to see the history of the use of credits or benefits.
As credits can be used by members to pay certain invoices, credit transactions are generated automatically. Here are the different events that lead to the creation of a credits transaction:
- An account becomes a member of your organization by paying a membership fee which includes a credit amount;
- An account is suspended;
- Account suspension is lifted;
- Credits have expired;
- A contact applies membership credits to the amount of a transaction carried out on the ticket office;
- You apply the membership credits available on a manual invoice;
- A refund of credits is made.
Benefits cannot be used directly by members. For a benefit to be used, you must create a benefit transaction.
For example, an account calls you to register for one of your events and tells you that they want to use one of the free tickets associated with their membership. You must then create a benefit transaction to indicate this use.
Create a benefit transaction
When a member indicates that they want to use a benefit, you must create a benefit transaction to indicate its use.
- Select the concerned account's file;
- Select the Benefits and Credits tab;
- Select
+New benefit transactionto open the Quick Create : Benefit Transaction form; - Fill in the various fields of the form;
| Fields | Description |
|---|---|
| Membership Benefit | Search field that allows you to choose the benefit to which to apply a transaction |
| Benefit transaction type | It is possible to use or cancel the use of a benefit |
| Quantity | Number of benefits affected by the transaction |
| Transaction Date | The date on which the benefit is used |
| Product | Product related to the benefit |
| Description | Field that allows you to add details to this benefit transaction related to its context |
- Select
Save and Close
Associate a benefit package with a membership
On the membership registration form
The benefit package linked to a membership can be chosen at the time of registering (this is the regular process) using the fields in the benefits section of the membership form.
On an active membership
- From the Benefits dashboard check out the Set selections of benefits to do;
This list is a list of memberships that have the Choose benefits Later field marked yes and that are not already linked to any benefits.
- Select one of the memberships with which to associate a benefit package;
- Select the Benefits tab;
- Using the search field benefit package identify the benefit package to be linked to the membership;
- Select
Saveto validate the selection.
Manually expire membership credits or benefits
- From the Benefits or Membership Credits dashboards, consult the Benefits to expire or Membership Credits to expire lists;
- Check credits or benefits to expire;
- Select
Disable.
Frequently asked questions
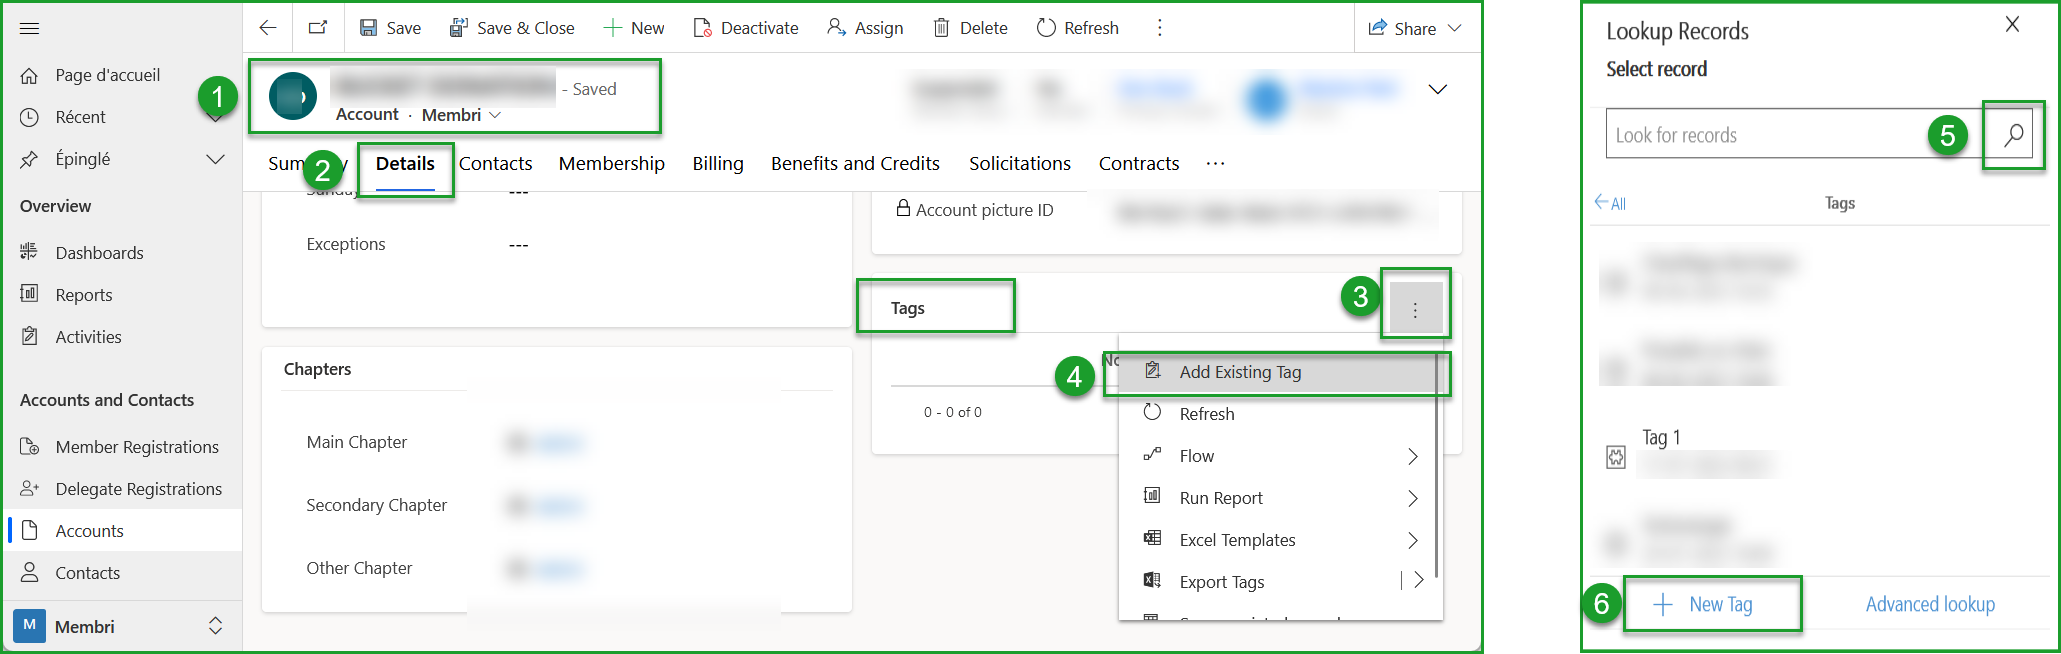
How to Use Tags on an Account
You can use tags with accounts. This allows certain accounts to be filtered as needed.
- Select the account file that interests you;
- Select the Details tab;
- From the Tags section, select the three small dots
⁝; - Using the drop-down, select Add Existing Tag;
- Using the search tool, select the tag(s) you wish to add;
- If needed, create your tag(s).
Field details
The reading key helps you to better understand the vocabulary used in this section.
If necessary, use the quick search command on your keyboard Ctrl + F to target the terms you are interested in.
| Term used | Explanation |
|---|---|
| Allows | Fields that can be modified to perform a specific task. |
| Displays | Field information that cannot be changed |
| During | Highlight an important step related to the field |
| If | Prior Action or Other Field Condition |
| Warning | Important information to take into account related to the field |
Tab - Summary
Section - Account Information
| Fields | Description |
|---|---|
| Account Name | Allows you to change the account name. |
| Language | Allows you to change the chosen language to communicate with the account.
|
| Activity Sector | Allows you to associate an activity sector with the account using the activity sector list of your environment. |
| Primary Activity Sub-Sector | If the Activity Sector field is completed; Associate a Primary Activity Sub-Sector with the account using the Activity Sub-Sector list of your environment. |
| Secondary Activity Sector | Allows you to associate a secondary activity sector with the account using the activity sector list of your environment. |
| Secondary Activity Sub-sector | If the Secondary Activity Sector field is completed; Associate a secondary activity sub-sector with the account using the Activity Sub-Sector list of your environment. |
| Member Number | Displays the account member's number.
|
| NEQ | Allows you to add the Quebec Enterprise Number. |
| Number of Employees | Allows you to indicate the number of employees in the company or organization. |
| Foundation Date | Allows you to specify the date the company or organization was founded. |
| Member since | Displays since when the company or organization is a member. Allows you to modify the date of the field. |
| Date of First Membership | Displays the date of the first enrolment of the account registered in the system. |
Section - Contact Information
| Fields | Description |
|---|---|
| Email Address | Allows you to change the main email of the account to which most automated emails from Membri will be sent. |
| Renewal Email Address | Allows you to change the email that will be used to send the renewal notice.
|
| CC Email Addresses | Allows you to add emails that will be CC when communicating with the account.
|
| Website | Allows you to change the full URL of the account website. |
| Allows you to change the full URL of the account's Facebook profile. | |
| Allows you to edit the full URL of the account's LinkedIn profile. | |
| Main Phone | Allows you to change the primary phone number of the account. |
| Toll-free phone | Allows you to change the toll-free phone number of the account. |
| Fax | Allows you to change the fax number. |
| Allows you to change the full URL of the account's Twitter profile. | |
| Allows you to change the full URL of the account's Instagram page. | |
| YouTube | Allows you to change the full URL of the account's YouTube channel. |
Section - Description
| Description |
|---|
| Allows you to enter a description of the company. |
| The account description can be displayed in your website's member directory. |
Section - Notes
| Description |
|---|
| Allows you to take internal notes related to the account. |
| These notes will only be visible to CRM users. |
Section - Main Address
| Fields | Description |
|---|---|
| Address | Allows you to enter the address associated with the account. |
| Address - line 2 | If you enabled Use Line Address 2 field in your settings; Add a second address line to your forms.
|
| City | Select the city from the list of cities of the environment. |
| District | If you have created districts in your environment for the city chosen in the City; Allows you to choose the district of the city. |
| Neighborhood | If you have created neighborhoods in your environment for the city chosen in the City field; Allows you to choose the neighborhood of the city. |
| Province | Displays the province associated with the chosen city. |
| Country | Displays the country associated with the displayed province. |
| ZIP/Postal Code | Allows you to change the postal code associated with the account. |
Tab - Details
Section - Additional information
| Fields | Description |
|---|---|
| Exporter | Allows you to use to indicate if the company is an exporter. |
| Self-Employed | Allows you to indicate if the account is self-employed. |
| Manufacturing Company | Allows you to indicate if the company is a manufacturing company. |
| Adopts Eco-Responsible Practices | Allows you to indicate if the company adopts eco-responsible practices. |
| 50% ownership and more for a woman entrepreneur | Allows you to indicate if the majority shareholder is a woman entrepreneur. |
| Company Mission | Allows you to enter the company's mission. |
| Offered services | Allows you to register the services offered by the company. |
| Logo URL | Allows you to add the URL of the company logo. |
| Email Domain(s) Matching |
Section - Business hours
| Fields | Description |
|---|---|
| Monday Tuesday Wednesday Thursday Friday Saturday Sunday | Allows you to enter account opening hours. |
| Exceptions | Allows you to add exceptions for account opening hours. |
Section - Chapters
Chapters are sub-branches of your organization. The following section shows which branches are responsible for the account you are joining.
| Fields | Description |
|---|---|
| Main Chapter | Allows you to select the main chapter for this account. |
| Secondary Chapter | Allows you to select the sub-chapter for this account. |
| Other Chapter | Allows you to select another chapter responsible for this account. |
Section - Website Visibility
This section allows you to choose the information that the CRM will return to the member directory of your website considering that you use the WordPress plugin for your website or that your website uses these fields through our API.
| Fields | Description |
|---|---|
| Show On Website | Allows you to choose whether the member should appear on your website. |
| Show Address On Website | If the Show On Website field is Yes; Allows you to show the account address in the member directory. |
| Show Email Address On Website | If the Show On Website field is Yes; Allows you to show the account phone number in the member directory. |
| Show Phone and Fax On Website | If the Show On Website field is Yes; Allows you to show the account email address in the member directory. |
| Show Social Networks On Website | If the Show On Website field is Yes; Allows you to show the account's various social networks in the member directory.
|
Section - Account picture
| Fields | Description |
|---|---|
| Button - Choose an image | Allows you to choose an image for the account. |
| Logo URL | Displays the URL of the account image added above. |
| Account picture ID | Displays the ID of the account image added above. |
Section - Tags
| Subgrid - Tags |
|---|
| Displays the list of tags that are associated with the account. |
| Allows you to add tags to the account. |
Tab - Contacts
Section - Contacts
| Fields | Description |
|---|---|
| Primary Contact |
|
Adding a new contact using the member OR non-member subgrid will automatically create a non-member contact. To add a member contact to an account, it is necessary to go through active membership or delegate registrations. See delegate registrations for more information.
| Subgrid Name | Description |
|---|---|
| Member Contacts | Displays a list of member contacts who are associated with the account. Allows you to add a new contact to the account. |
| Non-member contacts | Displays a list of non-member contacts who are associated with the account. Allows you to add a new contact to the account. |
| Manager Contacts | Displays a list of manager contacts that are associated with the account. Allows you to add account contacts as manager contacts. |
| VIP Contacts | Displays a list of non-member contacts who are associated with the account. Allows you to add contacts from the account as VIP contacts. |
Tab - Membership
Section - Membership
| Fields | Description |
|---|---|
| Membership Type | Displays the membership type of the Active, Pending, or Member-Pending Payment. If the account does not have an Active, Pending, or Member-Pending Payment; Allows you to specify the membership type of the account. |
| Membership Package | Displays the membership package for the Active, Pending, or Member-Pending Payment membership. If the account does not have an Active, Pending, or Member-Pending Payment; Allows you to specify the membership package for the account. |
| Membership Expiration Date | Displays the expiration date of the membership. |
| Invoicing of the renewal is scheduled on | If you enable automatic renewal billing X days after the renewal notice is sent; Displays the date when the active renewal will be automatically approved and the invoice will be sent. |
| Renew Automatically | Allows you to skip the renewal notice and send the invoice directly at renewal. |
| Automatic Renewal Until | If the field Automatic Renewal is set to Yes; Allows you to determine the date until which the renewal is automatic. |
| Set required intervention to renewal | Allows you to put the next renewal in required intervention upon its creation. |
| Reason for Required Intervention | If the field Put in Required Intervention at Renewal is set to Yes; Allows entering the reason why the next renewal needs an intervention. |
| Invoice Delegates Separately | Allows creating separate invoices for additional delegates when billing a membership registration or a renewal have delegates creating additional fees. |
| Do Not Renew | Allows you to not renew the account membership at the end of membership. |
| Cancellation Reason | If the Do not renew field is Yes; Select a cancellation reason from the list of reasons for refusal of the environment. |
Section - Grace period
This section is displayed only if the account status is Member-Pending Payment.
| Fields | Description |
|---|---|
| Deactivation Delayed | Displays if the account is in a grace period. |
| Deactivated on | Displays the date when the account grace period will end. |
Section - Parent account membership
This section appears only if the account is a child account.
| Fields | Description |
|---|---|
| Principal parent account | Displays the parent account of the account. |
| Parent Account | Allows you to choose the parent account of the account. |
Section - Automatic payment
| Fields | Description |
|---|---|
| Automatic Payment | Allows enabling the automatic payment option. |
| Send receipt | If receipts are enabled in your environment; Allows to send receipts during automatic payments. |
| Payment Process | Allows you to choose the payment process for automatic payments.
|
| Last 4 digits | |
| Bank | Allows adding the number of the banking institution. |
| Transit | Allows adding transit number. |
| Bank Account | Allows adding the account number. |
| Automatic Payment Error | If the system encounters an error during automatic payment; Displays the error message obtained during automatic payment. |
| Payment engine reference number | |
| Card Reference Number | |
| Special action applied |
Section - Unnamed
| Fields | Description |
|---|---|
| In renewal process | Displays if the account is currently renewing. |
| In renewal process | If the account is in a renewal process; Displays the current renewal. |
| In Membership Upgrade | Displays if the account is currently upgrading. |
| Membership Upgrade in progress | If the account is upgrading; Displays the current upgrade. |
| Subgrid - Account's Memberships |
|---|
| Displays all membership associated with the account. It gives you more information about the current member status and its membership history. |
| Allows you to access all the account-related memberships. |
Section - Account Membership Options
| Subgrid - Account Membership Options |
|---|
| If the account's membership package has membership options; |
| Displays the membership options that are included with the membership package. |
Section - Child Accounts
| Subgrid - Child Accounts |
|---|
| If the account is a parent account; |
| Displays the child accounts of the account. |
Tab - Billing
Section - Outstanding Invoices
| Subgrid - Outstanding Invoices |
|---|
| Displays invoices for the account with a balance different from $0. |
| Allows creating a new invoice for the account. |
Section - Billing Information
| Fields | Description |
|---|---|
| Billing Name | Allows you to specify the name that will be displayed on invoices created in Membri. |
| Billing Email Address | Allows to specify the email to which all invoices created in Membri will be forwarded. If this field is empty, invoices are sent to the account email address. |
| Billing Phone | Allows you to specify the phone number for billing. |
| Invoicing Contact | Allows you to choose a billing contact from the account contacts. |
| Use Different Address for Billing | Allows to specify whether you want to use a different address for billing. |
| Available Credits | Displays the total billing credits available for the account. |
| Main Chapter | Allows you to edit the main chapter used for the account. |
| Tax Group | Allows you to select a tax group from the list of tax groups of the environment. |
Section - Billing Address
This section of the form appears only if you have entered Yes in the Use a different address for billing field in the previous section.
| Fields | Description |
|---|---|
| Billing Address | Allows to specify the physical address that will be displayed on invoices generated from Membri. |
| Billing address - line 2 | If you enabled line 2 for billing addresses; Allows you to complete the billing address when it exceeds the number of characters allowed in the Billing address field. |
| Billing address: City | Allows selecting the city that will be used for billing from the list of cities of the environment. |
| Billing address: ZIP/Postal Code | Allows changing the postal code of the billing address. |
| Billing Address: Province | Displays the province associated with the chosen city. |
| Billing address: Country | Displays the country associated with the displayed province. |
Section - Accounting
This section should be kept up to date for accounting synchronization. See how to update customer accounts for details.
| Fields | Description |
|---|---|
| New Account To Synchronize | Allows to specify whether the synchronization tool should create a new account in the accounting system the next time it is synchronized. |
| Synchronization Reference | Allows you to modify account synchronization reference for the connection with the accounting system. |
| Synchronization Status | Allows you to change account synchronization status. |
| Sync Error | If the account has not received to synchronize with the accounting system; Displays the error that prevented the account from syncing. |
Tab - Benefits and Credits
| Subgrid Name | Description |
|---|---|
| Account's Benefits | Displays the benefits of the account. Allows creating a new free. |
| Benefit Transactions | Displays the free account transactions. Allows creating a new free transaction for the account. |
| Membership Credits | Displays the contribution credits for the account. Allows creating new contribution credits for the account. |
| Credit Transactions | Displays the credit transactions in the account. Allows creating a new credit transaction for the account. |
Tab - Solicitations
| Subgrid - Solicitations |
|---|
| Displays the current solicitations of the account. |
| Allows adding a solicitation to the account. |
Tab - Contracts
| Subgrid - Account Contracts |
|---|
| Displays the active contracts of the account. |
Tab - Sponsorships
| Subgrid Name | Description |
|---|---|
| Annual Sponsorships | Displays the account's annual sponsorships. Allows creating a new annual partnership. |
| Event Sponsorships | Displays the event sponsorships for the account. Allows creating a new event partnership. |
Tab - Donations
| Subgrid - Donations |
|---|
| Displays account donations. Allows adding a donation to the account. Allows creating a new donation and adding it to the account. |
Tab - Events
| Subgrid Name | Description |
|---|---|
| Event Registrations | Displays the event registrations associated with the account. Allows creating a new event registration for the account. |
| Participants | Displays event attendees associated with the account. |
Still not sure? Contact us - support@vendere.ca